
You will also need:
A tube of your choice. I'm using the fantastic artwork of Ismael Rac. You must have a license to use his work. You may purchase that license at My PSP Tubes.
Animation Shop - at this time, I'm not sure where you can get this program, if you don't already have it. You may, however, save the tut as a static (non-animated) image if you like.
Scrap kit by Jill of Scrap It Sassy. It is a PTU kit, but it *IS* a mini kit, as I mentioned in the last tut. And it's also on sale! Therefore the price is low-low-low-low. LOL! This kit is called Irish Charm I Mini Taggers' kit. (There are two of these minis. I posted another tutorial with the second version just prior this one. Look for it below!)
Filters: Eye Candy 4000 > Gradient Glow
I use Gradient Glow on almost every tag I make -- always for the name. Go figure!
Font: I used Unnamed Melody
Supplies: The mask, from Teresa at Boundless Bliss. Thanks, Teresa! I'm also including the sparkle I used on the coins in this tag. You can find the supplies here.
Open your supplies and minimize in PSP. Alternatively, you can load your mask into your PSP masks folder, for future use.
Let's begin!
Open a new image, 700 x 700, white.
Open paper6. Copy and paste as a new layer.
Apply your mask. Delete the mask layer, answer "yes" to the pop-up question, and merge group.
Open the paper4. Copy and paste as a new layer.
Open frame2. Copy and paste as a new layer.
Grab your magic wand and click inside the frame.
Highlight your paper4 layer. Selections > Modify > Expand by 8. Selections > Invert. Hit delete. Selections > Select none.
Add your tube of choice. Resize, position, and drop shadow your tube. If it's like mine, you can make it appear as though there is one foot in and one foot out of the frame. Highlight your frame layer again, and again click inside with your magic wand. Now Highlight the tube layer. Get your eraser tool (I sized mine down to 50 to get within the frame) and erase the portion of the leg that overlaps the frame. Selections > Select none.
If your tube is like mine in another way, in that she's bending over and showing off (this is not an R rated tube that I'm using, but I wanted to use the name tag. Just so happens the name Ismael Rac put on this tube is "Lucky"), then open the nametag. Resize by 50%. Copy and paste as a new layer. Rotate left by 25°. Position and drop shadow.
Open potofgold-rainbow. Resize 65%. Copy and paste as a new layer, below the frame layer. Position as you like it. I mirrored mine. Drop shadow your pot of gold.
Open goldcoins. Resize 40%. Copy and paste as a new layer, just above the pot of gold layer, and position so it looks like it *could* be an "overflow" from the pot of gold.
I chose to colorize the coins. Adjust > Hue and Saturation > Colorize with the following settings:
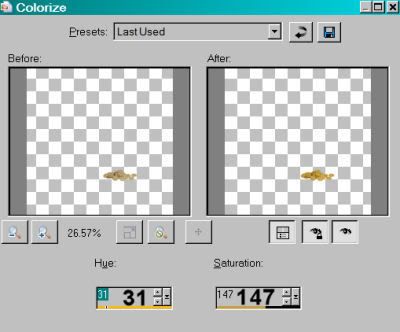
Hit okay. Duplicate this layer and Image > Mirror. Position to the other side of the pot of gold. Drop shadow your two piles of gold coins.
Open tassel2. Resize 35%. Copy and paste as a new layer. Lighten the color a bit by going Adjust > Brightness and Contrast > Brightness/Contrast with the settings below:
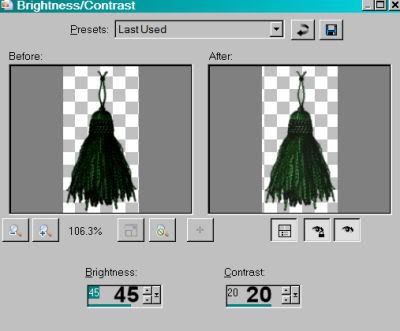
Hit okay. Drop shadow your green tassel. Position it on the top right hand corner of your frame. Rotate left 10°.
Open tassel1. Resize 35%. Copy and paste as a new layer. Darken this color up a bit by going Adjust > Brightness and Contrast > Brightness/Contrast with the settings below:

Hit okay. Position this tassel next to the green tassel. Drop shadow your gold tassel and rotate right 10°.
Open shamrockpaperclip1. Resize 50%. Copy and paste as a new layer. Position up on the right top corner, so it will look as though it's holding the tassels. Rotate right 25°. Use your lasso tool, set at point-to-point, and remove the outer loop of the paperclip. You may need to zoom in to do this. I know I did!
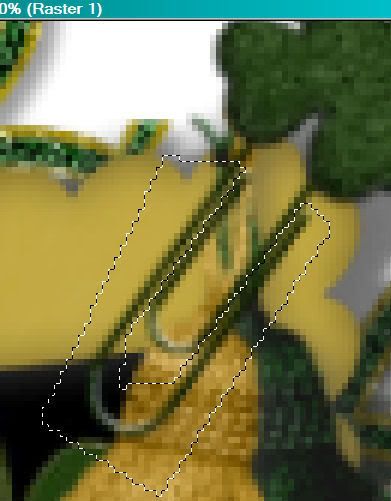
Hit delete. Drop shadow your paperclip.
Open your shamrockdoodles. Copy and paste as new layer. (I work with these on the top layer of the tag, so I can see what I'm doing.) Position as you would like. Duplicate this layer and Image > Mirror. Image > Flip. Image > Mirror again. Position as you would like. Merge these two layers down. Duplicate this layer, and rotate either direction 90°. Position this as you like and duplicate this layer. Image > Mirror. If there are more doodles than you'd like for your taste, as there were for me, take your selection tool and select around the areas you want to delete, and hit delete for the layers that are sticking out. I hope that made sense!! Merge all these layers down, drag this layer of doodles down to just above the mask layer. Drop shadow your doodles.
Open your sparkle, file called Albeelding1.pspimage. Resize 50%. Place these carefully. Put the first one on the left pile of coins, the next one on the coins in the pot, and a third on the right pile of coins. Repeat this process three times, moving the sparkles to other coins as you go.
[NOTE: If you're choosing not to animate, you don't have to repeat this step three times.]
Close out the top six layers of sparkles, leaving the bottom three open.
Add your name. I used color #45b31d and a stroke of 1 in the same color. Effects > Plugins > Eye Candy 4000 > Gradient Glow settings at 4 - 0 - 100, color black. Drop shadow your name.
Add your copyright, license information if applicable, and taggers'/watermark.
Resize your tag to the size you prefer. You may save now and quit and you're done!! If you want to continue to get the animation, on we go!
A N I M A T I O N
Edit > Copy merged
Open Animation Shop, right-click on the desktop area and paste as a new animation.
Return to PSP. Close out the bottom three sparkles and open the middle three.
Edit > Copy merged
Return to Animation Shop. Edit > Paste > After Current Frame
Go back to PSP. Close out the middle three sparkles and open the top three.
Back to Animation Shop and Edit > Paste > After Current Frame.
Edit > Select All.
Right-click on the top bar of the animation and choose "Frame Properties." Change this number to 35.
Save as .gif and you're done! Erin go bragh! Have a lovely day! :)
.


No comments:
Post a Comment