
You will also need:
At least two tubes of your choice, by the same artist. I'm using the gorgeous artwork of Keith Garvey. You must have a license to use his work. You may purchase that license at My PSP Tubes.
Animation Shop - at this time, I'm not sure where you can get this program, if you don't already have it. You may, however, save the tut as a static (non-animated) image if you like.
Scrap kit by Patty of Treasured Scraps. It is a PTU kit, and it's on SALE! Half-off!! Get it while it's hot! This kit is called Pinch Me, Baby.
Filters: Eye Candy 4000 > Gradient Glow, Mura's Meister > Copies, Xero > Porcelain
I use Gradient Glow on almost every tag I make -- always for the name.
Font: I used 36
Supplies: Just the sparkle, which you can find here. Not even a mask in this one! *GASP*
Let's begin!
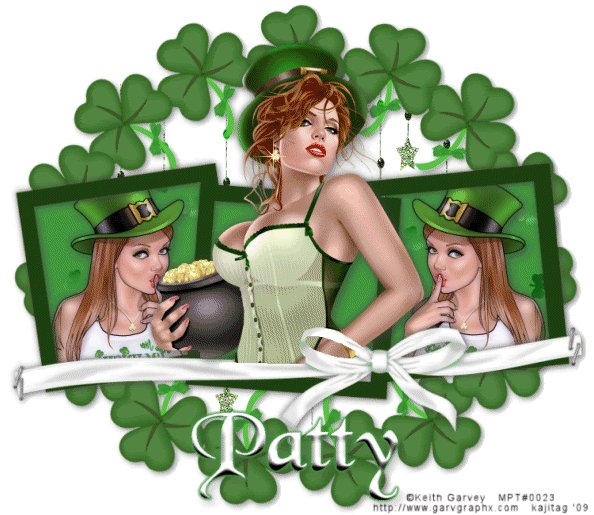
Open a new image, 750 x 650, white.
I sized it this way to make it oriented like the frame I used.
Open Frame2. Copy and paste as a new layer. Resize 90%.
Open the tube you want to be in the two side frames. Copy and paste as new layer. Position as desired.
Highlight the frame layer. Click into the side frame on which you're working with your magic wand. If there are any extraneous openings, like the loop of a bow, remember to click inside that, as well. Selections > Modify > Expand 5. Selections > Invert.
Highlight your tube layer. Hit delete. Selections > Select none. Drop shadow your tube.
Repeat this process for the opposite side of the frame. When they're both done, merge these two layers down. Apply Xero > Porcelain with the default settings. Drag this layer down below the frame layer.
Open paper11. Copy and paste as a new layer, below the frame and tube layers.
Highlight the frame layer again. And again, click inside all three areas of the frame (and into the loops again, as well). Selections > Modify > Expand by 5. Selections > Invert.
Highlight your paper11 layer. Hit delete. Selections > Select none.
Open your main tube. Copy and paste as new layer. Position over your center frame. Drop shadow your tube.
Highlight your frame layer and again click into the center frame, making sure you're including any loops. Selections > Modify > Expand by 2
Highlight your main tube layer. Selections > Invert. Grab your eraser tool, and erase any part of your main tube that overlaps the frame, ribbon and bow. Selections > Select none.
At this point I closed off the main tube layer and the bottom, white background layer. Layers > Merge Visible. Move this layer down a bit. I did this by clicking on the layer with my move tool, holding down the shift key and clicking the arrow down key ONCE. Then open your other layers and highlight the main tube layer. Move that layer down in the same way. (This way, they're all moving the exact same distance.)
Open Shamrock2. Resize 25%. Copy and paste as new layer. Effects > Plugins > Mura's Meister > Copies with the following settings:
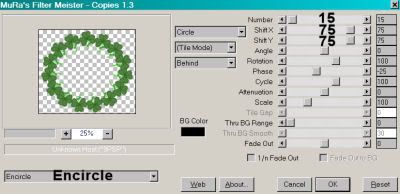
Hit okay. Drag this layer down below your frames layer.
Open Rain. Copy and paste as a new layer, beneath the circle of shamrocks you've just made. Move this layer up on the canvas, and use your pick tool to squish them together vertically so they fit into the circle. Duplicate this layer and move it down until there are some dangles below the frame, as well. As you can see on mine, there's only one star, I think, and that's enough for me! Use your selection tool, set on rectangle, and draw around the top part of this second layer, then hit delete, so there's no messy overlap. Merge these two layers down.
Add your name. I used white, with a stroke of one, also in white. I then applied the inner bevel shown below:
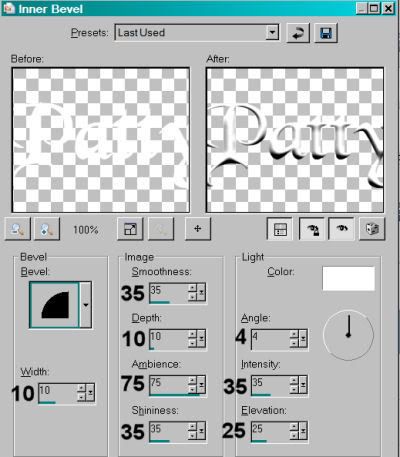
Hit okay.
Add a Gradient Glow of 4 - 0 - 100 in the color #419940. Drop shadow your name.
Add your copyright, license information if applicable, and taggers'/watermark.
Open your sparkle, file called Afbeelding1.pspimage. Resize 50%. Place this over the tube's earring. See my tag for placement. If you don't have a tube with a big ole honking earring, you can skip this part. But note that I will be including this in the animation steps, if you choose to animate.
Resize your tag to the size you prefer. You may save now and quit and you're done!! If you want to continue to get the animation, on we go!
A N I M A T I O N
Highlight your rain layer and duplicate twice, for a total of three layers.
Making sure the first rain layer is still highlighted, Adjust > Add/Remove Noise > Add Noise with the settings shown below:
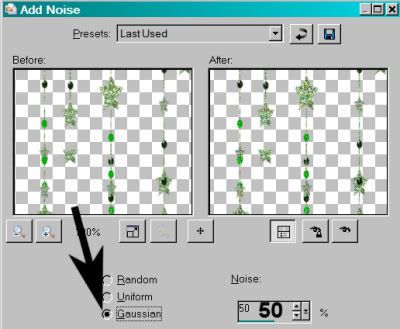
Hit okay.
Highlight the middle rain layer and add noise again, then adjust your noise setting to 55. Hit okay.
Highlight the top rain layer and add noise one last time, and adjust your noise setting to 60. Hit okay.
Close out the top two rain layers, leaving the bottom rain layer open.
Edit > Copy merged
Open Animation Shop, right-click on the desktop area and paste as a new animation.
Return to PSP. Close out the bottom rain layer and open the middle rain layer. ALSO!!! Close out the sparkle layer on the earring. We won't be using this sparkle anymore.
Edit > Copy merged
Return to Animation Shop. Edit > Paste > After Current Frame
Go back to PSP. Close out the middle layer of rain and open the top.
Back to Animation Shop and Edit > Paste > After Current Frame.
Edit > Select All.
Right-click on the top bar of the animation and choose "Frame Properties." Change this number to 17.
View > Animation. Save as .gif and you're done! Aye and begorrah! Have a lovely day! :)
.


No comments:
Post a Comment