
You will also need:
A tube of your choice. I'm using the great artwork of Steve Baier. You must have a license to use his work. You may purchase that license at Up Your Art.
Animation Shop - at this time, I'm not sure where you can get this program, if you don't already have it. You may, however, save the tut as a static (non-animated) image if you like.
[NOTE: There *IS* animation in this tag. It is VERY subtle, so I can perfectly understand if you choose not to animate. This is one of those where you have to squint to see it....]
Scrap kit by Pimptress of Pimp'd Tag Scraps. It is a FTU kit, called Memory Lane.
Filters: Eye Candy 4000 > Gradient Glow, DSB Flux > Bright Noise
Let's face it: I use Eye Candy 4000 Gradient Glow on almost every tag I make -- always for the name. *shrug*
Font: I used Penhurst
Supplies: The mask, by Sabre, and the frame, which I picked up along the way. If you know who made this frame (I have another by the same artist), please let me know and I'll get a link up to their site! You can get these supplies here.
Open your supplies and minimize in PSP. Alternatively, you can load your mask into your PSP masks folder, for future use.
Let's start!
Open a new image, 700 x 700, white.
Add a new raster layer. Selections > Select all.
Open pp05. Copy and paste INTO SELECTION. Selections > Select none.
Apply your mask. Delete the mask layer, answer "yes" to the pop-up question, and merge group.
Open your frame. Copy and paste as new layer.
Take your magic wand and click inside the frame. Please take note that this is not a one-click step. The strings (ropes?) that wind around the frame create little pockets that will show up as not being selected. Make sure you have it all selected!!
Selections > Modify > Expand by 7.
Open pp01. Copy and paste as new layer. Drag this layer below the frame layer. Selections > Invert. Hit delete. Selections > Select none.
If you see any areas within the frame that you missed because of those ropes, go back and do it again until you get it right. I had to do it about three times to get all the little places that weren't originally selected!
Add your tube of choice. Resize, position, and drop shadow as needed. To make your tube "emerge" from the frame, do the following:
Highlight your frame layer again. Take your magic wand and click inside the frame. You don't have to be *quite* so picky on the selections here, but try to get the areas that will show around your tube selected.
Selections > Invert
Highlight your tube layer. Grab your eraser tool and erase any of your tube that overlaps the bottom of the frame. See my tag for reference, if that helps. Selections > Select none.
Open Wisteria from the scrap kit. Resize 85%. Copy and paste on top right corner of your frame. Note that I took my selection tool, set on point-to-point, to crop out the branch that kind-of sticks out on top. Duplicate this layer. Image > Mirror. Position on the left side of the frame. Merge down these two layers. (Click on the top wisteria layer and merge down to the bottom wisteria layer.) Drop shadow your wisteria.
Open bow-01. Resize 65%. Copy and paste as new layer, positioning "atop" the wisteria on the left top corner of your frame. Duplicate this layer. Image > Mirror. Position so it looks right, then merge these two layers down. Drop shadow.
Open the jewel heart. Copy and paste as new layer. Position at the bottom left corner of the frame. Drop shadow.
Open the dragonfly. Resize 65%. Copy and paste as a new layer. Rotate right 25°. Position at the bottom right corner of your frame. Drop shadow.
Drop shadow your frame.
Add your name. I used color #713451. I then added a Gradient Glow of 4 - 0 - 100, color #dcd2b7, preset of medium. Drop shadow your name.
At this point, I moved my dragonfly layer to the top. It doesn't make much of a difference, but this way a wee bit of the dragonfly is over top of the name. (This, of course, depends upon where you put your name!)
Add your copyright, license information if applicable, and taggers'/watermark.
Resize your tag to the size you prefer. You may save now and quit and you're done!! If you want to continue to get that very subtle animation, on we go!
A N I M A T I O N
Highlight your mask layer and duplicate two times, for a total of three frames. Now, make sure you're highlighting the layer on the bottom of the three.
Effects > Plugins > DSB Flux > Bright Noise with settings below:
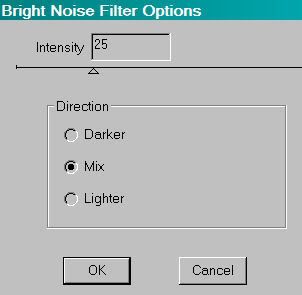
Hit "Mix" once and then hit okay.
Highlight the middle mask layer. Again, apply Bright Noise with the same setting, but hit "Mix" a couple of times.
Highlight the top mask layer. Once more, apply Bright Noise with the same setting, but hit "Mix" three or four times.
Close out the top two mask layers, leaving the bottom mask layer open.
Edit > Copy merged
Open Animation Shop, right-click on the desktop layer and paste as a new animation.
Return to PSP. Close out the bottom mask layer and open the middle mask layer.
Edit > Copy merged
Return to Animation Shop and Edit > Paste > After Current Frame
Once again, back to PSP. Close out the middle mask layer and open the top.
Edit > Copy merged
Back to Animation Shop and Edit > Paste > After Current Frame.
View > Animation. Save as a .gif and we're done! Thanks so much for trying my tuts!! Have a great day.
.


No comments:
Post a Comment