
You will also need:
Animation Shop - I've found it here! This is from CNET, so it's a safe download, too!
A tube of your choice. I'm using the fantastic artwork of Zindy S.D. Nielsen. You must have a license to use her work. You may purchase that license at Zindy's web site.
Scrap kit is by Vassia of Scrap Heaven Boutique. It's a PTU kit, called Stay In Touch. This is a new scrap boutique on the Web, and the grand opening is April 5. But they're open for business now! The kit we're using is available in both taggers' and scrappers' sizes. It's a great size, and I love the colors!
Filters: DSB Flux > Bright Noise
Font: I used Romanesque Normal
Supplies: The mask. This is another mask about which I do not know the origin. If it is yours, please let me know and I'll give you proper credit! It's named caro-mask010, so if anyone knows caro, let him/her know and have him/her get back to me! You can find the mask here.
Let's do it!!
Open your mask and minimize in PSP. Alternatively, you could file the mask in your PSP masks file for use later. Just be sure to give credit where it's due!
Create a new file, 700 x 700, white.
Open paper 11. Copy and paste as a new layer.
Apply your mask. Delete mask layer, answer "yes" to the pop-up question, and merge group.
I noticed that the mask was a bit big for the canvas (in my opinion), so I resized it by 90%. Then I used my lasso tool, set on point-to-point, feather set at 17, and drew around the bottom of the mask, which to me looked like too hard of a line. Hit delete. Selections > Select none. After I was done with the tag and posted it everywhere, I noticed that it looks hard on the right side, too, so if you're as picky as I am, you might want to do the same thing there.
Open frame 2. Copy and paste as a new layer.
Open paper 1. Copy and paste as a new layer. Drag this layer below the frame layer.
Grab your magic wand and click inside the frame. Selections > Modify > Expand by 8. Selections > Invert.
Highlight your paper1 layer and hit delete. Selections > Select none.
Add your tube. Resize, position and drop shadow to your liking. If your tube is emerging from the frame, like mine (almost always) is, do the following:
Grab your magic wand again. Highlight the frame layer. Click inside the frame. Selections > Modify > Expand by 1. Selections > Invert.
Highlight your tube layer. Grab your eraser brush and erase any overlap of the tube over the bottom of the frame. If you have things you'd like to hang down, as the elbow in my frame, go as closely as you can with the eraser brush and then Selections > Select none.
Grab your lasso tool, set at point-to-point, feather 0. Still highlighting your tube layer, carefully draw around the borders of the area you want to show as outside the frame. Hit delete. If all is okay, then Selections > Select none. If it's not as you like it, keep playing with your lasso until you get it right.
Okay? Good!
Open doodle3. Copy and paste as a new layer. Drag this layer between the frame layer and the paper 1 layer. Give it a soft drop shadow.
Now, this may get confusing. Sorry!
Copy and paste doodle3 again, as a new layer. Make this layer your top layer. Move this doodle to the right top corner of the canvas, so it will be showing out behind the head of your tube -- or, if using a different tube, above your frame, some. See my example for placement reference. Duplicate this layer and Image > Mirror. Merge these two layers down and duplicate that layer. Image > Flip.
Now, you need one more copy of doodle3, so copy and paste it again onto your canvas. Position this one up the center so it will show out of the top center of the frame area. Gosh, was that confusing? I'm sorry if it was!! See my tag for the top center placement.
Drop shadow all your doodle3 layers that are on the top of your layer palette. Merge all these doodle layers into one layer and drag that layer down to just above the mask layer.
Add your name. I used color #d8a497 for the fill. Stroke set at 2.5, color #221b1a. I added the following inner bevel:
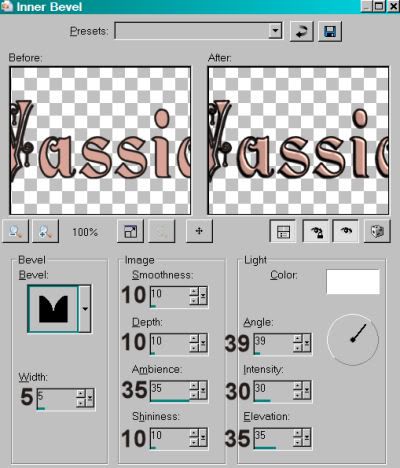
Drop shadow your name.
Add your copyright, license information if applicable and taggers'/watermark.
Resize your tag to the size of your choice. At this point you could stop, if you choose not to animate. Just merge your layers, and save!
A N I M A T I O N
We're going to be animating two sections of your tag at once. So follow along. I hope it's clear. If not, PLEASE drop me a line, and I will try to help!
Highlight your layer with the copious amounts of doodle3. LOL!! Duplicate twice, for a total of three layers.
Now, highlight the doodle3 layer that is between your frame and your paper1 layer. Duplicate this layer twice, for a total of three layers.
Highlight the bottom layer.
Effects > Plugins > DSB Flux > Bright Noise, setting the intensity to 35, and click on "mix."
Hit okay.
Now, do this same thing on the bottom layer of the other set of three layers we made.
Hit okay.
Highlight the middle layer (we are now still on the copious doodles layers). Apply Bright Noise again, but click on mix twice. Hit okay.
Go up to the other set of three doodle 3 layers and highlight the middle layer. Apply the same Bright Noise and hit okay.
Now highlight the top doodle layer and apply Bright Noise, hitting mix three times.
Down to the "copious" doodles layers and highlight the top one. Bright Noise here, hitting mix three times. Hit okay.
Close out the top two doodle layers in each set. Make sure the bottom doodle layer is open in each set of doodle layers.
Edit > Copy merged
Open Animation Shop, right-click on the desktop area, and paste as a new animation.
Return to PSP. Close out the bottom doodle layer in both sets, and open the middle doodle layer, again in both sets.
Edit > Copy merged.
Return to Animation Shop and Edit > Paste > After Current Frame.
Once more back to PSP. Close out the middle doodle layer and open the top layer. Yes, in both sets of layers.
Edit > Copy merged.
And again, back to Animation Shop. Edit > Paste > After Current Frame.
View > Animation. And we're done! I hope you've enjoyed this tutorial! If I wasn't clear on it or I made your head spin, again, let me know. It's easier to do than it is to explain in words! Thanks for stopping by!
.


No comments:
Post a Comment