
You will also need:
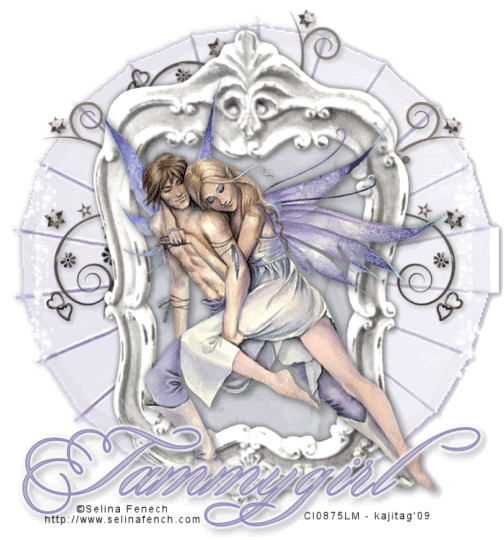
A tube of your choice. I'm using the beautiful artwork of Selina Fenech. You must have a license to use her work. You may purchase that license at CILM.
Scrap kit is by Tammygirl0 of Treasured Scraps. It's a PTU kit, called Love, Honor and Cherish. It's a really soft color spectrum , and a HUGE kit!!
Filters: Eye Candy 4000 > Gradient Glow, Alien Skin Xenofex 2 > Constellation
Font: I used Portfolio
Supplies: The frame, made by Jen Ulasiewicz Designs. It's part of the "Shabbier Chic Frames" pack, and you can find that here.
Let's begin!!
Open your frame and minimize in PSP.
Create a new file, 700 x 750, white.
Open your frame of choice. Copy and paste as a new layer.
Okay, you'll notice the parts of this scrap kit are labeled in a way with which you might not be accustomed. I'm using her file numbers throughout, so it's just a bit different.
Open 027. Copy and paste as a new layer, below the frame layer.
Grab your magic wand, click inside the frame, and Selections > Modify > Expand by 7. Selections > Invert. Hit delete. Selections > Select none.
At this point I added my tube. Resize, position and drop shadow to your taste.
Open 158. Resize 220%. Copy and paste as a new layer. Softly drop shadow this layer.
Open 070. Copy and paste as a new layer. Do this on the top of your layer palette. Position the doodle to the upper left side of your tag. See my tag for reference purposes. Duplicate this layer and Image > Mirror. Duplicate the original one more time and rotate right 70°. Position so the swirls will be seen above your frame Merge all three of these layers together and give it a soft drop shadow. Drag this layer down to just above the 158 layer.
Open 212. Copy and paste as a new layer. This will be difficult to see! Resize 110%. Position toward the top of your tag. Duplicate this layer and Image > Flip. There will be an overlap in the center, on each side. Grab your selection tool (set on rectangle would likely be easiest) and draw a selection around the middle of the overlap on each side. Hit delete. Selections > Select none. Merge these two layers down.
Add your name. I used color #c1baca. Stroke set on 3, color #968dbd. Effects > Plugins > Eye Candy 4000 > Gradient Glow, settings 5 - 0 - 100, color white. Drop shadow your name.
Add your copyright, license information if applicable and taggers'/watermark.
Resize your tag to the size of your choice. At this point you could stop, if you choose not to animate. Just merge your layers, and save!
A N I M A T I O N
Highlight your 212 layer. Duplicate twice, for a total of three layers. Make sure you're still highlighting the bottom of the three.
Effects > Plugins > Xenofex 2 > Constellation, using the Small Star Constellation preset.
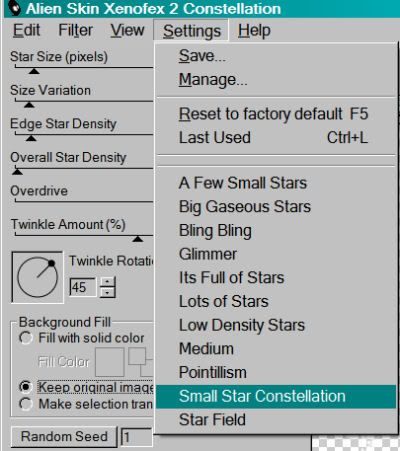
Make sure you click on "Keep original image" when you're doing this. Hit okay.
Highlight the middle 212 layer and apply Constellation again, same settings, but hit the "Random Seed" button. Hit okay.
Highlight the top 212 layer and apply Constellation one more time, same settings, and hit the "Random Seed" button again. Hit okay.
Close out the top and middle 212 layers, leaving the bottom 212 layer open.
Edit > Copy merged
Open Animation Shop, right-click on the desktop area, and paste as a new animation.
Return to PSP. Close out the bottom 212 layer and open the middle layer.
Edit > Copy merged.
Return to Animation Shop and Edit > Paste > After Current Frame.
Once more back to PSP. Close out the middle 212 layer and open the top.
Edit > Copy merged.
And again, back to Animation Shop. Edit > Paste > After Current Frame.
View > Animation. And we're done! I hope you've enjoyed this tutorial! Thanks for stopping by!
.


No comments:
Post a Comment