
Have you Heard? The Saga..... BEGINS!!

There are FOUR new kits coming out in honor of Twilight, a story with which Pimptress is totally enamoured. Each of the kits symbolizes a different period in the story. I'll be doing tuts with these kits, in order, in the next couple of days. There is also a Saga Freebie!! She's been busy! All you Twilight fans, give it a go!!


You will also need:
A tube of your choice. I'm using the amazing artwork of Olivia. You must have a license to use her work. You may purchase that license at CILM.
Scrap kit is by Pimptress of Paradise 4 Scrappers. It's a PTU kit, called The Saga: The Beginning. You can also just get The Complete Series at Paradise 4 Scrappers, as one purchase. (I advise getting them separately! ;) I am trying to do a tut from each part of the series, so stay tuned!!
Pimptress also has a Saga Freebie on her personal blog. It includes 4 frames, one to coincide with each of the individual kits. I'm using the frame made for this one, so if you want to make a tag pretty much close to mine, you'll need to pick that up, too.
Filters: Eye Candy 4000 > Gradient Glow
Font: I used BARNACLE
Supplies: The mask, by Sabre of The Quill and Parchment. Also, there are some stills that Pimptress sent out for possible use in the tutorials, and I used one. I'm a bit "iffy" about the use, but she said the credit should be listed: ©Summit Entertainment and to use the link to the official Twilight web site. I couldn't really find an official Twilight web site, but I did use "Twilightthemovie.com" -- which is now dedicated to the upcoming DVD release. Another thing that can be said about the supplies: I used the mask twice, in two different colors. I tried taking out one of them, but it just didn't look right. LOL. You can get the supplies here.
Let's get to it!! This is a very short tutorial, but my instructions aren't very clear. Sorry about that. I think it's really a case of this tube being in a rare "position." I hope you can understand when I get all vague.....
Open your supplies in PSP and minimize. Alternatively, you can load your mask into your PSP masks file, for use again later.
Create a new file, 700 x 750, white.
Add a new raster layer. Selections > Select all.
Open pp01. Copy and paste INTO SELECTION. Selections > Select none.
Apply your mask. Delete the mask layer, answer "yes" to the pop-up question and merge group.
Add another new raster layer. Selections > Select all.
Open pp08. Copy and paste INTO SELECTION. Selections > Select none.
Apply the mask once more. Delete the mask layer, answer "yes" to the pop-up question and merge group. Make sure this layer is below your other mask layer.
Open cluster-01 from the saga freebie you got from Pimptress' blog. Copy and paste as a new layer. Resize 130%. I needed to do this to make it right for my tube. You may not be using a tube such as this (Olivia's pretty good at making this type of position... I realize one can't find it everywhere), so yours might not need to be at 130%. Totally up to you.
Add your tube. Resize, position and drop shadow as you like.
Open cluster-01 again. Copy and paste above the tube layer. Resize 130%.
NOW, you need to grab your lasso tool, set on point-to-point, to take out some of the top frame while leaving some exposed. I realize that this isn't all that easy to see in the confines of the blog, but hopefully you'll get the idea:
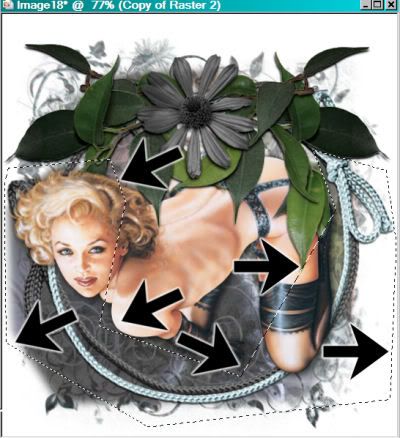
I hope you got my drift and have your frame selected as best as you can for your tube (if you even need the top layer -- that might not even be needed in your case. Sorry I'm being so confusing).
Making sure your top frame layer is highlighted, hit delete. Selections > Select none.
Drop shadow your bottom frame. You may also drop shadow your top frame, if you want.
With the still photo, I resized it 200%, then Adjust > Softness > Soften. Copy and paste as a new layer.
Adjust > Brightness and Contrast > Brightness/Contrast with the following settings:
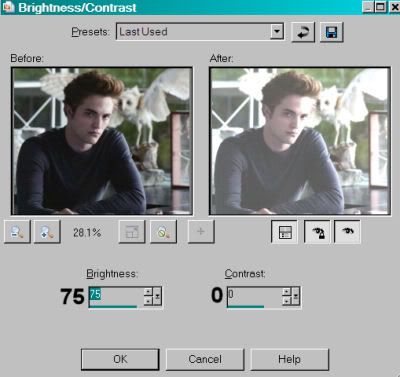
Hit okay.
Now, grab your lasso tool again, set point-to-point, feather set at 17. Draw around the face and shoulders. Basically, just draw around the portion you want to show in your tag. For mine, I had to really whittle it down to have his face show at all. With your tube, you may have more latitude.
Selections > Invert. Hit delete. Selections > Select none.
Use your mover tool to get the photo layer positioned where you'd like it.
Add your name. I used color #818487.
Effects > Plugins > Eye Candy 4000 > Gradient Glow set on 4 - 0 - 100. Color #8cb8c1, preset of "medium" chosen.
Drop shadow your name.
Add your copyright, license information if applicable, the photo still credit and taggers'/watermark.
Resize your tag to the size of your choice. Merge your layers, and save! We're done! I hope you enjoyed this tut! Again, I apologize for the vagueness of it all. PLEASE drop me a note, or leave me a comment, if you're having any trouble! (Don't put it in the shout box, I don't get to that as often as my e-mail.)
.


No comments:
Post a Comment