
You will also need:
Tube of your choice. I'm using the really cute artwork of Mashi. You must have a license to use this work. You may purchase that license at CILM.
Animation Shop - at this time, I'm not sure where you can get this program, if you don't already have it. You may, however, save the tut as a static (non-animated) image if you like.
Scrap kit by Vella of Treasured Scraps. It is a PTU kit, called Rainbow Grunge. There is a taggers' size and a scrappers' size. It's a big, bright kit and right now the taggers' size is on sale for 35¢ !!!!
Filters: None!!!! Can you believe it??!?
Font: I used A&S Christmas Script
Supplies: Just the mask, here.
Okay, let's start!
Open a new image, 700 x 700, white.
Open paper2. Resize to 700 x 700. Copy and paste as new layer.
Apply your mask. Delete the mask layer, answer "yes" to the pop-up question, and merge group.
Open Flower1. You can choose the flower color your want. Resize 175%. Adjust > Sharpness > Sharpen. Copy and paste as a new layer.
The rest of this is really up to you. I'll tell you the flowers and arranging of them that I did. You do what pleases your eye. Remember also, so it might help you, that I do this stuff on the top layer, so I can see what I'm doing.
Open Flowers3. You can choose the flowers color your want. Resize 65%. Copy and paste as new layer. Rotate left 20°. Position so that these flowers will peek out from behind the main flower when you're done. Duplicate this layer. Image > Mirror. Merge these two layers down.
Open Flowers1. Again, you can choose whichever color you want. Resize 65%. Copy and paste as a new layer. Rotate right 10°. Position next to your Flowers3 layer. Duplicate this layer and Image > Mirror. Merge these two layers down.
Open Flowers4, or whichever color you prefer. Resize 65%. Copy and paste as a new layer. Position this in the middle of your flowers bunches that you're building.
Drop shadow each layer of flowers, then merge them all down to one layer. Drag this layer below your main flower layer.
Drop shadow your main flower.
Back to the top layer, open Feather5. Resize 50%. Copy and paste as new layer. Rotate left 15°. Position to the left so that it will be sticking out over the flowers layers. (Poor grammar, but that's what these elements are called. LOL) Duplicate this layer. Image > Mirror. Merge these two layers down. Drop shadow.
Open Feather4. Resize 50% Do not rotate. Position to the left, in the center of the canvas. Duplicate this layer. Image > Mirror. Merge these two layers down. Drop shadow.
Merge down the two feather layers together. Drag this layer below your flowers layer.
Add your tube. Resize, position and drop shadow to your taste.
Add your name. I used color #a737dd for the fill. Stroke 1. Stroke color #450188. Drop shadow your name.
Add your copyright, license information if applicable, and taggers'/watermark.
Resize your tag to your desired size.
You can save now as a static image, and you're done, if you choose not to animate.
A N I M A T I O N
Layers > View > None
Open your mask layer. Edit > Copy
Open Animation Shop, right-click on the desktop layer and paste as new animation.
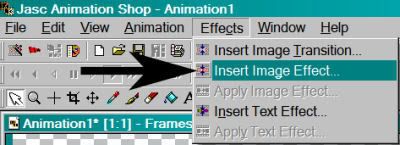
Go to Effects > Insert Image Effects
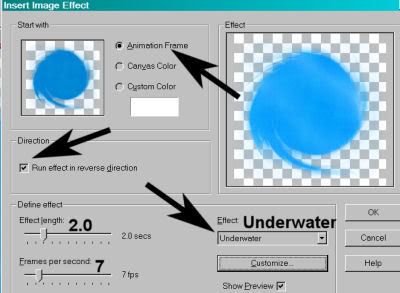
Choose "Underwater," with the settings shown below:
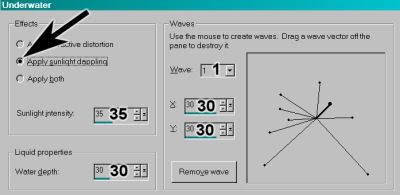
Hit the "customize" button. See my settings, below:
Hit okay.
This gives you 15 frames. Delete the last frame. Bring the slider at the bottom of this animation to the first frame.
Return to PSP. Layers > View > All. Close out the bottom two layers (mask and background).
Edit > Copy merged
Return to Animation Shop, right-click on the desktop area and paste as new animation.
Duplicate this frame until you have a total of 14 frames. Again, bring the slider at the bottom of this animation to the first frame.
Edit > Select All
Edit > Copy
Go to your animation with the underwater effects.
Edit > Select All
[NOTE: On the next step, do not release your mouse button until you have positioned your frames where you want them to be on the finished product!]
Edit > Paste > Into Selected Frame
Animation > Animation Properties with the following settings:
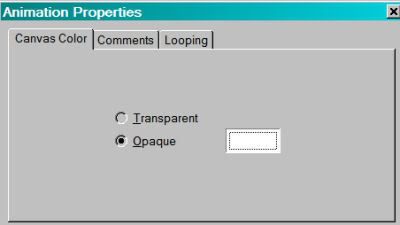
Hit okay.
View > Animation! Save as .gif and we're done!! Thanks for trying my tut, I hope it was clear for you.
.


No comments:
Post a Comment