
You will also need:
A tube of your choice. I'm using the fairy artwork of Amy Brown. You must have a license to use her work. You may purchase that license at CILM.
Animation Shop - at this time, I'm not sure where you can get this program, if you don't already have it. You may, however, save the tut as a static (non-animated) image if you like.
Scrap kit by Dannie of Terminally Unique Designs. It is a PTU kit, called Slumber.
Filters: Eye Candy 4000 > Gradient Glow, DSB Flux > Bright Noise
Font: I used the alpha supplied in the scrap kit. I used the "all-in-one" alpha, sized it down by 15%, then selected each letter, copied and pasted, etc.
Supplies: The mask, by Sabre, and the whitewashed window. You can get these supplies here.
Let's begin!
Open your supplies and minimize in PSP. Alternatively, you can load the mask into your PSP masks file, so it will be there for future use!
Open a new image, 750 x 700, white. I know this is even larger than I normally start with, but as I went on in the process of building this tag, I had to change the canvas size twice. So I just decided to start with the final size! Remember, at the end you do resize the tag to your size of choice.
Open the "WindowWhitewash" file. Copy and paste as a new layer. Resize 125%. Depending on the type of tube you're using, you may need to position it off-center. My tube has big wings on the side, so that's what I had to do. Drop shadow the window.
Open "Elements_001." Copy and paste as a new layer. I duplicated this layer about five times and arranged them so they almost filled in the blankness of the area behind the window. See my tag for reference. It's difficult to see, since there's so much in front of it, but you might catch my drift! When you've got them all arranged as you like them, merged them all down on each other until you have one layer. Drag this layer below your window.
Open "Elements_004." Copy and paste as a new layer. Use your pick tool to squish it horizontally so all the stars fit within the window area. Drag this layer below your window, above your clouds. Move it up so it looks somewhat as if the stars are hanging from the top of the window.
Open paper_008. Copy and paste as new layer.
Apply your mask. Delete mask layer, answer "yes" to the pop-up question, and merge group. If your tag is going to be off-center a bit, move your mask layer to where it looks like it belongs. LOL.
Add your tube. Resize and drop shadow as needed. Position where you like.
Add your name. This is where I used the included alpha that came with the kit. Again, open the "all-in-one" alpha and resize by 15%. Then use your selection tool set on rectangle to select the letters you need, one by one. I added a gradient glow (of course -- it's ME after all LOL) of 4 - 0 -100, color #895cec. Drop shadow your name.
Add your copyright, license information if applicable, and your taggers'/watermark.
Resize your tag to your size of choice. You can stop here if you choose not to animate.
A N I M A T I O N
Highlight your Elements_004 layer. Grab your selection tool, set on star1.
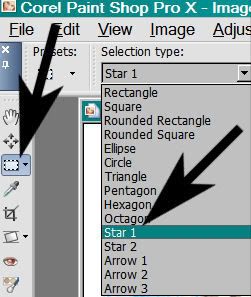
To do this, I needed to close out my tube layer, so I could see all the stars.....
Draw a selection around the little stars on the Elements_004 layer. There aren't that many, and it doesn't take much time to figure out how to orient the cursor to make the stars look right.
We're doing it this way because the magic wand and "Select all" would not work with this element.
Done? Good!
Duplicate this layer twice, for a total of three star layers.
Highlight the bottom star layer. Effects > Plugins > DSB Flux > Bright noise with the following settings:
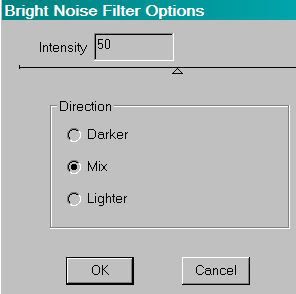
Hit okay.
Highlight the middle star layer. Apply DSB Flux > Bright noise again, hitting the "Mix" button a couple of times. Hit okay.
Highlight the top star layer. Apply DSB Flux > Bright noise again, hitting the "Mix" button three or four times. Hit okay.
Selections > Select none
Close the top and middle star layers, leaving the bottom one open.
Edit > Copy merged
Open Animation Shop, right-click on the desktop area and paste as a new animation.
Return to PSP. Close off the bottom star layer and open the middle one.
Edit > Copy merged.
Return to Animation Shop. Edit > Paste > After Current Frame
Once more to PSP. Close the middle star layer and open the top.
Edit > Copy merged
Back once again to Animation Shop. Edit > Paste > After Current Frame
View > Animation. Save as a .gif and we're done! I hope you've enjoyed this tutorial! Thanks for stopping by!
.


No comments:
Post a Comment