
You will also need:
Animation Shop - I've found it here! This is from CNET, so it's a safe download, too!
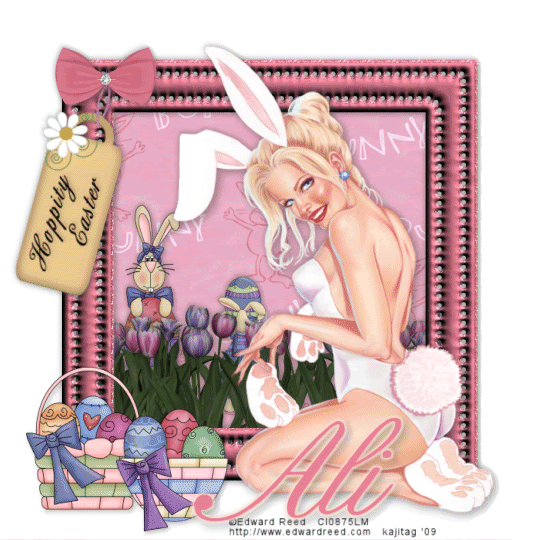
A tube of your choice. I'm using the elegant artwork of Edward Reed. You must have a license to use his work. You may purchase that license at CILM.
Scrap kit is by Ali, of Designs by Ali. It's a PTU kit, available at Bitchin' Scraps Boutique, and is called Hoppity Easter. This kit is on sale for 69% off!! Get it while it's hot!
Filters: Eye Candy 4000 > Gradient Glow
Font: I used BixAntiqueScriptHmk
Supplies: The teeny diamond and the silver sparkle. You can find these really small files here.
Let's create!!
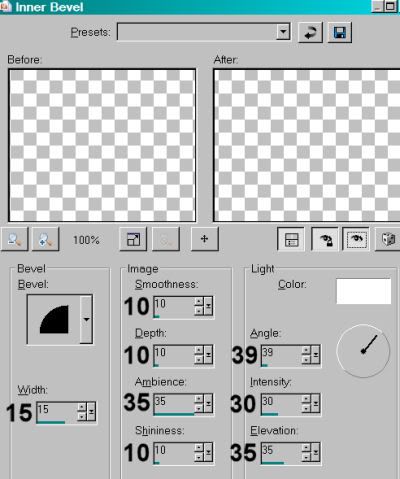
Open Frame 3. Copy and paste as a new layer. I added a bevel to the frame with the following settings:
Open Paper 23. Resize to 700 x 700. Copy and paste as a new layer. Drag below your frame layer in the layer palette. Position the paper as you'd like it to look inside the frame.
Highlight your frame layer. Grab your magic wand and click inside the frame. Selections > Modify > Expand by 7. Selections > Invert.
Highlight your paper layer. Hit delete. Selections > Select none.
Add your tube. Resize, position and drop shadow to your liking.
Open Tulips 3. Resize 50%. Copy and paste as a new layer. Duplicate this layer and Image > Mirror. Move the two bunches of tulips together to try and make it look like one bunch. LOL. Merge these two layers down. Drop shadow your tulips. Drag the tulips layer below your frame layer and position them on the bottom area of the frame. See my tag for placement reference. If you have some of the greenery sticking out of the frame like I did, grab your selection tool, set on rectangle, mode is Add (Shift), and draw a selection around the greenery on each side. Hit delete. Selections > Select none.
Open Bunnie 6. Resize 45%. Copy and paste as a new layer. Position this layer below the tulips in the layer palette. Have your bunnie looking like it's peeking out of the garden. Drop shadow this bunnie.
Open Bunnie 3. Resize 30%. Copy and paste as a new layer, dragging this layer again down below the tulips. Position as you like. Drop shadow this bunnie.
Open Tag 1. Rotate right 90° ALL LAYERS CHECKED! Add a saying or your name or whatever you'd like to put on the tag. I used "Hoppity Easter." Drop shadow your text.
Edit > Copy merged.
Return to your canvas and paste as a new layer. Resize 75%. Rotate back left 90°. Position so the tag appears to be hanging from the frame. Use your selection tool to remove the parts of the strings that hang over the top. I rotated the tag again, 15° right. Drop shadow your tag.
Open Bow 3. Resize 25%. Copy and paste as a new layer. Position over the strings you have left on the tag. Drop shadow your bow.
Open DiamondTeeny from your supplies. Copy and paste as a new layer. Position over the middle of the bow.
Open Sparkle Silver from your supplies. Copy and paste as a new layer. Position this over the diamond. If your tube has a prominent earring like mine does, duplicate this layer and position it over the earring.
Open Egg in a Basket 2. Resize 35%. Copy and paste as a new layer. Position where you'd like it and drop shadow.
Open Egg in a Basket 3. Resize 35%. Copy and paste as a new layer. Position this next to your first Egg in a Basket. Drop shadow.
Add your name. I used color #ea8297 for the fill. No stroke.
Effects > Plugins > Eye Candy 4000 > Gradient Glow set at 5 - 0 - 100, preset on medium, color #fae1d2.
Drop shadow your name.
Add your copyright, license information if applicable and taggers'/watermark.
Resize your tag to the size of your choice. At this point you could stop. It could be the case that, if you did NOT have the earring to put the sparkle on, you won't be animating your tag. Just merge your layers and save, and you're done.
In the case that you ARE utilizing the second sparkle, we'll go on....
A N I M A T I O N
Close one of your sparkle layers, leaving the other open.
Edit > Copy merged
Open Animation Shop, right-click on the desktop area, and paste as a new animation.
Return to PSP. Close out the first sparkle layer, and open the other sparkle layer.
Edit > Copy merged.
Return to Animation Shop and Edit > Paste > After Current Frame.
Edit > Select All. Right-click on the bar at the top of your animation and choose 'Frame Properties.' Change this number to 30.
View > Animation. And we're done! I hope you've enjoyed this tutorial! Thanks for stopping by!
.


No comments:
Post a Comment