

You will also need:
A tube of your choice. I'm using the great artwork of Ismael Rac. You must have a license to use his work. You may purchase that license at My PSP Tubes.
Animation Shop - I found this a week or so ago, but it must have been in the original Fairy Dust tut, which I had to take down. Let me look around a bit.... Okay, I've found it here! This is from CNET, so it's a safe download, too!
Scrap kit is by Pimptress of Paradise 4 Scrappers. It's a PTU kit, called The Saga: The Pause. You can also just get The Saga: The Complete Series at Paradise 4 Scrappers, as one purchase. (I advise getting them separately! ;) I am trying to do a tut from each part of the series, so look for more.... I'm tutting as fast as I can! LOL.
Pimptress also has a Saga Freebie on her personal blog. It includes 4 frames, one to coincide with each of the individual kits. I'm using the frame made for The Pause.
Filters: No outside filters in this tut!
Font: I used A&S Signwriter
Supplies: The mask and two twinks. I've gotten these along the way while doing my PSPing, so I don't know from where any of these came. If you know whose they are, or they are yours, let me know so that I can credit you correctly! You can get the supplies here.
Let's get to it!! This is what I like to call a "quick-n-dirty" tutorial.
Open your mask in PSP and minimize. Alternatively, you can load your mask into your PSP masks file, for use again later. Place your twinks to wherever they will be easily accessible to you when you get to Animation Shop.
Create a new file, 750 x 700, white.
Add a new raster layer. Selections > Select all.
Open pp12. Copy and paste INTO SELECTION. Selections > Select none.
Apply your mask. Delete the mask layer, answer "yes" to the pop-up question and merge group.
Open cluster-02 from the saga freebie you got from Pimptress' blog. Copy and paste as a new layer.
Open pp05. Copy and paste as a new layer. Drag below the frame layer.
Highlight the frame layer. Grab your magic wand and click inside the frame. PLEASE NOTE! There is a chain hanging down on this frame, so you must click inside and to the outside of the chain links, as well.
Selections > Modify > Expand by 7. Selections > Invert
Highlight your pp05 layer. Hit delete. Selections > Select none.
Add your tube. Resize, position and drop shadow as you like.
Drop shadow your frame.
Now, this doesn't really show up, so you could choose not to do this part: Open moon. Resize 65%. Copy and paste as a new layer, just above your pp05 layer. I positioned mine in the upper right-hand corner of the frame. It just peeks out above and below the flowers on the frame. Drop shadow your moon.
Open your heart-trinket. Copy and paste as a new layer. Place at the bottom end of the chain which is hanging from the frame. Drop shadow your heart-trinket.
Add your name. For the fill color on the name, I chose to use pp10. Open pp10. Click on your materials palette, and choose "pattern." Click on the side of the square and find pp10. Select it.

Write out your name. I then used the following bevel:
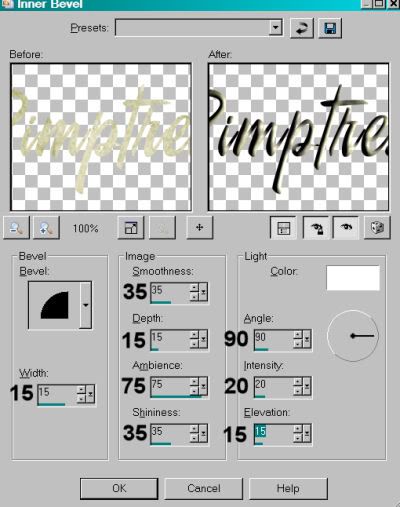
Hit okay. Rotate your name 30° left. Place in bottom right-hand corner of the frame. See my tag for reference purposes.
Drop shadow your name.
Add your copyright, license information if applicable and taggers'/watermark.
Resize your tag to the size of your choice. You can save here and be done, if you choose not to animate.
A N I M A T I O N
Close out all the layers above your frame. It should look something like this:
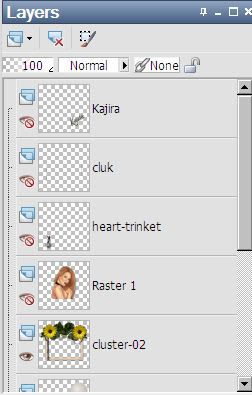
[NOTE: "cluk" refers to my copyright, license, etc. layer. I don't remember after all this time what the u and the k stand for! lol]
Edit > Copy merged
Open animation shop, right-click on the desktop area and paste as a new animation.
Duplicate this frame until you have a total of 16 frames. Move the slider on the bottom of this animation to frame 1.
Choose one of your twinks. They appear to be slightly different, but after using them and mirroring them and everything, I don't know for sure if they are. lol! Use your own judgment!!
Edit > Select All. Edit > Copy
Go back to the animation you are building and Edit > Select All. Edit > Paste > Into Selected Frame.
Place your twink where you want it and release your mouse button. Continue to do this, over and over, until the area you want to twinkle is done.
Return to PSP.
Close out all the open frames and open all the closed frames. I found the easiest way to do this is to just start at the bottom and click on each frame and see as they do the opposite thing from what they were doing before. I hope that made sense. :)
Edit > Copy merged
Return to Animation Shop, right-click on the desktop area, and paste as a new animation. Duplicate this frame until you have 16 frames. Move the slider over so it's on frame 1.
Edit > Select All. Edit > Copy.
Go back to the animation we're building (the one with the twinks on it) and Edit > Select All. Edit > Paste > Into Selected Frame.
Position your tube and etc. where you want them to be and release your mouse button.
View > Animation. If you like what you see, save as a .gif and we're done! Thanks for trying my tut!
.


No comments:
Post a Comment