

You will also need:
A tube of your choice. I'm using the wonderful artwork of Dominic Marco. You must have a license to use his work. You may purchase that license at CILM.
Scrap kit is by Bluey of Bluedream Designs. It's a FTU kit, and it's called Slave. Be sure to leave some lurve for the great freebie kit!
Filters: No filters used in this tut!
Font: I used Inscription LET
Supplies: Two masks, one of which is the art of the great Vix! I have no idea where I got the second one. If it is yours, please let me know so that I might give you proper credit! You can find them both here!
Let's get workin'!!
Open your masks and minimize in PSP. Alternatively, you could add your masks to your PSP masks folder, so you'd have them for use later. Always give proper credit where you can, though, as you collect your PSP booty!
Create a new file, 700 x 750, white.
Add a new raster layer. Selections > Select all.
Open Paper 6. Copy and paste INTO SELECTION. Selections > Select none.
Apply your Vix_Mask05 mask. Delete the mask layer, answer "yes" to the pop-up question, and merge group.
Now, apply your "mask layer" mask. Delete the mask layer, answer "yes" to the pop-up question, and merge group.
Open Frame1. Copy and paste as a new layer.
Open Paper 6 again. Copy and paste as a new layer. Drag this layer below the frame in the layer palette.
Grab your magic wand and click inside the frame. Don't forget the little space between the ribbon and the frame on the bottom! Click in there, too! Selections > Modify > Expand by 10. Selections > Invert.
Highlight your paper layer and hit delete. Selections > Select none.
At this point, I added my tube layer. Resize, position and drop shadow as you like it.
Highlight your frame layer again, and grab the magic wand again. Click inside the frame and in the space between the ribbon and the bottom of the frame. Selections > Modify > Expand by 2.
Highlight your tube layer. Get your eraser brush and erase any part of the tube that overlaps the bottom of the frame. You should be able to peek a portion of your tube in that space between the ribbon and the bottom of the frame. Selections > Select none.
At this point, highlight the frame layer and colorize. Adjust > Hue and Saturation > Colorize with the following settings:
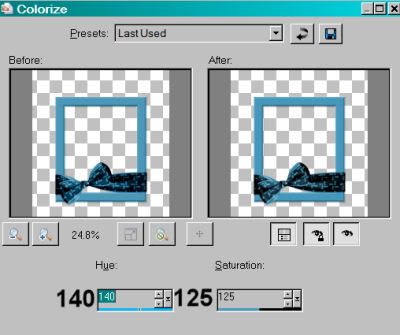
Hit okay.
Now, to make it a bit darker, Adjust > Brightness and Contrast > Brightness/Contrast with the following settings:
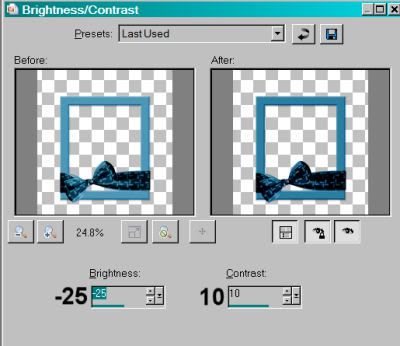
Hit okay.
I did this a couple of times until I got the color I wanted.
Open the Slave Wordcharm. Copy and paste as a new layer. Position it on one side or the other. See my tag for reference purposes. Drop shadow the wordcharm.
Open Label1. Resize 90%. Copy and paste as a new layer. Colorize as we did above. Do not change the brightness and contrast. Rotate left 30°. Position where you'd like it to be in reference to your frame, the ribbon, etc. This label should be just below the frame layer. Duplicate this layer. Drag the duplicate up in the layer palette until it's above your frame, wordcharm and tube.
Grab your lasso tool, set at point-to-point, and draw around each end of the top label, so what shows is the bottom label layer, and it seems to be attached somehow to the frame. See my example for reference purposes. This is hard to explain in words!! Do this on both ends of the label. Selections > Select none.
Change the opacity on your top label layer to about 60. Highlight the top label layer. Still using your lasso tool set at point-to-point, carefully draw around the top of the bow that's poking out into the center of the label. (See my tag for reference purposes.) Hit delete. Selections > Select none. Return the opacity on the label layer to 100.
Add your name. I used color #05628a as the fill color. Stroke size is 1.5, color #eaeaea. Drop shadow your name.
Add your copyright, license information if applicable and taggers'/watermark.
Resize your tag to the size of your choice. Merge your layers, and save! We're done! I hope you enjoyed this tut!
.


No comments:
Post a Comment