
You will also need:
A tube of your choice. I'm using the great artwork of Brian Rood. You must have a license to use his work. You may purchase that license at CILM.
Scrap kit is by Missy of Scraps With Attitude. It's a FTU kit, called Give Thanks. It's a beautiful kit, done in the autumn, but still beautiful today. Be sure to leave some luv when you download this freebie!
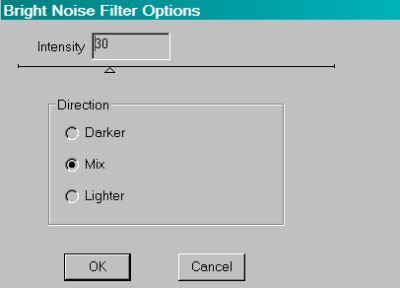
Filters: DSB Flux > Bright Noise
Font: I used Base:Christmas
Supplies: The mask, made by the uber talented Zuzzanna!! You can get this mask here.
Let's get to it!!
Open your mask and minimize in PSP. Alternatively, you could file the mask in your PSP masks file for use later. Just be sure to give credit where it's due!
Create a new file, 700 x 700, white.
Open Frame4. Copy and paste as a new layer. Resize 80%.
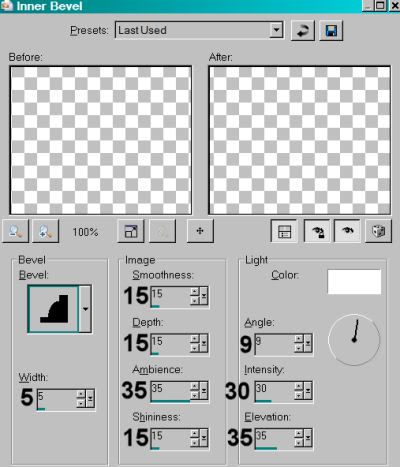
I chose to give the frame a bevel. Here are the settings I used:
Open Paper19. Copy and paste as a new layer. Drag this layer below your frame.
Take your magic wand and click inside the frame. Selections > Modify > Expand by 7. Selections > Invert.
On your paper layer, hit delete. Selections > Select none.
Again, Open Paper19. Copy and paste as a new layer, below your last paper layer and above your white background.
Apply your mask. INVERT TRANSPARENCY CHECKED!!! Delete mask layer, answer "yes" to the pop-up question, and merge group. Resize the mask layer by 96%.
Highlight your frame layer and add your tube. Resize, position and drop shadow to your taste.
Grab your magic wand again, and click again inside the frame. Selections > Modify > Expand by 1.
Highlight your tube layer. Take your eraser brush and erase any of the tube that is overlapping the bottom of the frame. Selections > Select none.
Open the Metal Flower Ribbon 1. Copy and paste as a new layer. Line it up with the top or bottom of your frame. Using your lasso tool, select the ends on each side that are hanging out beyond the frame. Hit delete. Selections > Select none.
Duplicate this layer. Image > Flip. Position as you like it on the opposite (top or bottom) end of the frame.
Duplicate one of these layers. Move to the middle of the frame and rotate left 90°. Move it over to the left side of the frame. Again, grab your lasso tool to select the ends hanging over and hit delete. Selections > Select none.
Duplicate this layer and Image > Mirror. Position all to your liking. Merge these layers down. Drop shadow this layer.
Open Flower4. Resize 35%. Copy and paste as a new layer. Rotate left 20°. Position on the bottom left corner of your frame. Refer to my example for positioning. Drop shadow your flower.
Open Flower3. Resize 35%. Copy and paste as a new layer. Do not rotate this flower. Drag the layer below your first flower layer and position as you like. Drop shadow this flower.
Open Flower1. Resize 40%. Copy and paste as a new layer. Do not rotate this flower. Drag this flower below your other two flower layers and position as you like. Drop shadow this flower.
Open Bow4. Resize 27%. Copy and paste as a new layer. Make sure this is your top layer. Rotate left 40°. Position over your bunch of flowers. Again, see my example for positioning. Drop shadow your bow.
Highlight your Flower4 layer. Duplicate this layer. Image > Mirror. Position as you like.
Highlight your Flower3 layer. Duplicate this layer. Image > Mirror. Position as you like. You may notice I dragged this layer up above the Flower4 duplicated layer. It's up to you.
Highlight your Bow4 layer. Duplicate this layer. Image > Mirror. I had to play with resizing this one, but just a tad!! I think I resized this 96%. Position above the mirrored flower layers.
Add your name. I used color #ad412f. Stroke set on 2, color #eedcd5. I added the same Inner Bevel used above.
Hit okay.
Drop shadow your name.
Add your copyright, license information if applicable and taggers'/watermark.
Resize your tag to the size of your choice. At this point you could stop, if you choose not to animate. Just merge your layers, and save!
A N I M A T I O N
Highlight your mask layer. Duplicate twice, for a total of three layers. Make sure you're still highlighting the bottom of the three.
Effects > Plugins > DSB Flux > Bright Noise, using the following settings:
Hit mix once, then hit okay.
Highlight the middle mask layer. Apply Bright Noise again, but click on mix twice. Hit okay.
Now highlight the top mask layer and apply Bright Noise, hitting mix three times.
Close out the top two mask layers. Make sure the bottom mask layer is open
Edit > Copy merged
Open Animation Shop, right-click on the desktop area, and paste as a new animation.
Return to PSP. Close out the bottom mask layer and open the middle mask layer.
Edit > Copy merged.
Return to Animation Shop and Edit > Paste > After Current Frame.
Once more back to PSP. Close out the middle mask layer and open the top layer.
Edit > Copy merged.
And again, back to Animation Shop. Edit > Paste > After Current Frame.
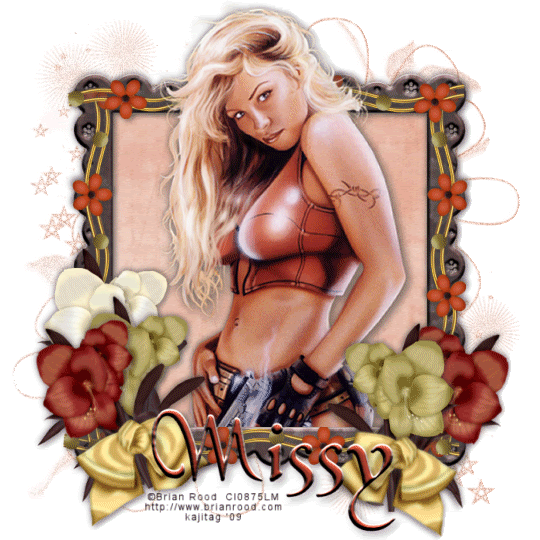
View > Animation. And we're done! I hope you've enjoyed this tutorial! Thanks for stopping by!
.


No comments:
Post a Comment