
You will also need:
Many (I used six) tubes of your choice, all from the same artist. I'm using the wonderful artwork of Amy Brown. You must have a license to use her work. You may purchase that license at CILM.
Animation Shop - at this time, I'm not sure where you can get this program, if you don't already have it. You may, however, save the tut as a static (non-animated) image if you like.
Scrap kit by Clarey of Clarey's Designz. It is a PTU kit, and it's called Sparkalicious. This is a taggers' sized kit!
Filters: Xero > Porcelain
Font: I used WaterLily
Supplies: here. This file includes the new falling mist animation, which was made especially for this tut by my SUPERSTAR, Raven. Thank you, girl, for doing this for me! The mask was picked up along the way in my PSP travels. If it is yours, let me know so that I may credit you correctly!
Let's begin!
Open your mask and minimize in PSP. Alternatively, you can file it in you PSP masks file, for use again at a future date! File your animation wherever it will be handy for you once you're in Animation Shop.
Open a new image, 750 x 700, white.
Open longframe2. Copy and paste as a new layer. Position to almost the bottom of your canvas.
Choose one of your tubes that you've decided upon to be in the frame. Copy and paste as new layer. Drag it below your frame in the layer palette. Position it as you'd like it to be seen through the frame.
Highlight your frame layer. Grab your magic wand and click inside the section of the frame you're going to be using for this particular tube. Selections > Modify > Expand by 7. Selections > Invert.
Highlight your tube layer. Hit delete. Selections > Select none.
Drop shadow your tube.
Repeat this process until all five sections of the frame are filled. To simplify things, I merged all five of the tube layers down to one layer.
Highlight your white background layer. Add a new raster layer. Selections > Select all
Open paper2. Copy and paste INTO SELECTION. Selections > Select none.
Highlight the frame layer again. This time, click inside all five sections of the frame. Selections > Modify > Expand by 7. Selections > Invert.
Highlight your paper layer. Hit delete. Selections > Select none.
Highlight your tube layer. Effects > Plugins > Xero > Porcelain with the default settings.
Close out the white background layer. Make sure one of your other layers is highlighted. Layers > Merge > Merge Visible. Open the white background layer again.
Highlight the white background layer. Again, add a new raster layer. Selections > Select all.
Open paper8. Copy and paste INTO SELECTION. Selections > Select none.
Adjust > Blur > Gaussian Blur, set at 7. Hit okay.
Apply your mask. Delete the mask layer, answer "yes" to the pop-up question, and merge group.
Open clusteredglitter. Copy and paste as a new layer. Give this a soft drop shadow.
Add your "main" tube. Resize, position, and drop shadow to taste.
Add your name. I used color #e6d0d9 as the fill and #934446 as the stroke, stroke set at 2. You may choose to add an inner bevel. Here are the settings I used:
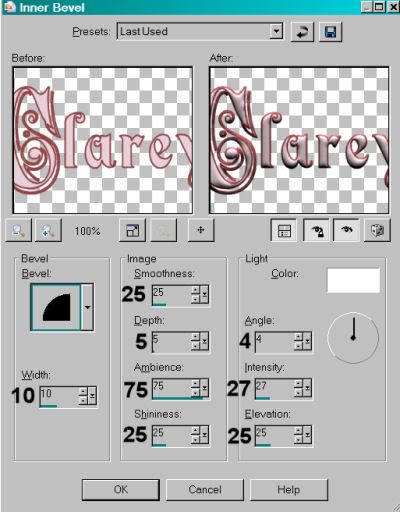
Hit okay. Drop shadow your name.
Add your copyright, license information if applicable, and taggers'/watermark.
Resize your tag to your desired size. Here is where you can stop and save if you choose not to animate.
A N I M A T I O N
Edit > Copy merged
Open Animation Shop, right-click on the desktop area and paste as a new animation.
Duplicate this frame until you have a total of 12 frames. Move the slider on the bottom of this animation to frame 1.
Open the falling_mist animation. Making sure the bottom slider is all the way over to frame one,
Edit > Select All. Edit > Copy
Move to the tag that we are working on. Edit > Select All. Edit > Paste > Into Selected Frame.
Position the fairy dust where you'd like it and release your mouse button.
We're going to change the frame properties. Making sure all frames are selected, right-click on the top bar of the animation and choose "Frame Properties." Change this number to 23.
Now go to the last frame and highlight just this frame by clicking on it (it should have a red line around it when it's selected). Right-click and choose "Frame Properties." Change this frame to the number 100.
View > Animation. You like? Save as .gif and we're done! I hope you've enjoyed making this tag, and I thank you for trying my tut!
.


No comments:
Post a Comment