
You will also need:
A tube of your choice. I'm using the artwork of Tom Hoover. You must have a license to use his work. You may purchase that license at My PSP Tubes.
Animation Shop - at this time, I'm not sure where you can get this program, if you don't already have it. You may, however, save the tut as a static (non-animated) image if you like.
Scrap kit by Jill of Scrap It Sassy. It is a PTU kit, but it *IS* a mini kit, so the price is low-low-low-low. LOL! This kit is called Irish Charm II Mini Taggers' kit. (There are two of these minis. I'm going to be posting another tutorial with the first version after this one. Look for it above!) Anyway, they're both on a pretty kewl sale, so get 'em while they're hot!
Filters: Eye Candy 4000 > Gradient Glow, Alien Skin Xenofex 2 > Constellation
Let's face it: I use Eye Candy 4000 Gradient Glow on almost every tag I make -- always for the name. *shrug*
Font: I used P22 Kilkenny Swash Caps
Supplies: The mask, here. I don't know where I got this mask along the way. If it is yours, let me know, and I'll be sure to give you proper credit!
The photo I used is courtesy StockXpert.com. You must be a member to get their images, but it doesn't cost much at all. I just typed into the search area "Irish Countryside" and this is one of the choices I got. I will be including steps for the use of an outside stock photo. Just to let you know beforehand.
Open your mask and minimize in PSP. Alternatively, you can load your mask into your PSP masks folder, for future use.
Let's start!
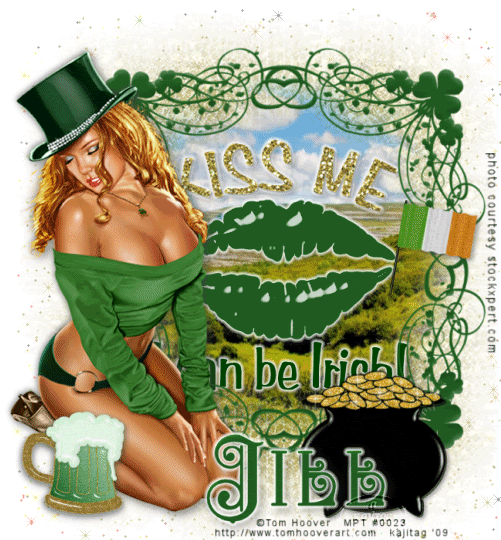
Open a new image, 650 x 700, white.
Open Frame1. Copy and paste as a new layer.
Open your stock photo. Copy and paste below the frame layer. If it's not tall enough (as mine was not), use your pick tool to draw the photo up and down to fill the frame. I drew mine to not cover the outside of the frame, but to come to the next "loop" down from the top loop. Same with the bottom.
Highlight your frame layer. Grab your magic wand, feather set to 17, and click inside the frame. Now go Selections > Modify > Feather > 25.
Highlight your stock photo layer. Selections > Invert. Hit delete. Selections > Select none.
Now highlight your background layer (the white one). Open paper1. Resize to 700 x 700 pixels. Copy and paste as new layer.
Apply your mask. Delete the mask layer, answer "yes" to the pop-up question, and merge group.
Open the wordart1. Copy and paste as a new layer. Center within the frame. Effects > Eye Candy 4000 > Gradient Glow, settings at 5 - 0 - 100, color white. Add a soft drop shadow to the word art.
Add your tube of choice. If it's like mine, and sits to the side of your tag, then move the frame, photo, mask and wordart layers equal distance to the opposite side of your tag, to balance it out and allow the frame to form more of a "window" appearance. Resize, position, and drop shadow your tube.
Open flag1. Resize 35%. Copy and paste as new layer. I put mine to the right side of the frame, trying to make it somewhat appear as though it could have been put somewhere in the countryside, then is sticking out of the frame. I used my selection tool set on freehand, feather of 17, and removed part of the flag pole. (Trying to make it look a bit softer on the bottom....)
Open your potofgold. Resize 50%. Copy and paste as a new layer. Position where you think it looks best on your tag. See my example for reference purposes. Drop shadow your potofgold.
Open your greenbeer. Resize 35%. Copy and paste as a new layer. I mirrored mine and put it to the left side of the tube. Drop shadow your greenbeer. LOL.
Add your name. I used color #205c20 and a stroke of 2 in the same color. Effects > Plugins > Eye Candy 4000 > Gradient Glow same settings as above. Drop shadow your name.
Add your copyright, license information if applicable, and taggers'/watermark.
Resize your tag to the size you prefer. You may save now and quit and you're done!! If you want to continue to get the animation, on we go!
A N I M A T I O N
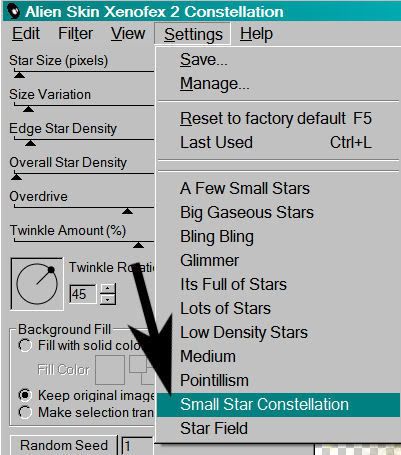
Highlight your mask layer and duplicate three times, for a total of four frames. Now, make sure you're highlighting the layer on the bottom of the three.
Effects > Plugins > Alien Skin Xenofex 2 > Constellation > Use the Small Star Constellation preset:
And change your numbers to this:
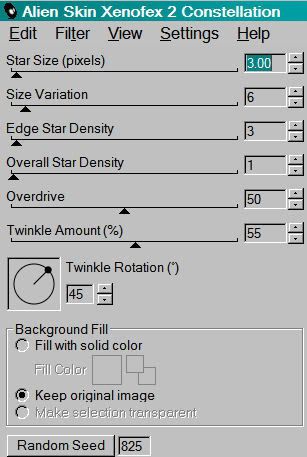
Hit okay.
Highlight the second mask layer up. Apply Constellation again, this time just hitting the "Random Seed" button. Now, I must tell you that I went back and forth on this animation many times to find the effect for which I was looking. It's actually still not exactly what I wanted, but I can live with it. LOL! So it may come to pass that your "Random Seed" settings won't produce what you want in the end. In that case, go back and undo everything and try again. It is for this reason we have four layers this time instead of three. Just a warning.
Highlight the next mask layer up. Apply Constellation again, and again hit the "Random Seed" button. Hit okay.
Finally, highlight the top mask layer and apply Constellation again. Hit "Random Seed" again, and hit okay.
Close out the top three mask layers, leaving the bottom mask layer open.
Edit > Copy merged
Open Animation Shop, right-click on the desktop layer and paste as a new animation.
Return to PSP. Close out the bottom mask layer and open the next one up.
Edit > Copy merged
Return to Animation Shop and Edit > Paste > After Current Frame
Once again, back to PSP. Close out the open mask layer and then open the one above.
Edit > Copy merged
Back to Animation Shop and Edit > Paste > After Current Frame.
Finally, back once more to PSP. Close out the current mask layer and open the top mask layer.
Edit > Copy merged.
Return to Animation Shop and Edit > Paste > After Current Frame.
Still in Animation Shop, Edit > Select All
Right-click on the top bar of your animation and choose "Frame Properties." Change that number to 25.
View > Animation. Save as a .gif and we're done! Thanks so much for trying my tuts!! Have a great day.
.


No comments:
Post a Comment