
You will also need:
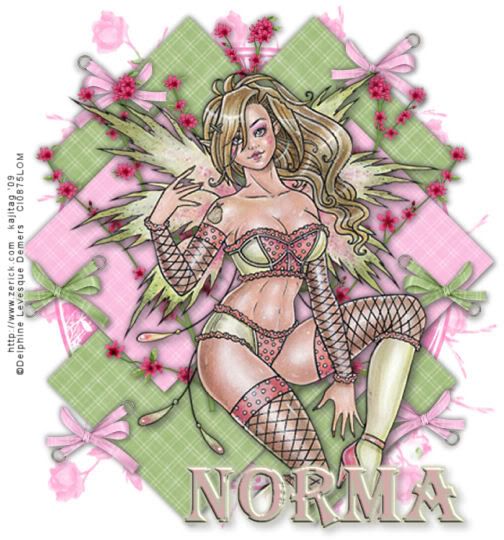
A tube of your choice. I'm using the fantastic artwork of Delphine Levesque Demers. You must have a license to use her work. You may purchase that license at CILM. It's impossible to choose one favorite artist, but Delphine Demers is certainly ONE of mine!
Scrap kit is by Norma of Swheat Creations. It's a PTU kit, and it's called simply Pretty N Pink! As soon as I saw this kit, I thought of the tube I'm using. A perfect match!
Filters: Eye Candy 4000 > Gradient Glow
Font: I used Algerian
Supplies: The mask, which is the art of the always-wonderful Kirsty! You can find the mask here!
Let us create!!
Open your mask and minimize in PSP. Alternatively, you could add your mask to your PSP masks folder, so you'd have it for use later. Always give proper credit where you can, though, as you collect your PSP booty!
Create a new file, 700 x 750, white.
Open Bkg13. Copy and paste as a new layer.
Apply your mask. INVERT TRANSPARENCY CHECKED! Delete the mask layer, answer "yes" to the pop-up question, and merge group.
I added my tube at this point. It was good to have it there, to judge where the rest of the elements and papers were going. So add your tube. Resize, position and drop shadow as is your preference. If your tube seems to go off the page at the bottom, as mine did, then:
Grab your lasso tool, set on freehand, feather set at 23. Highlight your tube layer and draw your selection around the bottom-most portions of your tube. It will be in a downward curve, like a smile. Draw it down and around, back up to the left starting point and finish your selection. Hit delete once or twice, depending upon how much you want to remove. Selections > Select none.
Open Bkg7. Resize 35%. Copy and paste as a new layer. Rotate either way, 45°. Place on the upper left of your canvas. See my tag for placement reference. Duplicate this layer and Image > Mirror. Duplicate the original again and Image > Flip. Then duplicate this layer and Image > Mirror.
Drop shadow each of the smaller paper layers, then merge all four layers down.
Open Bkg5. Resize 35%. Copy and paste as a new layer. Rotate either way, 45°. Place in the middle to the left, and above the four green paper layers. Again, for placement purposes, use my tag as a reference. Duplicate this layer and Image > Mirror. Drop shadow each of the pink paper layers and then merge those two layers down. Position to your liking.
It may seem the mask isn't centered well enough for you. Feel free to move the mask around a bit as you think it may be needed.
Open FlowerBranch. Resize 40%. Copy and paste as a new layer. Rotate left 10°. Place to the left of your tube, below the tube and above the pink papers. See my tag for placement. Duplicate this layer and Image > Mirror. Copy and paste the original again as a new layer. Do not rotate this branch, but position it between the other two branch layers and up a bit, so it's centered and appears above the tube's head. Drop shadow your FlowerBranch layers and merge these layers down.
Open Eyelet Bow 3. Resize 40%. Copy and paste as a new layer. Position where you like. I tended to apply the pink ones to the green paper, and vice-versa. So duplicate this layer and Image > Mirror. If one of your Eyelet Bows ends up above any part of your tube or other elements besides the papers, drag that layer down in the layer palette to below the branches layer. Duplicate one of your pink bow layers and Image > Flip. Position to your liking and duplicate this layer and Image > Mirror. Position all your eyelet bows as you like, dragging them down in the layer palette as needed. Drop shadow your pink eyelet bows.
Open Eyelet Bow 2. Resize 40%. Copy and paste as a new layer, on the pink paper. See my tag for placement. Duplicate this layer and Image > Mirror. Again, if the bows appear above your tube or other elements besides the paper, drag it down in the layer palette to below the branches layer. Drop shadow each of these eyelet bows.
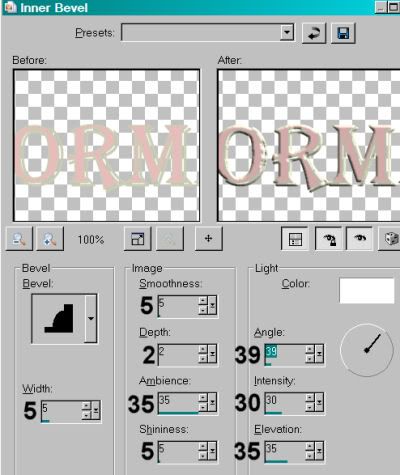
Add your name. I used color #e8bcbb for the fill, and #cccdb5 for the stroke. Stroke size is 2. I added an Inner Bevel, settings shown below. NOTE: This is not the same Inner Bevel I have been using over and over, so take note of the settings:
I then added Effects > Plugins > Eye Candy 4000 > Gradient Glow set at 4 - 0 - 100, color #cccdb5.
Drop shadow your name.
Add your copyright, license information if applicable and taggers'/watermark.
Resize your tag to the size of your choice. Merge your layers, and save! We're done! I hope you enjoyed this tut!
.


No comments:
Post a Comment