

You will also need:
Animation Shop - I've found it here! This is from CNET, so it's a safe download, too!
A tube your choice. I'm using the sexy artwork of Gennadiy Koufay. You must have a license to use his work. You may purchase that license at CILM.
Scrap kit is by Crystal, of Scrappy Inspirations. It's a PTU kit, available at Scrap It Sassy. Crystal is currently (and until April 15) the featured designer at Scrap It Sassy. As a result, all of her designs are now 50% off!! Get 'em while they're hot! This particular kit is called A Little Old Fashioned.
Also, here's a good place to mention that Scrap It Sassy as a whole is having a whopping Spring Cleaning Sale, with prices in effect until the first of May!!!
Filters: Mura's Meister > Copies, VM Natural > Sparkles
Font: I used OttumHmkBold
Supplies: The mask, by the fabulous mask-maker (lol) Essex Girl!! You can get this mask here!
Let's create!!
Open your mask and minimize in PSP. Alternatively, you could file the mask in your PSP masks file for use later. Just be sure to give credit where it's due!
Open a new image, 700 x 700, white.
Open frame4. Copy and paste as a new layer. Give this a very soft drop shadow, so you can see the lace.
Add your tube. Resize, position and drop shadow to your taste.
Highlight your frame layer. Grab your magic wand, click inside the frame and Selections > Modify > Expand by 1. Selections > Invert.
Highlight your tube layer. Grab your eraser brush and erase any part of the tube you don't want overlapping the bottom of the frame. Selections > Select none.
Open rose1. Resize 35%. Copy and paste as a new layer.
Effects > Plugins > Mura's Meister > Copies with the following settings:
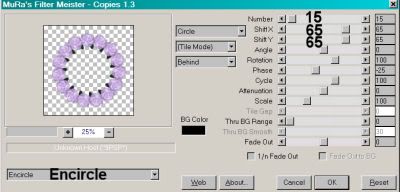
Hit okay.
Drag this layer below your frame layer.
Open leaf. Resize 35%. Copy and paste as a new layer. Rotate left 35°. Drop shadow.
Effects > Plugins > Mura's Meister > Copies with the same settings as above.
Drag this layer under the rose layer.
Open paper4. Copy and paste as a new layer. Drag this layer to just above the white background.
Apply your mask. INVERT TRANSPARENCY CHECKED!! Delete the mask layer, answer "yes" to the pop-up question, and merge group.
Take your selection tool, set on rectangle, and draw a square selection on top of the frame. Highlight your leaf layer. Hit delete. Selections > Select none.
Open the doodle. Copy and paste as a new layer. This should be just above the mask layer in the layer palette.
Open butterfly1. Resize 75%. Copy and paste as a new layer. Position where you'd like it. See my tag for reference. Drop shadow your butterfly.
Add your name. I used color #eedcff for the fill. Stroke set on 2, color #77519a. I added the following inner bevel:
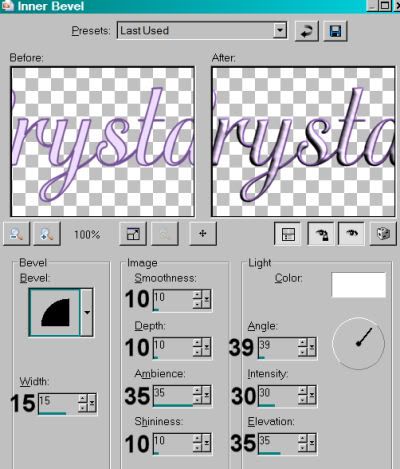
Drop shadow your name.
Add your copyright, license information if applicable and taggers'/watermark.
Resize your tag to the size of your choice. At this point you could stop, if you choose not to animate. Just merge your layers, and save!
A N I M A T I O N
Go to your frame layer. Duplicate this layer twice, for a total of three layers.
Highlight the bottom of these layers.
Draw another square selection around *just the outside* of the frame. Selections > Invert.
Effects > Plugins > VM Natural > Sparkle with the following settings:
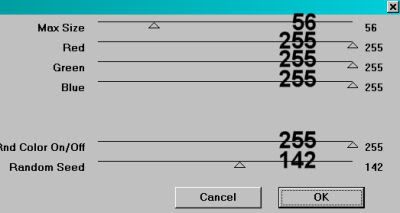
Hit okay.
Highlight the middle frame layer and do the same thing, but change the "Random Seed" setting to something... well... random!! You can play with the size slider, too, if you like.
Hit okay.
Highlight the top frame layer and add sparkles again, changing the Random Seed and/or Size setting again.
Hit okay.
Now, I'm sorry if this is a repeat for you, but in case you've NOT done any of my tuts with this Sparkle filter, I'll say it anyway: Whenever I use VM Natural > Sparkle, I do it twice. So go through the three layers again the same way.
Selections > Select none.
Close out the top two frame layers. Make sure the bottom frame layer is open.
Edit > Copy merged
Open Animation Shop, right-click on the desktop area, and paste as a new animation.
Return to PSP. Close out the bottom frame layer, and open the middle frame layer.
Edit > Copy merged.
Return to Animation Shop and Edit > Paste > After Current Frame.
Once more back to PSP. Close out the middle frame layer and open the top frame layer.
Edit > Copy merged.
And again, back to Animation Shop. Edit > Paste > After Current Frame.
Edit > Select All.
Right-click on the bar on top of your animation and choose "Frame Properties." Change this number to 35.
View > Animation. And we're done! I hope you've enjoyed this tutorial! Thanks for stopping by!
.


Kajira, this is absolutely stunning! Thank you so very much for featuring one of my kits! It's awesome!!
ReplyDeleteHugs,
Crystal