
This is just a guideline, and I know not everyone is going to be using the same tube... so use your imagination as you go!
You will also need:
Animation Shop. This is from now a pay-for product, through Corel. That changed a while ago. I don't know why!!
[Please Note: The animation in this tutorial is minimal: The sparkle in the eye. You can very easily go without the animation if you choose not to do it.]
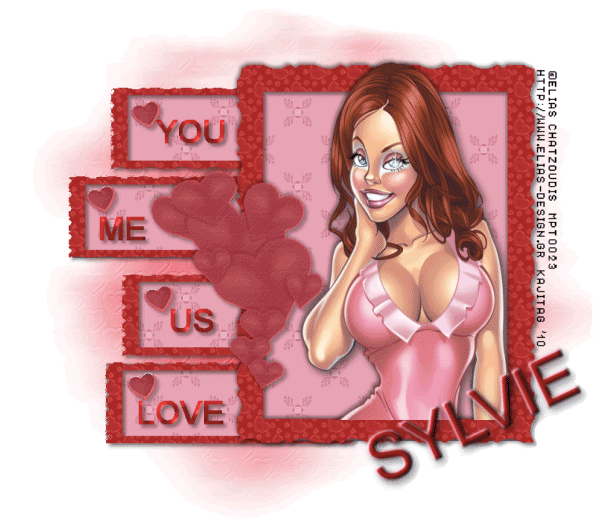
A tube of your choice. I'm using the great artwork of Elias Chatzoudis. You must have a license to use his work. You can get that license *and* his art at My PSP Tubes.
The scrap kit is by Sylvie, of Fantasy Moments. This is a FTU kit called "For Your Love."
This kit is available through Rapid Share, a site with which I have numerous problems. It took me about 15 tries to get this kit. So if this happens to you, too, please know that you can use ANY kit with this tutorial, or even just use your flood fill tool with your chosen colors.
The template, which I got from Trish at Dreamland Designs. This particular template was offered a year ago, and you may find it here.
Filters: Eye Candy 4000 > Gradient Glow
Font: I used Arial.
Supplies: The mask and the sparkle, both available here. The sparkle is obviously from someone named Laura, but I don't know exactly WHICH Laura, so... basically it's another "unknown" file. And the mask is by the wonderful-yet-MIA Becky! Thanks so much to both these lovely ladies for their contributions to the PSP community!
Okay... I have a feeling this is going to be difficult to put into words, so please bear with me!
Open your supplies and minimize in PSP. Alternatively, you could save them in with those already in your masks file, for use at a later date!
Open the template. Window > Duplicate. Close the original template. Resize to a width of 650 pixels, a height of 548 pixels.
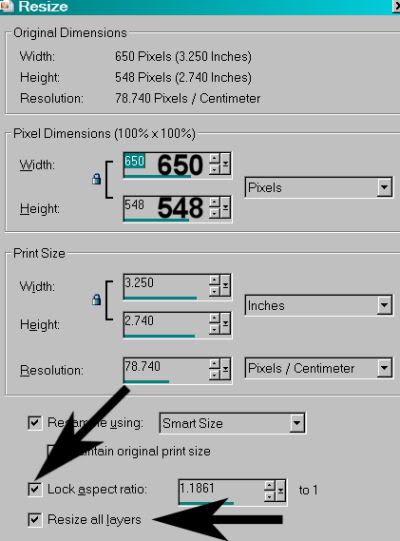
Hit okay.
Change your canvas size to 800x700.
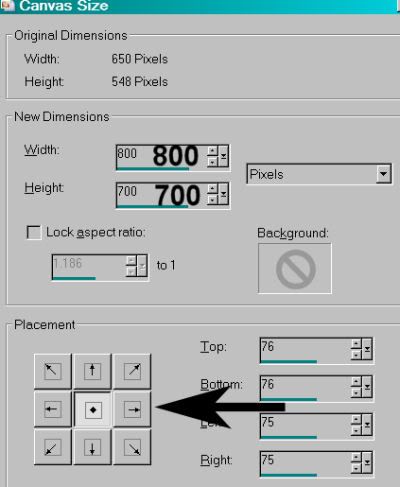
Hit okay.
Highlight your white background layer. Grab your flood fill tool and fill the background with white.
Delete your copyright layer (on top), and the Frame2 and BLACK SHAPE 1 layers (just above your white background layer).
Highlight your Large Hearts layer.
Open Paper-12. Copy and paste as a new layer.
[Please Note: If you're using just your colors of choice, be sure to add a new raster layer, then flood fill this area with your color as a substitute for the paper. This holds true with all the paper layers in this tutorial. And face it, most of this tutorial is reliant upon paper layers....]
Again, highlight the Large Hearts layer. Grab your magic wand and click on the canvas outside the hearts. Selections > Invert.
Highlight your Paper-12 layer. Hit delete. Selections > Select None.
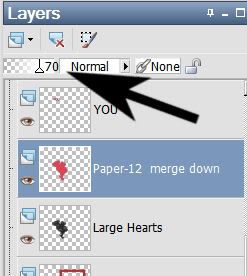
Reduce the opacity on this paper layer to 70.
Merge your paper layer down with your Large Hearts layer. Drop shadow.
Highlight your Little Hearts layer.
Again, open paper-12. Copy and paste as a new layer. Highlight your Little Hearts layer again. Grab your magic wand and click on each of the little hearts. Selections > Invert.
Highlight your new Paper-12 layer. Hit delete. Selections > Select None.
Reduce the opacity on this paper layer to 70.
Merge this paper layer down with your Little Hearts layer. Drop shadow.
Highlight your Frame 1 layer.
Add your tube. Resize, position, and drop shadow to your taste.
Highlight your frame layer. Grab your magic wand and click inside the frame.
Selections > Modify > Expand by 1. Selections > Invert
Highlight your tube layer. Grab your eraser brush and erase any portion of the tube you don't want showing at the sides or on the bottom of the frame.
Selections > Select none.
Highlight your TOP SHAPE 1 layer.
Open Paper-30. Copy and paste as a new layer.
Back to the shape layer. Grab your magic wand and click outside the shape.
Highlight your Paper-30 layer. Hit delete. Selections > Select None.
Merge these two layers down.
Highlight the RECTANGLE SHAPES layer.
Again, open Paper-30, copy and paste as a new layer.
Back to the RECTANGLE SHAPES layer. Grab your magic wand, click outside all the rectangles.
Highlight your new Paper-30 layer and hit delete. Selections > Select none.
Merge these two layers down.
Highlight your Rectangle Frames layer.
Open Paper-4. Copy and paste as a new layer.
Back to the Rectangle Frames layer. Grab your magic wand and click inside AND outside the four rectangle frames.
Highlight again Paper-4 layer and hit delete. Selections > Select None.
Merge your Paper-4 layer with your Rectangle Frames layer. Drop shadow.
Highlight your Frame 1 layer again.
Open Paper-4 again. Copy and paste as a new layer.
Back to the Frame 1 layer. Grab your magic wand and click inside and outside the frame.
Return to your new Paper-4 layer and hit delete. Selections > Select None.
Merge this Paper-4 layer down with your Frame 1 layer. Drop shadow your frame.
Highlight the white background layer.
Open Paper-15. Resize to 800x700. Copy and paste as a new layer.
Apply your mask. Delete mask layer, answer "yes" to the pop-up question, and merge group.
I found I wanted to move the mask layer a bit to the right at this point. You may, or may not. Up to you!
At this point I went to the top and started adding my text. I used Arial and just typed out something simple. You may use "You Me Us Love" or anything you like. I used color #ab2927. Drop shadow your text.
Go back to the top again and add your name. I used color #ab2927 again as the fill, no stroke.
Effects > Plugins > Eye Candy 4000 > Gradient Glow set at 4-25-100 with color #e8a3b6.
Hit okay.
I added the following bevel:
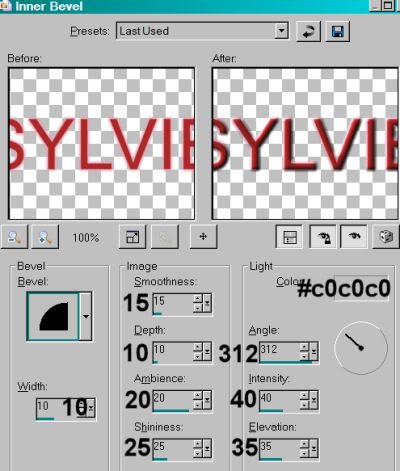
Hit okay.
Drop shadow your name.
I rotated mine 25° left. Position as you like.
It was at this point, with the drop shadow already in place on all of my text, that I decided to add the above bevel also to the "You Me Us Love" text. That, again, is up to you.
Resize your canvas to a size with which you are comfortable.
Add your copyright, license information if applicable, and taggers'/watermark.
If you choose not to animate, you're now done, and you can merge your layers and save!
A N I M A T I O N
Go again to the top layer of your tag.
Open the SparkleLauras I included with the supplies. Resize 50%. Copy and paste as a new layer.
Position over the eye area of your tube. (Actually, it doesn't need to be positioned correctly at this point... but I just did it. lol.)
Making sure you're on that sparkle layer, Edit > Copy.
Open Animation Shop. Right-click on the desktop area, and paste as a new animation.
Effects > Insert Image Transition with settings like so:
Hit okay. You should now have 18 frames.
Go back to PSP and close out the sparkle layer. Edit > Copy Merged.
Return to Animation Shop and once more, right-click on the desktop area and paste as a new animation.
Duplicate this frame until you have a total of 18 frames. Make sure your bottom slider is positioned at the first frame.
Go to the sparkle animation you created and Edit > Select All. Edit > Copy.
Return to the main tag you just duplicated and Edit > Select All. Edit > Paste > Into Selected Frame.
NOW!! lol. Position your sparkle in the area of the eye on your tube. Release your mouse button.
View > Animation.
Lookie there! You're done! I sincerely hope I was able to put this into words well enough for you to follow and understand! Thank you for giving this one a try!!
.


No comments:
Post a Comment