
This is just a guideline, and I know not everyone is going to be using the same tube... so use your imagination as you go!
You will also need:
Animation Shop. This is from now a pay-for product, through Corel. That changed a while ago. I don't know why!!
A tube of your choice. I'm using the glamorous artwork of Jennifer Janesko. You must have a license to use her work. You can get that license and art at C.I.L.M.
The scrap kit is by Vivian, of Sinfully Blissful Scraps. This is a FTU kit called "Into The Night." This is was previously a PTU kit, which Viv put on FTU status. It's the third one down in that post. Click the image to download.
Filters: Eye Candy 4000 > Gradient Glow, VM Natural > Sparkle
Font: I used SecejaPL.
Supplies: The mask and the sparkle, which you may find here. The mask is from Boundless Bliss, which has recently dropped off the face of the blogosphere. I don't know where she went, but I thank her for her mask!! The sparkle? I don't know the origin. I have many sparkles, all the same basic look, just differing colors and sizes. I don't know where most of them came from. If anyone knows (somehow), let me know so that I may give proper credit and thanks!!
Okay, let's do this!
Open your supplies and minimize in PSP. Alternatively, you could save them in with those already in your PSP files, for use at a later date!
Open a new canvas, 700 x 700, white.
Open frame. Copy and paste as a new layer.
Add your tube. Resize, position, and drop shadow to your taste.
Highlight your frame layer. Grab your magic wand and click inside the frame. Be sure to click in both the empty areas: the top and the bottom!
Selections > Invert
Highlight your tube layer. Grab your eraser brush and erase any portion of the tube you don't want showing at the sides or on the bottom of the frame.
Selections > Select none.
Highlight your white background layer.
Open paper4. Resize to 700x700 pixels. Copy and paste as a new layer.
Apply your mask. Delete mask layer, answer "yes" to the pop-up question, and merge group.
Open nightcharm. Resize 40%. Copy and paste as a new layer. Position in the top right area of your frame. See my example for placement reference. It's up to you and your choice of tube as to where to put it. Drop shadow.
Open bow2. Resize 40%. Copy and paste as a new layer. Position as though the bow is holding the nightcharm onto the frame. See my example for placement reference. Drop shadow.
Drop shadow your frame.
Open the sparkle provided in your supplies. Copy and paste as a new layer. Position this sparkle as close to the center of the flower in the frame as you can. This is just meant as an accent.
Duplicate your sparkle layer and Image > Free Rotate 90° either direction. Merge these two layers down.
Okay, here's a long and drawn out process. You have been warned! I find it easier to do these things on the top layer. Your process may be different. These layers are going to eventually be merged down and dragged below your mask layer.
Open doodle. Resize 150%. Copy and paste as a new layer.
Duplicate this layer. Rotate 35° right. Duplicate *this* layer (Copy of Copy). Rotate 35° right.
Duplicate *this layer* (Copy 2 of Copy). Rotate 35° right. Duplicate *this* layer (Copy 3 of Copy). Rotate 35° right.
Finally, duplicate *this* layer (Copy 4 of Copy). Rotate 15° right.
Merge all these doodle layers down. Drag this layer below your mask layer.
You may notice it's not exactly centered. It pokes up toward the top more than it shows on the bottom. Move your doodle layer to your taste.
Go back to the top and add your name. I used black, as you can see.
Effects > Plugins > Eye Candy 4000 > Gradient Glow set at 4-0-100 with color #c0c0c0.
Drop shadow your name.
Resize your canvas to a size with which you are comfortable.
Add your copyright, license information if applicable, and taggers'/watermark.
If you choose not to animate, you're now done, and you can merge your layers and save!
A N I M A T I O N
Highlight your mask layer. Duplicate this three times, for a total of four mask layers.
Now highlight the bottom mask layer.
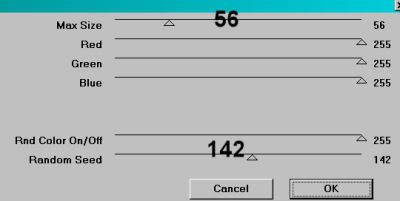
Effects > Plugins > VM Natural > Sparkle
Use the default settings. Mine started like so:
Hit okay.
Highlight the next mask layer up.
Add Sparkle again, this time moving the "random seed" and/or the "max size" to something different. You can watch on the screen provided in the plug-in to see the effect you're getting, so move the sliders 'til you get what you like.
Hit okay.
Highlight the next mask layer up.
Add Sparkle again, and again moving "random seed" and/or "max size."
Hit okay.
Highlight the top mask layer.
Add Sparkle once more, again moving "random seed" and/or "max size."
Now, whenever I use this filter, I give it a double dose, to get more sparkles. So go back, layer by layer, and do the sparkle thing again. You don't HAVE to, of course. Just what I do! When finished, then:
Close out the top three of the mask layers, leaving the bottom layer open.
Edit > Copy Merged.
Open Animation Shop. Right-click on the desktop area and paste as a new animation.
Return to PSP. Close out the bottom mask layer, and open the next mask layer up.
Edit > Copy merged.
Back to Animation Shop. Edit > Paste > After Current Frame.
Return again to PSP. Close out the mask layer you just worked with, and open the next mask layer up.
Edit > Copy merged.
Again, back to Animation Shop. Edit > Paste > After Current Frame.
Finally, return to PSP one last time, and close the current mask layer and open the top mask layer.
Edit > Copy merged.
Return once more to Animation Shop. Edit > Paste > After Current Frame.
Still in Animation Shop, Edit > Select All.
Right-click on the bar above your animation and choose "Frame Properties." Change this number to 27.
View > Animation.
Et, voila! We're done! Thank you for using my tutorials! I appreciate you for it! Leave a shout out if you're feeling talky! :)
.


No comments:
Post a Comment