
This is just a guideline, and I know not everyone is going to be using the same tube... so use your imagination as you go!
You will also need:
Animation Shop. This is from now a pay-for product, through Corel. That changed a while ago. I don't know why!!
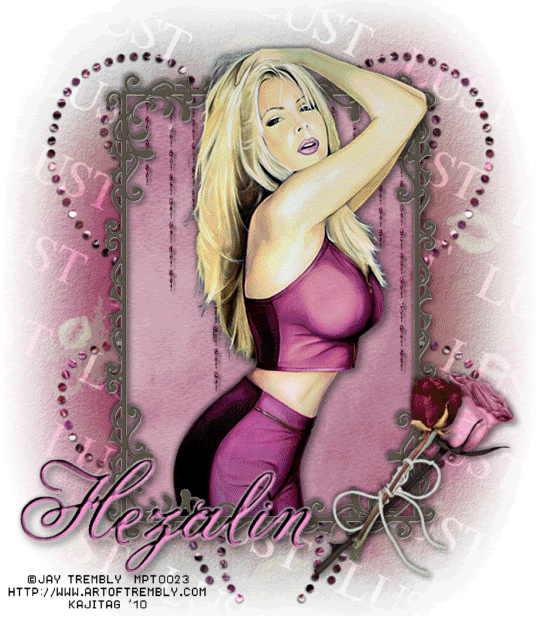
A tube of your choice. I'm using the great artwork of Jay Trembly. You must have a license to use his work. You can get that license and art at C.I.L.M. If you notice I put an MPT license on mine. I bought this tube from MPT when Jay was with them. He has since moved to C.I.L.M.
The scrap kit is by Hezalin, of Heza Scraps. This is a PTU kit, available at Treasured Scraps. This kit is called "Craving a Dark Heart." This kit is currently on sale for $1.00!! Get it while you can!!
Filters: Eye Candy 4000 > Gradient Glow, Eye Candy 4000 > HSB Noise, dsb Flux > Bright Noise
Font: I used Anglia Script Enhancements.
Supplies: The mask is all for this one, found here. I do not know from whence I got this mask. If anyone knows this info, PLEASE let me know so that I can give proper credit! Thanks a bunch!
Okay, get going!
Open your mask and minimize in PSP. Alternatively, you could save it in with those already in your masks file, for use at a later date!
Open a new canvas, 700 x 800, white.
Open Frame5. Rotate it 90° either way. Resize 80%. Copy and paste as a new layer.
Add your tube. Resize, position, and drop shadow to your taste.
Highlight your frame layer. Grab your magic wand and click inside the frame. This is a very tricky frame! Be sure to click in all the little nooks and crannies that the swirls cause in the frame!
Selections > Modify > Expand by 2. Selections > Invert
Highlight your tube layer. Grab your eraser brush and erase any portion of the tube you don't want showing at the sides or on the bottom of the frame.
Selections > Select none.
Highlight your white background layer.
Open Paper19. Resize to 800x800 pixels. Copy and paste as a new layer.
Apply your mask. Delete mask layer, answer "yes" to the pop-up question, and merge group.
Open Rose. Resize 50%. Copy and paste as a new layer. Rotate 45° right. Position in the bottom left corner of your frame. See my example for placement reference. It's up to you where to put it. Drop shadow.
Open Flower3. Resize 50%. Copy and paste as a new layer. Rotate 45° right. Drag this layer below your first rose layer. Drop shadow
Drop shadow your frame.
Open PearlCurtain1. Copy and paste as a new layer. In your layer palette, drag this below your frame layer. Position it so that it looks as though it may be attached to the inside top of the frame.
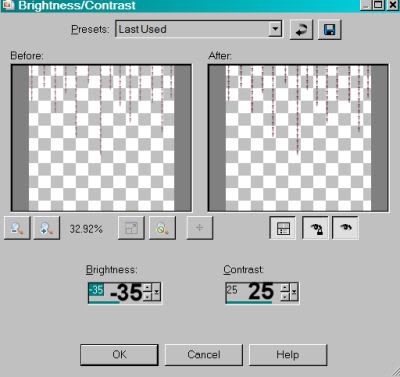
Adjust > Brightness and Contrast > Brightness/Contrast with the following settings:
Grab your pick tool...

...and squish together the sides, then pull the curtain downward until you get it to fit in the frame's area, and you feel you like the length.
Highlight you white background layer.
Open GlitterDoodle1. Copy and paste as a new layer. Rotate 20° left. Duplicate this layer. Image > Mirror. Merge down these two layers.
Go back to the top and add your name. I used color #b65e92 as the fill and the stroke, stroke set on 2.
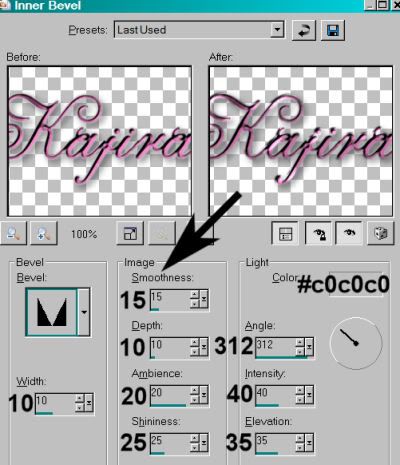
I added the following bevel:
Hit okay.
Effects > Plugins > Eye Candy 4000 > Gradient Glow set at 3-25-100 with color #c0c0c0.
Drop shadow your name.
Resize your canvas to a size with which you are comfortable.
Add your copyright, license information if applicable, and taggers'/watermark.
If you choose not to animate, you're now done, and you can merge your layers and save!
A N I M A T I O N
I've animated two layers in this one. The GlitterDoodle1 layer and the PearlCurtain1 layers. The PearlCurtain1 layer doesn't really show up well. I'm including the instruction for both, but you don't have to do the PearlCurtain1 if you don't want to.
Highlight your PearlCurtain1 layer. Duplicate this three times, for a total of four PearlCurtain1 layers.
Do the same with your GlitterDoodle1 layer.
Now highlight the bottom GlitterDoodle1 layer.
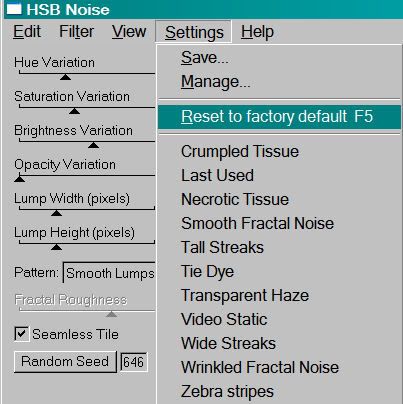
Effects > Plugins > Eye Candy 4000 > HSB Noise
Use the default settings. If you're not sure what they are, they are listed under "Settings."
Hit okay.
Highlight the next GlitterDoodle1 layer up.
Add HSB Noise again, this time clicking on "random seed."
Hit okay.
Highlight the next layer up of the GlitterDoodle1 layers.
Add HSB Noise again, clicking again on "random seed."
Hit okay.
Highlight the top GlitterDoodle1 layer.
Add HSB Noise once more, again clicking on "random seed."
Go to the bottom layer of the PearlCurtain1 layers.
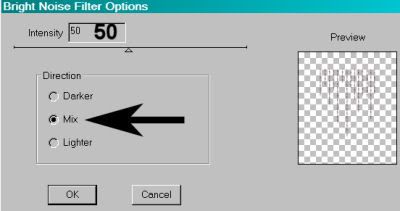
Effects > Plugins > dsb Flux > Bright Noise with the following setting:
Hit okay.
Highlight the next PearlCurtain1 layer up.
Add Bright Noise again, this time clicking on "mix" a couple times.
Hit okay.
Highlight the *next* PearlCurtain1 layer up.
Add Bright Noise again, again clicking on "mix" a couple times.
Highlight the top PearlCurtain1 layer.
Add Bright Noise a last time, clicking on "mix" a couple times.
Close out the top three layers of the GlitterDoodle1 and the PearlCurtain1 layers, leaving the bottom layers open.
Edit > Copy Merged.
Open Animation Shop. Right-click on the desktop area and paste as a new animation.
Return to PSP. Close out the bottom Glitter Doodle1 and PearlCurtain1 layers, and open the next layers up.
Edit > Copy merged.
Back to Animation Shop. Edit > Paste > After Current Frame.
Return again to PSP. Close out the layers you just worked with, and open the next Glitter Doodle1 and PearlCurtain1 layers up.
Edit > Copy merged.
Again, back to Animation Shop. Edit > Paste > After Current Frame.
Finally, return to PSP one last time, and close those two Glitter Doodle1 and PearlCurtain1 layers, and open the top layers.
Edit > Copy merged.
Return once more to Animation Shop. Edit > Paste > After Current Frame.
View > Animation.
Phew! You're done! Thank you for using my tutorials! I appreciate that you appreciate it!
.


No comments:
Post a Comment