

This is just a guideline, and I know not everyone is going to be using the same tube... so use your imagination as you go!
You will also need:
Animation Shop. This is from now a pay-for product, through Corel. That changed a while ago. I don't know why!!
A tube of your choice. I'm using the gorgeous artwork of Jennifer Janesko. You must have a license to use her work. You can get that license and art at C.I.L.M.
The scrap kit is by Tina, of Tina's Magical Scrap World. This is a PTU kit, available exclusively at Sophisti-Scraps. This kit is called "Sophistication." This kit is going to be used in this tutorial, as well as the next tutorial, "Painting the Town Red," that I'm going to post. It's also on sale right now (January 11, 2010). The store sale was scheduled to end, but I connected with Tina and I think it's been extended!! Hurry while the gettin's good!! :)
Filters: Eye Candy 4000 > Gradient Glow
Font: I used Edwardian Script.
Supplies: Two masks used in this one, both found here. One is the Becky mask I've used a lot of late, and the other the 20-20 mask. I don't know where Becky's gone, and have no idea who came up with the 20-20 mask. If anyone knows this info, PLEASE let me know so that I can give proper credit! Thanks a bunch!
Okay, let's do it!
Open your masks and minimize in PSP. Alternatively, you could save them in with those already in your masks file, for use at a later date!
Open a new canvas, 700 x 700, white.
Open CircleFrame3. Copy and paste as a new layer.
Add your tube. Resize, position, and drop shadow to your taste.
Highlight your frame layer. Grab your magic wand and click inside the frame.
Selections > Modify > Expand by 1. Selections > Invert
Highlight your tube layer. Grab your eraser brush and erase any portion of the tube you don't want showing at the sides or on the bottom of the frame.
Selections > Select none.
Highlight your white background layer.
Open Paper1. Copy and paste as a new layer.
Again, highlight your frame layer and again, grab your magic wand and click inside.
Selections > Modify > Expand by 15. Selections > Invert.
Highlight your Paper1 layer and hit delete.
Selections > Select None.
Highlight the white background layer.
Open Paper2. Copy and paste as a new layer.
Apply your 20-20 mask. Delete mask layer, answer "yes" to the pop-up question, and merge group.
After I applied the mask, I did some "refining" (for lack of a better term) to the effect, so the color didn't slam right up to the edge of the canvas.
I grabbed my lasso tool, set on freehand, feather set at 20. Then did my best to draw a circle around the outside edges of the canvas (this is all on the mask layer). Selections > Invert. Hit delete. Then Selections > Select None. This took me a couple swipes, because I can't draw a perfect (nor near perfect) circle for the life of me! :)
Open CornerFlower1. Rotate 90° left, ALL LAYERS CHECKED! Resize 60%. Copy and paste as a new layer. Position in the bottom left corner of your frame. See my example for placement reference. It's up to you where to put it. Drop shadow.
Drop shadow your frame.
This next part is easier (at least for me) if you go to the top layer and start there.
Open SeedBeads1. Copy and paste as a new layer. Position to the left top, so the outer edges are kinda in that corner.
Duplicate this layer. Image > Mirror. Position this to the right top, if it's not where you like it already. Merge these two layers down.
Duplicate *this* layer. Image > Flip. Merge these two layers down.
Apply your BeckyMask_023. Delete the mask layer, answer "yes" to the pop-up question, and merge group.
In your layer palette, drag this layer down to just above your black paper mask layer.
Duplicate this layer and merge down as much as needed (I think I did this about four times) to make the seed beads stand out more than they are now. Make sure all these layers are merged!
Go back to the top and add your name. I used color #d00000 as the fill, black as the stroke, stroke set on 2.
I added the following bevel:
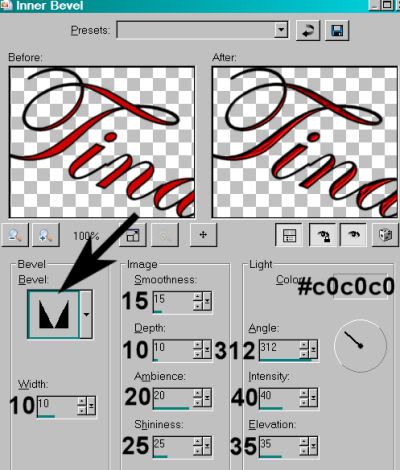
Hit okay.
Effects > Plugins > Eye Candy 4000 > Gradient Glow set at 3-25-100 with color #c0c0c0.
Drop shadow your name.
I rotated mine 20° right. Position as you like.
Resize your canvas to a size with which you are comfortable.
Add your copyright, license information if applicable, and taggers'/watermark.
If you choose not to animate, you're now done, and you can merge your layers and save!
A N I M A T I O N
Highlight your SeedBeads1 layer. Duplicate this three times, for a total of four SeedBeads1 layers.
Now highlight the bottom SeedBeads1 layer.
Adjust > Add/Remove Noise > Add Noise with the following settings:
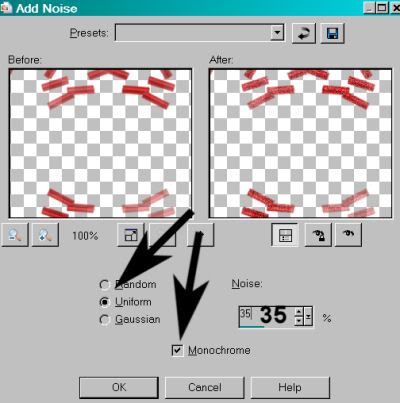
Hit okay.
Highlight the next SeedBeads1 layer up.
Add Noise again, this time changing the intensity to 40.
Hit okay.
Highlight the next layer up of the SeedBeads1 layers.
Add Noise again, this time changing the intensity to 45.
Hit okay.
Highlight the top SeedBeads1 layer. Add Noise once more, this time changing the intensity to 50.
Hit okay.
Close out the top three layers of the SeedBeads1 layers, leaving the bottom layer open.
Edit > Copy Merged.
Open Animation Shop. Right-click on the desktop area and paste as a new animation.
Return to PSP. Close out the bottom SeedBeads1 layer, and open the next layer up.
Edit > Copy merged.
Back to Animation Shop. Edit > Paste > After Current Frame.
Return again to PSP. Close out the layer you just worked with, and open the next SeedBeads1 layer up.
Edit > Copy merged.
Again, back to Animation Shop. Edit > Paste > After Current Frame.
Finally, return to PSP one last time, and close that SeedBeads1 layer, and open the top layer.
Edit > Copy merged.
Return once more to Animation Shop. Edit > Paste > After Current Frame.
View > Animation.
You're done! I *do* hope you're happy with your results! And thanks for trying my tutorials!
.


No comments:
Post a Comment