
This is just a guideline, and I know not everyone is going to be using the same tube... so use your imagination as you go!
You will also need:
Animation Shop. This is from now a pay-for product, through Corel. That changed a while ago. I don't know why!!
A tube of your choice. I'm using the fantastic artwork of Keith Garvey. You must have a license to use his work. You can get that license and art at My PSP Tubes.
The scrap kit is by Bluey, at Bluedream Designs. This is a FTU kit called simply "Valentine." This is a kit she made last year, but it's still a good one! Continue to leave lots of love for the freebies!
Filters: Mura's Meister > Copies, Eye Candy 4000 > Gradient Glow, dsb Flux > Bright Noise
Font: I used A&S Christmas Script.
Supplies: Just the mask, which you may find here. First time in my recollection that I've used this mask. That doesn't make sense, but I don't remember it! lol. I don't know who shared this mask with me, so if you do, or if it's yours, let me know so that I may give credit where it's due! Thanks!!
Let's get this baby rockin'!!
Open a new canvas, 800 x 700, white.
Open FlowerPearls2. Copy and paste as a new layer.
Effects > Plug-ins > Mura's Meister > Copies with the following settings:
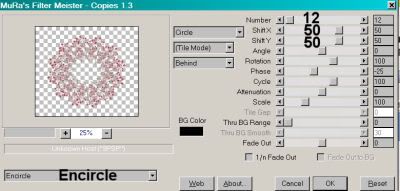
Hit okay.
Effects > Plug-Ins > Eye Candy 4000 > Gradient Glow set at 3-0-100, color #e6dede.
Drop shadow.
Add your tube. Resize, position, and drop shadow to your taste.
Highlight your white background layer.
Open paper8. Resize to 800x700. Copy and paste as a new layer.
Apply your mask. Delete mask layer, answer "yes" to the pop-up question, and merge group.
Back to the top of your layer palette -- This part might be weird, if you're not using the same tube. But again, tutorials are a guide. Hopefully this will help?!?!
Open FlowerRose, FlowerRose1 and FlowerRose2. Resize all three by 50%. Copy all and paste as new layers. Duplicate FlowerRose1.
FlowerRose1: Rotate 75° right. Position toward the bottom right area of your canvas. In your layer palette, drag this layer below your tube layer. If you're using the same (or similar) tube, position it so that it will stick out from under the candy box. Drop shadow.
FlowerRose: Rotate 65° right. Position just above the previous rose. Drop shadow.
FlowerRose2: Rotate 50° right. Position just above the previous rose. Drop shadow.
Second FlowerRose1: Rotate 40° right. Position in your tag so that it is just below the FlowerRose2 layer. In your layer palette, drag this layer below the FlowerRose2 layer. Drop shadow.
Open Flower4. Copy and paste as a new layer. Resize 130%. Position in the center of the FlowerPearls2 circle/frame layer that you created with Copies. Drop shadow.
Open Butterfly4. Resize 65%. Copy and paste as a new layer. Image > Mirror. Position to the side of your canvas. See my example for placement reference. Add the same Gradient Glow as before. Drop shadow.
Go back to the top and add your name. I used color #721927 as the fill. No stroke was used.
No bevel! Surprise! LOL!!
Again, apply the same Gradient Glow as before to your name.
Drop shadow your name.
Resize your canvas to a size with which you are comfortable.
Add your copyright, license information if applicable, and taggers'/watermark.
If you choose not to animate, you're now done, and you can merge your layers and save!
A N I M A T I O N
Highlight your name layer.
Grab your magic wand and click inside each of your letters. Make sure you get all the swirls and swashes that your particular font may include.
Duplicate this layer twice, for a total of three name layers.
Now highlight your bottom name layer.
Effects > Plug-ins > dsb Flux > Bright Noise with the following settings:
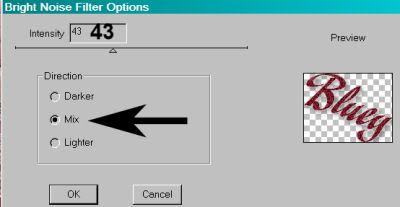
Hit okay.
Highlight your middle name layer.
Add Bright Noise again, this time changing the "Intensity" setting to 47. Click "Mix" once or twice.
Hit okay.
Highlight your top name layer.
Add Bright Noise once more, this time changing the "Intensity" setting to 52. Click "Mix" again, once or twice.
Selections > Select None.
Close out your top two name layers, leaving the bottom layer open.
Edit > Copy Merged.
Open Animation Shop. Right-click on the desktop area and paste as a new animation.
Return to PSP. Close out your bottom name layer, and open the middle layer.
Edit > Copy merged.
Back to Animation Shop. Edit > Paste > After Current Frame.
Return again to PSP. Close out your middle name layer, and open your top name layer.
Edit > Copy merged.
Again, back to Animation Shop. Edit > Paste > After Current Frame.
View > Animation.
Finis!! You're done! Thanks so much for trying one of my tuts! I appreciate you stopping by!
.


No comments:
Post a Comment