

This is just a guideline, and I know not everyone is going to be using the same tube... so use your imagination as you go!
You will also need:
Animation Shop. This is from now a pay-for product, through Corel. That changed a while ago. I don't know why!!
A tube of your choice. I'm using the wonderful artwork of Elias Chatzoudis. You must have a license to use his work. You can get that license and art at My PSP Tubes.
The scrap kit is by Doris, of Scraps Dimensions. This is a FTU kit called "Lovey Dovey." Leave lots of love for the freebies, ladies!
Filters: No outside filters used in this tutorial!
Font: I used Headache Normal.
Supplies: No outside supplies for this tutorial!
Okay, let's begin...
Open a new canvas, 700 x 800, white.
Open Frame 1. Resize 65%. Copy and paste as a new layer.
Add your tube. Resize, position, and drop shadow to your taste.
Highlight your frame layer. Grab your magic wand and click inside the frame.
Selections > Modify > Expand by 1. Selections > Invert
Highlight your tube layer. Grab your eraser brush and erase any portion of the tube you don't want showing at the sides or on the bottom of the frame.
Selections > Select none.
Highlight your white background layer.
Open Paper 4. Copy and paste as a new layer.
Again, highlight the frame layer. Grab the magic wand, click inside the frame. Selections > Modify > Expand by 15. Selections > Invert.
Highlight your paper layer. Hit delete.
Selections > Select None.
Again, highlight your white background layer.
Open Doodle Heart 2. Copy and paste as a new layer. Resize 75%. I moved this layer up a bit on the canvas. Duplicate this layer. Image > Mirror. Merge these two layers down.
Back to the top of your layer palette.
Open Calla Lilly 3. Resize 40%. Copy and paste as a new layer. Rotate 23° left. Place on the bottom left corner of the frame. Duplicate this layer. Image > Mirror. Merge these two layers down. Drop shadow.
Open Cushion. Resize 20%. Copy and paste as a new layer. Position over the Calla Lilly on the bottom right corner of your canvas. Duplicate this layer. Image > Mirror. Merge these two layers down. Drop shadow.
Open Rose 2. Resize 20%. Copy and paste as a new layer. Position in the middle, between the two cushions at the bottom center of the frame. Drop shadow.
Open Heart 8. Resize 20%. Copy and paste as a new layer. Position along one side of the frame. See my example for placement reference. Drop shadow.
Go back to the top and add your name. I used color #f75b9b as the fill and #a6ca3b as the stroke, stroke set on 3.
I added the following bevel:
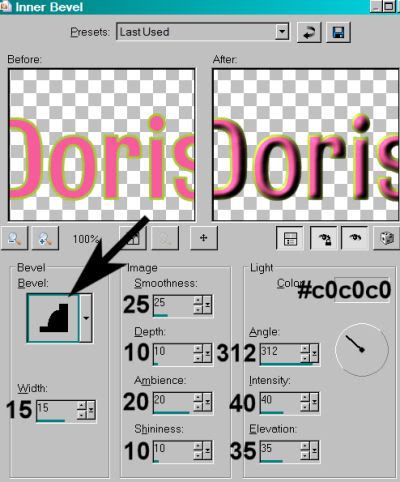 0
0Hit okay.
Drop shadow your name.
Resize your canvas to a size with which you are comfortable.
Add your copyright, license information if applicable, and taggers'/watermark.
If you choose not to animate, you're now done, and you can merge your layers and save!
A N I M A T I O N
Highlight your Doodle Heart 2 layer. Duplicate this twice, for a total of three Doodle Heart 2 layers.
Now highlight the bottom Doodle Heart 2 layer.
Adjust > Add/Remove Noise > Add Noise with the following settings:
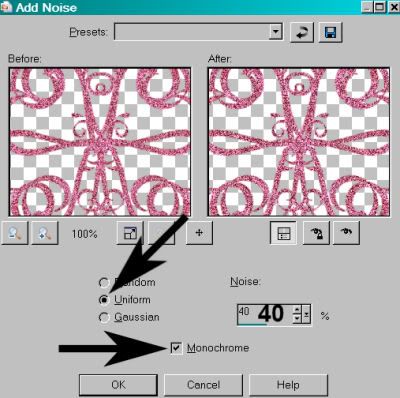
Hit okay.
Highlight the middle Doodle Heart 2 layer.
Add Noise again, this time changing the "Noise" setting to 45.
Hit okay.
Highlight the top Doodle Heart 2 layer.
Add Noise once more, this time changing the "Noise" setting to 50.
Close out the top two Doodle Heart 2 layers, leaving the bottom layer open.
Edit > Copy Merged.
Open Animation Shop. Right-click on the desktop area and paste as a new animation.
Return to PSP. Close out the bottom Doodle Heart 2 layer, and open the middle layer.
Edit > Copy merged.
Back to Animation Shop. Edit > Paste > After Current Frame.
Return again to PSP. Close out the middle Doodle Heart 2 layer, and open the top Doodle Heart 2 layer.
Edit > Copy merged.
Again, back to Animation Shop. Edit > Paste > After Current Frame.
View > Animation.
Once more, we are done! Thanks for using my tutorial! I hope you'll come back soon! Leave me a shout out if you're feeling "talky." LOL!
.


No comments:
Post a Comment