

You will also need:
A tube of your choice. I'm using the glamorous artwork of Jennifer Janesko. You must have a license to use her art. You may obtain that license and her art from C.I.L.M.
The scrap kit is by LaCarolita, of LaCarolitas Designz. This is a FTU kit, which is called "Be Mine." Keep on leaving lots of love for the freebies!!
Supplies: You may get the file here. This includes the mask, by whom I do not know, and the doodle. I got the art file from Stock Xpert, and eliminated the white background to create the isolated doodle. You're welcome! LOL!
Filters: No outside filters used in this tutorial!
Font: I used Phyllis Swash.
Let's do it!
Open a new canvas, 700 x 700, white.
Open frame1. Resize 57%. Copy and paste as a new layer.
Add your tube. Resize, position and drop shadow to your taste.
Highlight your frame layer. Grab your magic wand and click inside the frame. Selections > Modify > Expand by 1. Selections > Invert.
Highlight your tube layer. Grab your eraser brush and erase any of your tube that you don't want showing along the sides and/or bottom of your frame.
Selections > Select none.
Highlight your white background layer.
Layers > New Raster Layer.
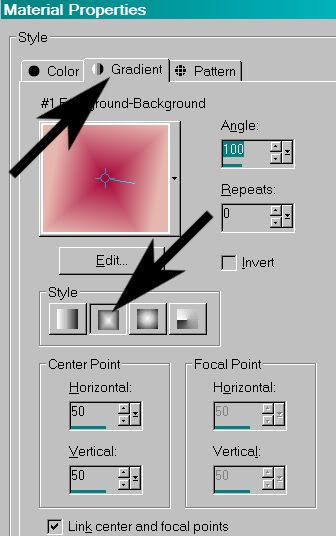
Create a foreground-background gradient to go with your color scheme. I chose color#a60336 as my background, and #e1cac7 as the foreground. Rectangular gradient, angle 100, repeats 0.
Apply your mask. Delete the mask layer, answer "yes" to the pop-up question, and merge group.
I had to move the mask layer a bit to look how I wanted it to look. Go ahead, if you think you should, too!
Open hearts1. Resize 20%. Copy and paste as a new layer. Position in the lower right corner of your frame. Drop shadow your hearts.
Open the ribbonbow2. Resize 40%. Copy and paste as a new layer. Position it towards the bottom of your frame. See my example for placement reference. Drop shadow this layer.
Highlight your frame layer. Grab your magic wand and click inside the frame. Selections > Modify > Expand by 1. Selections > Invert.
Highlight your ribbonbow2 layer. Hit delete. Selections > Select None.
Now, this layer is still overlapping the hearts layer. So...
Highlight the hearts layer. Grab your magic wand and click outside the hearts on the canvas. Selections > Modify > Expand by 1. Selections > Invert.
Highlight the ribbonbow2 layer once more. Grab your eraser brush and erase the part of the ribbonbow2 layer that's overlapping the hearts layer. Selections > Select none.
Open the doodle from StockXpert that was in your supplies. Copy and paste as a new layer. Position this so that it's in the upper left quadrant of your canvas. Duplicate this layer. Image > Mirror. Merge these two layers down. Duplicate that layer. Image > Flip. Merge *these* two layers down. Drop shadow. In your layer palette, drag this layer to just above your mask layer.
Drop shadow your frame layer.
Go to the top layer and add your name. I used color #a60336 as the fill and #e1cac7 as the stroke. Stroke set at 2.
I added the following bevel:
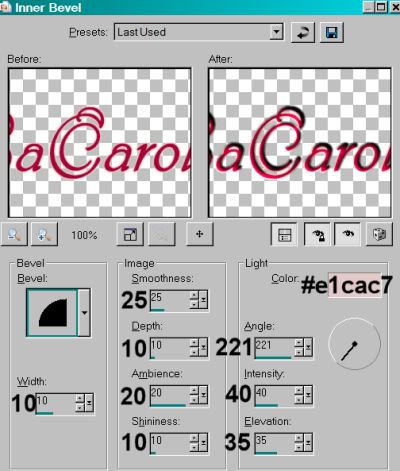
Hit okay.
Drop shadow your name.
Resize your canvas to a size with which you're comfortable.
Add your copyright, license information if applicable, and taggers'/watermark.
Layers > Merge > and save! We are done!
And there you go! Another finished tag! I hope you liked this tutorial, and I thank you SO much for choosing to work with it!!
.


No comments:
Post a Comment