
You will also need:
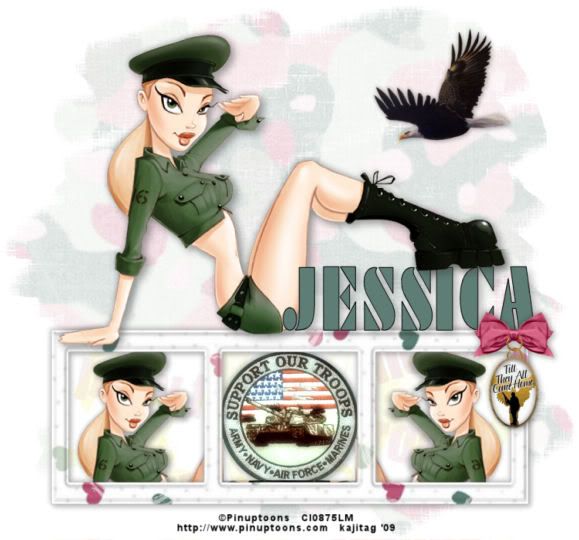
A tube of your choice. A sitting or leaning back tube would be best for this tag. I'm using the cute artwork of Pinuptoons. You must have a license to use this work. You may purchase that license at C.I.L.M..
Scrap kit is by Jessica, of Scraps by Jessica. This is a FTU kit, available through her blog, and is called In Memory of Chris. This kit was made to honor the memory of one of Jessica's close friends, who died serving our country in Afghanistan. Please be sure to leave her lots of love when downloading this kit!
Filters: No outside filters used in this tutorial!
Font: I used ArmyBlackCondensed.
Supplies: The mask and the eagle files. I don't know where I got either of them, sorry. So if they are yours, let me know, so I can give you proper credit! You can find these files here!!
Also, please, if you have problems with the download link for supplies, drop me a line via e-mail. Leaving a comment without a way for me to contact you back doesn't help. If you e-mail me, I'll send you the supplies.
Another note: I use a program called WinRAR for my compression of files. It has the capacity to save things as and/or open .rar files OR .zip files. I have been saving the supplies within this program, as .zip files. I'm beginning to use a .rar file for compression. I want to see if you guys have less problems getting supplies with this type of file. Wondering if, because the program is called WinRAR, maybe making .zip files with it is screwing people up? You can find WinRAR free at CNET Downloads. I hope this helps! I think I'll be doing this, and keeping this paragraph in as a boilerplate, while I see if it fixes the problem. *Fingers crossed!*
Okay,let's do this!
Open your supplies in PSP and minimize. Alternatively, you could load the mask into your PSP masks file. This way, you'd have it to use later on....
Open a new image, 750 x 700, white.
Open Frame2. Resize 150%. Copy and paste as a new layer. Rotate 90° either way. Position almost to the bottom of your canvas.
Add your tube. Resize, position and drop shadow to your liking.
Highlight your frame layer. Grab your magic wand and click inside each section of the frame. Selections > Modify > Expand by 7. Selections > Invert.
Open paper 20. Copy and paste as a new layer, dragging this layer below the frame layer. Position the paper where you'd like it, then hit delete. Selections > Select none.
Duplicate your tube layer. Resize as necessary, then position below the frame layer, in the left section of the frame.
Duplicate this layer and Image > Mirror.
Open the patch. Resize 50%. Copy and paste as a new layer. Bring this layer below the frame as well, and position in the middle area of your frame.
Highlight the frame layer. Click inside all sections of the frame and Selections > Modify > Expand by 7. Selections > Invert.
Highlight each of the three layers below the frame and hit delete. Selections > Select none.
You can merge these layers down now, if you like.
Drop shadow your frame.
Open the charm. Resize 65%. Copy and paste as a new layer. Position where you would like it on the frame. I chose the top right corner of the frame. Drop shadow your charm.
Open the eagle image included in the supplies. Resize 50%. Copy and paste as a new layer. Rotate 15° left. Drop shadow the eagle.
Highlight your white background layer.
Add a new raster layer. Selections > Select All.
Open paper1. Copy and paste INTO SELECTION. Selections > Select none.
Apply your mask. Delete mask layer. Answer "yes" to the pop-up question and merge group.
Add your name. I used color #5d7d75 for the fill and black for the stroke, stroke set at 1.
Drop shadow your name.
Add your copyright, license information if applicable, and taggers'/watermark.
Resize your tag to the size with which you're most comfortable.
We are done! I hope you enjoyed this tutorial! Thanks for trying my it!
.


No comments:
Post a Comment