
You will also need:
Animation Shop. This is from CNET, so it's a safe download.
[NOTE: The only animation on this tut is that the pendant on this tube is sparkling. If your tube doesn't have such a thing, animation is not necessary.]
A tube of your choice. I'm using the sexy artwork of Bam Bam. I've just discovered that this URL doesn't seem to be working. I'll contact MPT about it, and see if there is an update to this info. In any case, you must have a license to use his work. You may purchase that license at My PSP Tubes.
Scrap kit is by Dannie of Home of the Urban Fairy. This is a PTU kit, available through Terminally Unique Designs, where it is now (May 15, 2009) on sale, at 55% off!! This great kit is called Clarey. I decided on this kit because it goes perfectly with this particular tube!
Filters: Mura's Meister > Copies
Font: I used 2Ps Blessings.
Supplies: The mask, by Gabbee, which you can find here. And my sparkle of choice, which you can find here.
Also, please, if you have problems with the download link for supplies, drop me a line via e-mail. Leaving a comment without a way for me to contact you back doesn't help. If you e-mail me, I'll send you the supplies.
Another note: I use a program called WinRAR for my compression of files. It has the capacity to save things as and/or open .rar files OR .zip files. I have been saving the supplies within this program, as .zip files. I'm beginning to use a .rar file for compression. I want to see if you guys have less problems getting supplies with this type of file. Wondering if, because the program is called WinRAR, maybe making .zip files with it is screwing people up? You can find WinRAR free at CNET Downloads. I hope this helps! I think I'll be doing this, and keeping this paragraph in as a boilerplate, while I see if it fixes the problem. *Fingers crossed!*
Okay, let's start, shall we?
Open your mask in PSP and minimize. Alternatively, you could load it into your PSP masks file. This way, you'd have it to use later on. Open the sparkle and minimize until needed.
Open a new image, 700 x 750, white.
Open Elements 028. Resize 50%. Copy and paste as a new layer.
Effects > Plugins > Mura's Meister > Copies with the following settings:
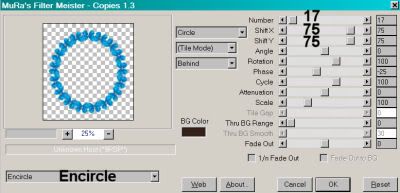
Hit okay.
Highlight your white background layer. Open Papers 007. Copy and paste as a new layer.
Highlight your circle of bows layer. Grab your magic wand and click inside the circle.
Selections > Modify > Expand by 8. Selections > Invert
Highlight your Papers 007 layer and hit delete. Selections > Select none.
Now, to tone down that paper a bit, Adjust > Brightness and Contrast > Brightness/Contrast with the following settings:
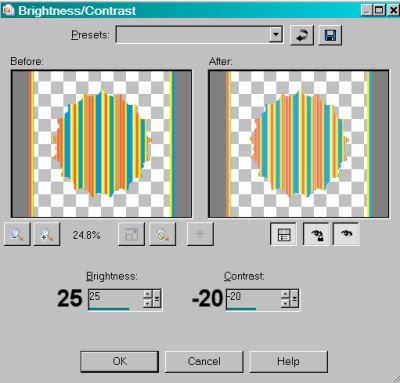
Hit okay.
Add your tube, as the top layer. Resize, position and drop shadow to your liking.
Highlight your circle layer and click inside with the magic wand once again.
Selections > Modify > Expand by 1.
Highlight your tube layer. Grab your eraser brush and erase any of your tube that overlaps the bottom of the circle of bows. Selections > Select none.
Open Elements 011. Resize 50%. Copy and paste as a new layer. Position as your like -- I chose to put it on the right upper area of the circle of bows. Drop shadow.
Duplicate this layer and move the duplicate up or down from the original.
Open Elements 15. Resize 40%. Copy and paste as a new layer. Position between the other two flower layers. See my tag for placement reference. Drop shadow.
Now, here is the tricky part.....
Open Elements 020. Resize 30%. Rotate 90° right.
I used my pick tool to stretch the tag out long enough to compensate for the longer name. Stretch it to the length you think you will need.
Add your name. I used color #13b8ea for the fill, and color #036ca8 for the stroke, stroke set at 1. If the name doesn't fit, highlight the tag layer and use your pick tool to stretch until it does.
Drop shadow your name.
Merge your name layer down to the tag layer. Stretch back to a plausible size with your pick tool.
Now, rotate 45° left. Place on the bottom left area of the circle of bows. Drop shadow your tag.
Highlight your white background layer.
Open Papers 002. Resize to 750 x 750 pixels. Copy and paste as a new layer.
Apply mask gabbeemask13. Delete mask layer. Answer "yes" to the pop-up question and merge group.
Add your copyright, license information if applicable, and taggers'/watermark.
Resize your tag to your desired proportions.
If you're not going to animate, you can just merge and save.
A N I M A T I O N
Open Afbeelding1.pspimage. Resize 50%. Copy and paste as a new layer, placed over the pendant or earring or whatever it is you're sparkling.
Edit > Copy merged
Open Animation Shop, right-click on the desktop area, and paste as a new animation.
Return to PSP. Close out the sparkle layer.
Edit > Copy merged.
Return to Animation Shop and Edit > Paste > After Current Frame.
Still in Animation Shop, highlight your first frame (the one with the sparkle). Click on the top bar of your animation and choose "Frame Properties." Change this number to 50.
Click on the second frame (only -- don't have both frames highlighted). This would be the frame without the sparkle. Click on the top bar of your animation and choose "Frame Properties." Change this number to 75.
View > Animation. Et, voila! We're done! I hope you've enjoyed this tutorial! Thanks for trying my tutorial!
.


No comments:
Post a Comment