
You will also need:
Animation Shop. This is from CNET, so it's a safe download.
A tube of your choice. I'm using the wonderful work of Gennadiy Koufay. There is a very short time left that you can get his art at C.I.L.M. I've written to C.I.L.M. for an update. He *IS* leaving them, and I know nothing about his future plans. So, I guess you must have a license to use his work right now, and you can get that license and his tubes at C.I.L.M., link above.
Okay, I've heard from Michelle, and this is what she has to say about Gennadiy Koufay's art being available at C.I.L.M.:
"Once Koufay is off the site then you will no longer be able to purchase his work from CILM. You will only be able to obtain replacements for any orders you may lose, but other than that they will not be available."
I wrote her back for the date, and she said his last day with C.I.L.M. is June 7, 2009.
Scrap kit is by KrazyMary, of The Krazy World of Mary. This is a FTU kit, available through Digital Arts Cafe, and is called I'm Gonna Tell Mommy. This is part of a collaboration from the ladies at Digital Arts Cafe, and it's full scrappers' sized. So it's a heavy download, split into three parts. Also, you must sign up at Digital Arts Cafe to get the free download. But it's BEAUTIFUL!! This is only free until May 31. The collaboration is in celebration of Mothers' Day.
Filters: Eye Candy 3.1 > Glass, Eye Candy 4000 > Gradient Glow -=- and -=- Alien Skin > Xenofex 2 > Constellation
[NOTE: Gradient Glow and Glass settings were used on the name only, so are totally optional!]
Font: I used WaterLily.
Supplies: The mask, from whom I do not know. If you do this tut and find it is yours, please let me know so that I can give you proper credit!
Also, please, if you have problems with the download link for supplies, drop me a line via e-mail. Leaving a comment without a way for me to contact you back doesn't help. If you e-mail me, I'll send you the supplies.
Another note: I use a program called WinRAR for my compression of files. It has the capacity to save things as and/or open .rar files OR .zip files. I have been saving the supplies within this program, as .zip files. I'm beginning to use a .rar file for compression. I want to see if you guys have less problems getting supplies with this type of file. Wondering if, because the program is called WinRAR, maybe making .zip files with it is screwing people up? You can find WinRAR free at CNET Downloads. I hope this helps! I think I'll be doing this, and keeping this paragraph in as a boilerplate, while I see if it fixes the problem. *Fingers crossed!*
Okay let's go!
Open a new image, 700 x 750, white.
Open beige-frame. Resize 35%. Rotate 90° left. Image > Mirror. Now, copy and paste as a new layer on your canvas.
Add your tube. Resize, position and drop shadow to your taste.
Open grey-doodle. Resize 10%. Copy and paste as a new layer. Drag this layer below your tube layer. Position as you would like it. Duplicate this layer and Image > Mirror. Merge these two layers down. Drop shadow.
Open paper18. Copy and paste as a new layer. Drag this layer below the grey-doodle layer.
Highlight your frame layer. Grab your magic wand and click inside the frame. Selections > Modify > Expand by 5. Selections > Invert.
Highlight your paper18 layer. Hit delete. Selections > Select none.
Drop shadow your frame.
Open grey-doodle again. Resize 20%. Copy and paste as a new layer. Rotate 50° right. Drag this layer below your paper18 layer. Duplicate this layer and Image > Mirror, Image > Flip and Image > Mirror again. Merge these layers down and duplicate. Image > Flip. Position these doodles however you'd like them to look. Merge all these layers down and drop shadow.
Highlight your white background layer.
Open paper18 again. Resize to 750 x 750 pixels. Copy and paste as a new layer.
Apply your mask. Delete the mask layer, answer "yes" to the pop-up question, and merge group.
Go back to the top layer and add your name. I used color #eacecb for the fill, color #807575 for the stroke and set the stroke at 1.5.
I then applied Eye Candy 3.1 > Glass with the default settings, but changed the color to light grey:
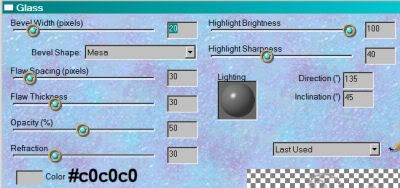
And then I applied Eye Candy 4000 > Gradient Glow with settings of 3 - 0 - 100, color white.
Drop shadow your name.
Add your copyright, license information if applicable, and taggers'/watermark.
Resize your tag to the size with which you're most comfortable.
If you're NOT going to animate, you can just merge and save. You're done!
A N I M A T I O N
Highlight your bottom-most grey-doodle layer. (The background doodles.) Duplicate this layer three times, for a total of four grey-doodle layers.
Still on the bottom grey-doodle layer...
Effects > Plugins > Alien Skin Xenofex 2 > Constellation, with the following settings:
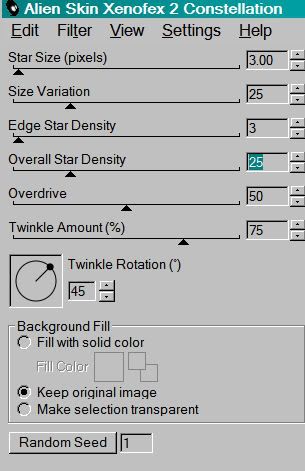
Hit okay.
Highlight the next grey-doodle layer up. Again, apply Constellation, clicking on "Random Seed" once.
Hit okay.
Highlight the next grey-doodle layer. Apply Constellation again, and again click "Random Seed."
Hit okay.
Now, highlight the top grey-doodle layer and apply Constellation, clicking "Random Seed" once more.
Close out the top three grey-doodle layers, leaving the bottom grey-doodle layer open.
Edit > Copy merged
Open Animation Shop, right-click on the desktop area, and paste as a new animation.
Return to PSP. Close out the bottom grey-doodle layer, and open the next grey-doodle layer up.
Edit > Copy merged.
Return to Animation Shop and Edit > Paste > After Current Frame.
Back to PSP. Close out the open grey-doodle layer, and open the next grey-doodle layer up.
Edit > Copy merged.
And, back to Animation Shop. Edit > Paste > After Current Frame.
Return again to PSP and close out the open grey-doodle layer. Open the top grey-doodle layer.
Edit > Copy merged.
Back again to Animation Shop. Edit > Paste > After Current Frame.
View > Animation. And, we're done! I hope you've enjoyed this tutorial! Thanks for trying my tut!!
.


No comments:
Post a Comment