
You will also need:
Animation Shop. This is from CNET, so it's a safe download.
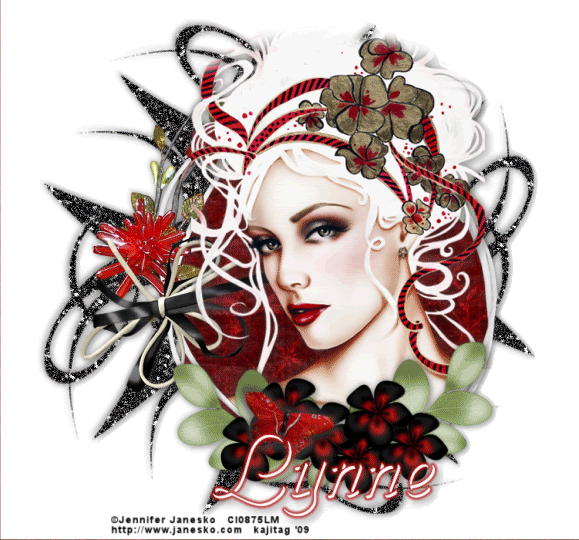
A tube of your choice. I'm using the wonderful artwork of Jennifer Janesko. You must have a license to use her work. You may purchase that license at C.I.L.M..
Scrap kit is by Lynne, of Baby Cakes Scraps. This is a FTU kit, available through her blog, and is called After Midnight. Another FTU kit, ladies and gents! Leave some love!!
Filters: Eye Candy 4000 > Gradient Glow -=- and -=- dsb Flux
Font: I used PhillisOnlShadD.
Supplies: NO outside supplies are used in this tut!
Okay let us begin!
Open a new image, 750 x 700, white.
Open the string frame. Copy and paste as a new layer.
Add your tube. Resize, position and drop shadow to your liking.
Highlight your frame layer. Grab your magic wand and click inside the frame. This is a tricky one, so be sure you remember all the little loops and stuff on the left, AND the outside mini-loops at the bottom! Selections > Modify > Expand by 3. Selections > Invert.
Highlight your white background layer.
Open the Dark Floral Paper. Copy and paste as a new layer. Hit delete.
Selections > Invert. Selections > Modify > Contract by 2. Selections > Invert again.
Grab your eraser brush and erase any of your tube that is overlapping the frame areas. Selections > Select none.
Open the flowers labeled as "cluster." Resize 65%. Copy and paste as a new layer. Position at the bottom of the frame. See my tag for placement reference. Drop shadow your flower cluster.
Open the bfly. Resize 50%. Copy and paste as a new layer. Position over your flower cluster. I also rotated mine 15° to the right. Drop shadow your butterfly.
Highlight your white background layer again.
Open "black swirl." Resize 135%. Copy and paste as a new layer. Duplicate this layer and Image > Flip, then Image > Mirror. Merge these two layers down. Duplicate that layer. Rotate 90° either direction. Merge these two layers down. Resize this layer 90%.
Add your name. I used white for the fill and stroke, stroke set at 1. I then applied Eye Candy 4000 > Gradient Glow with settings of 5 - 0 - 100, color #b31916.
Drop shadow your name.
Add your copyright, license information if applicable, and taggers'/watermark.
Resize your tag to the size with which you're most comfortable.
If you're NOT going to animate, you can just merge and save. You're done!
A N I M A T I O N
Highlight your black swirl layer. Duplicate this layer four times, for a total of five black swirl layers.
Still on the bottom black swirl layer...
Effects > Plugins > dsb Flux > Bright Noise, with settings somewhat like this:
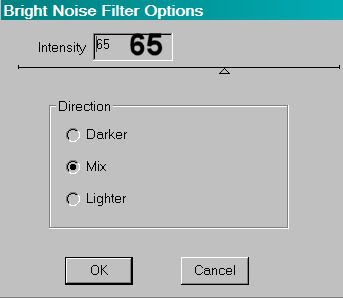
Hit okay.
Highlight the next black swirl layer up. Again, apply Bright Noise, clicking on "mix" a couple times.
Hit okay.
Highlight the middle black swirl layer. Apply Bright Noise again, and again click "mix" a few times.
Hit okay.
Now, highlight the next black swirl layer up and apply Bright Noise, clicking "mix" a few more times.
And finally, highlight the top black swirl layer, and apply Bright Noise again. And again click on "mix" a few times.
Close out the top four black swirl layers, leaving the bottom black swirl layer open.
Edit > Copy merged
Open Animation Shop, right-click on the desktop area, and paste as a new animation.
Return to PSP. Close out the bottom black swirl layer, and open the next black swirl layer up.
Edit > Copy merged.
Return to Animation Shop and Edit > Paste > After Current Frame.
Back to PSP. Close out the open black swirl layer, and open the middle black swirl layer.
Edit > Copy merged.
And, back to Animation Shop. Edit > Paste > After Current Frame.
Return again to PSP and close out the middle black swirl layer. Open the next layer up.
Edit > Copy merged.
Back again to Animation Shop. Edit > Paste > After Current Frame.
Finally, return to PSP and close out the open black swirl layer, opening the top black swirl layer.
Edit > Copy merged.
Return again to Animation Shop. Edit > Paste > After Current Frame.
View > Animation. And, we're done! I hope you've enjoyed this tutorial! Thanks for trying my tut!!
.


No comments:
Post a Comment