
You will also need:
Animation Shop. This is from CNET, so it's a safe download.
A tube of your choice. I'm using the great work of Dirk Richter. You must have a license to use his work. You may purchase that license at My PSP Tubes.
Scrap kit is by Lynne, of Baby Cakes Scraps. This is a FTU kit, available through her blog, and is called After Midnight. Another FTU kit, ladies and gents! Leave some love!!
This is the second tutorial I've done with this kit, and I've used the same "black swirl" for the background on both. But as you can see, Midnight Sparkle, written yesterday, looks much different. I liked them both, so I decided to document them both. If you did or looked at Midnight Sparkle yesterday or today, the verbiage on this tutorial is going to be almost a slam-dunk duplicate of that one. Just to let you know!!
Filters: Eye Candy 4000 > Gradient Glow -=- and -=- dsb Flux
Font: I used Yolanda Princess.
Supplies: NO outside supplies are used in this tut!
Okay let us begin!
Open a new image, 750 x 700, white.
Open the brooch. Resize 250%. Adjust > Sharpness > Sharpen. Copy and paste as a new layer.
Open the gem. Resize 165%. Adjust > Sharpness > Sharpen. Copy and paste as a new layer.
Add your tube. Resize, position and drop shadow to your taste.
Highlight your white background layer.
Open "black swirl." Resize 135%. Copy and paste as a new layer. Duplicate this layer and Image > Flip, then Image > Mirror. Merge these two layers down. Duplicate that layer. Rotate 90° either direction. Merge these two layers down. Resize this layer 90%.
Add your name. I used color #dd1c00 for the fill, black for the stroke, stroke set at 0.5. I then applied Eye Candy 4000 > Gradient Glow with settings of 5 - 0 - 100, color white.
Drop shadow your name.
Add your copyright, license information if applicable, and taggers'/watermark.
Resize your tag to the size with which you're most comfortable.
If you're NOT going to animate, you can just merge and save. You're done!
A N I M A T I O N
Highlight your black swirl layer. Duplicate this layer four times, for a total of five black swirl layers.
Still on the bottom black swirl layer...
Effects > Plugins > dsb Flux > Bright Noise, with settings somewhat like this:
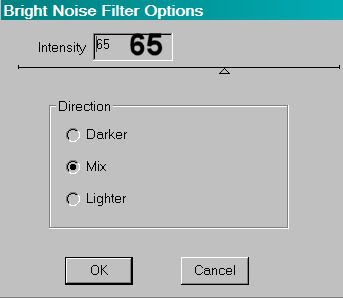
Hit okay.
Highlight the next black swirl layer up. Again, apply Bright Noise, clicking on "mix" a couple times.
Hit okay.
Highlight the middle black swirl layer. Apply Bright Noise again, and again click "mix" a few times.
Hit okay.
Now, highlight the next black swirl layer up and apply Bright Noise, clicking "mix" a few more times.
And finally, highlight the top black swirl layer, and apply Bright Noise again. And again click on "mix" a few times.
Close out the top four black swirl layers, leaving the bottom black swirl layer open.
Edit > Copy merged
Open Animation Shop, right-click on the desktop area, and paste as a new animation.
Return to PSP. Close out the bottom black swirl layer, and open the next black swirl layer up.
Edit > Copy merged.
Return to Animation Shop and Edit > Paste > After Current Frame.
Back to PSP. Close out the open black swirl layer, and open the middle black swirl layer.
Edit > Copy merged.
And, back to Animation Shop. Edit > Paste > After Current Frame.
Return again to PSP and close out the middle black swirl layer. Open the next layer up.
Edit > Copy merged.
Back again to Animation Shop. Edit > Paste > After Current Frame.
Finally, return to PSP and close out the open black swirl layer, opening the top black swirl layer.
Edit > Copy merged.
Return again to Animation Shop. Edit > Paste > After Current Frame.
Still in Animation Shop, Edit > Select All.
Right-click the top bar above the animation and select "Frame Properties." Change this number to 5.
View > Animation. And, we're done! I hope you've enjoyed this tutorial! Thanks for trying my tut!!
.


No comments:
Post a Comment