
You will also need:
Animation Shop. This is from CNET, so it's a safe download.
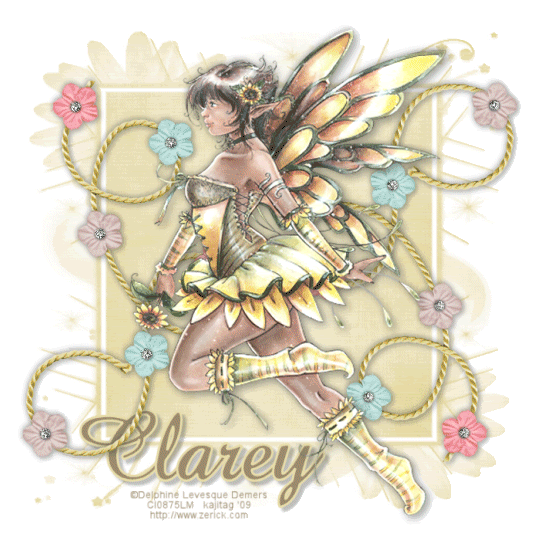
A tube of your choice. I'm using the beautiful, mystical artwork of Delphine Levesque Demers. You must have a license to use her work. You may purchase that license at C.I.L.M..
Scrap kit is by Clarey!! Always great when she offers a FTU kit. Be sure to leave lots of love when you download! It's called Delightful. It certainly is! Scroll down past the NSD ad, and there you can download this kit in either taggers' or scrappers' size.
Filters: dsb Flux > Bright Noise
Font: I used Amaze Bold.
Supplies: The mask, which is from Zuzzanna. She has a lot of beautiful masks there, so look around! Thank you, Zuzzanna!!
Also, please, if you have problems with the download link for supplies, drop me a line via e-mail. Leaving a comment without a way for me to contact you back doesn't help. If you e-mail me, I'll send you the supplies.
Another note: I use a program called WinRAR for my compression of files. It has the capacity to save things as and/or open .rar files OR .zip files. I have been saving the supplies within this program, as .zip files. I'm beginning to use a .rar file for compression. I want to see if you guys have less problems getting supplies with this type of file. Wondering if, because the program is called WinRAR, maybe making .zip files with it is screwing people up? You can find WinRAR free at CNET Downloads. I hope this helps! I think I'll be doing this, and keeping this paragraph in as a boilerplate, while I see if it fixes the problem. *Fingers crossed!*
Okay,let's start! This is a "quick-n-dirty" tutorial!
Open your mask in PSP and minimize. Alternatively, you could load it into your PSP masks file. This way, you'd have it to use later on....
Open a new image, 700 x 700, white.
Open paper5. Resize to 700 x 700 pixels. Copy and paste as a new layer.
Apply your mask. Delete the mask layer, answer "yes" to the pop-up question and merge group.
Resize your mask layer 90%.
Add your tube. Resize, position and drop shadow to your liking.
Open stringflowers. Copy and paste as a new layer. Move to the left or the right of your canvas. Duplicate this layer. Image > Mirror. Image > Flip. Merge these two layers down and drop shadow.
Add your name. I used color #9c8c6d for the fill and color #e7dcaa for the stroke, stroke set at 3. Drop shadow your name.
Add your copyright, license information if applicable, and taggers'/watermark.
Resize your tag to the size with which you're most comfortable.
If you're NOT going to animate, you can just merge and save. You're done!
A N I M A T I O N
Highlight your stringflowers layer. Zoom in. I zoomed to 300%. Grab your lasso tool, set on point-to-point, and carefully draw a selection around the middle circle areas of each flower in the stringflowers.
Duplicate this layer two times, for a total of three layers.
Still on the bottom stringflowers layer...
Effects > Plugins > dsb Flux > Bright Noise, set at 41 and click on "mix."
Hit okay.
Highlight the middle stringflowers layer. Again, apply Bright Noise, this time clicking on "mix" a couple times. (That's not really necessary - if you pay attention to the preview in the plugin, you can see the pattern changes if you just hit "mix" once. This is just the way it's always been instructed in tutorials. It's up to you!)
Hit okay.
Highlight the top stringflowers layer. Apply Bright Noise again, and again click on "mix."
Hit okay.
Selections > Select none.
Close out the top two stringflowers layers, leaving the bottom stringflowers layer open.
Edit > Copy merged
Open Animation Shop, right-click on the desktop area, and paste as a new animation.
Return to PSP. Close out the bottom stringflowers layer, and open the middle stringflowers layer.
Edit > Copy merged.
Return to Animation Shop and Edit > Paste > After Current Frame.
Back to PSP. Close out the middle stringflowers layer, and open the top stringflowers layer.
Edit > Copy merged.
And, back to Animation Shop. Edit > Paste > After Current Frame.
View > Animation. And, we're done! I hope you've enjoyed this tutorial! Thanks for trying my tut! I hope you enjoyed it!
.


No comments:
Post a Comment