

You will also need:
Animation Shop. This is from CNET, so it's a safe download.
A tube of your choice. I'm using the fun artwork of Rion Vernon aka Pinuptoons. You must have a license to use his work. You may purchase that license at C.I.L.M..
Scrap kit is by Patty of Honored Scraps. This is a PTU kit, available through Treasured Scraps, where it is now (May 12, 2009) on sale, at 50% off!! This great kit is called Denim Daze. I loved working with this kit. When I started out, I really wanted to incorporate the purple, but it just didn't work out that way!
Filters: Alien Skin > Eye Candy 5 > Nature > Fire - and - Eye Candy 4000 > Gradient Glow (for name)
Font: I used Weimar.
Supplies: Just the two masks, about which I know absolutely nothing, save the fact I've collected them along the way. If they are yours, let me know and I'll give you proper credit!!
I got the stock photo used within the frame from StockXpert.com. I entered the search term "blue forest." There is a small fee.
Also, please, if you have problems with the download link for supplies, drop me a line via e-mail. Leaving a comment without a way for me to contact you back doesn't help. If you e-mail me, I'll send you the supplies.
Another note: I use a program called WinRAR for my compression of files. It has the capacity to save things as and/or open .rar files OR .zip files. I have been saving the supplies within this program, as .zip files. I'm beginning to use a .rar file for compression. I want to see if you guys have less problems getting supplies with this type of file. Wondering if, because the program is called WinRAR, maybe making .zip files with it is screwing people up? You can find WinRAR free at CNET Downloads. I hope this helps! I think I'll be doing this, and keeping this paragraph in as a boilerplate, while I see if it fixes the problem. *Fingers crossed!*
Okay,then! Let's begin!
Open your masks in PSP and minimize. Alternatively, you could load them into your PSP masks file. This way, you'd have them to use later on....
Open a new image, 700 x 700, white.
Open Frame6. Resize 85%. Copy and paste as a new layer. Position toward the upper left corner of your canvas. This can be finalized later. And your tube may not work with that placement. Remember, the tutorial is just a guide. Yours might be better positioned on the right, who knows?? ;=)
Open your stock photo or other element that you're going to be using to fill the frame. Copy and paste as a new layer. In the layer palette, drag this layer below the frame layer. Using your mover tool, position this element or stock photo as you'd like it to be.
Highlight your frame layer. Grab your magic wand and click inside the frame. Selections > Modify > Expand by 7.
Highlight your stock photo layer. Hit delete. Selections > Select none.
Open your tube now. Copy and paste as a new layer. Resize, position and drop shadow to your taste. I am, of course, going to be giving the directions to the tag I made. Your tube might make placement, etc., different that I'm saying. Again, this is just a guide.
Okay!
Open Blossom1. Resize 65%. Copy and paste as a new layer. Position behind your tube, around the right side of the frame. Drop shadow.
Open Blosson3. Resize 25%. Copy and paste as a new layer. Rotate 30° right. Position with the first branch, kinda making it so the colors alternate a bit. Drop shadow.
Open Rose6. Resize 50%. Copy and paste as a new layer. Rotate the rose 30° right as well. In your layer palette, position this rose under the Blossom3 layer. Arrange it so the rosebud shows between the stems of Blossom3. Drop shadow.
Duplicate the Rose6 layer. Rotate back, 30° left. I know, I know!! In your layer palette, drag this copy of the rose down below the Blossom1 layer. Position it so it shows between those stems.
Open Rose4. Resize 60%. Copy and paste as a new layer. Rotate 55° right. Position this over the lowest stem of Blossom1. In your layer palette, drag this below Blossom3 and Rose6 (the first copy). Drop shadow.
See my tag for examples of placement. I know, it's mostly behind the tube, but I hope you're getting my drift!!
Open Candle1. Resize 75%. Copy and paste as a new layer. Position where you'd like it. Drop shadow.
Open Bow8. Resize 60%. Copy and paste as a new layer. This should be above the candle in the layer palette. Position so it appears to be wrapped around the candle holder. Drop shadow.
Highlight your white background layer.
Open Paper1. Resize to 700 x 700 pixels. Copy and paste as a new layer.
Apply mask _MA31311112. Delete mask layer. Answer "yes" to the pop-up question and merge group.
Now, apply mask !Mask182. Delete mask layer. As before, answer "yes" to the pop-up question and merge group.
Back up to the top layer in your layer palette.
Add your name. I used color #516390 for the fill and the stroke, stroke set at 2. I then applied Eye Candy 4000 > Gradient Glow with settings of 5 - 0 - 100, preset medium, and color #9eb2d2 Drop shadow your name.
Add your copyright, license information if applicable, and taggers'/watermark. Don't forget the credit for your stock photo!
If you're going to animate the candle burning, do not resize your tag *yet*. If you're NOT going to animate, you can just merge and save.
A N I M A T I O N
Highlight your candle layer. Zoom into the flame area of the candle. Grab your lasso tool, set on point-to-point, and carefully draw a selection around the flame.
Duplicate this layer two times, for a total of three layers.
Still on the bottom candle layer...
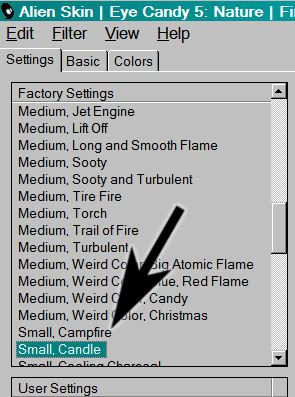
Effects > Plugins > Alien Skin > Eye Candy 5 > Nature > Fire with the following preset:
... and the following settings:
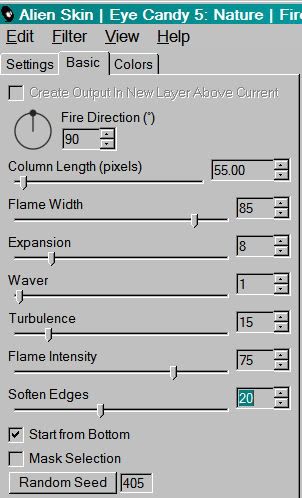
Hit okay.
Highlight the middle candle layer. Again, apply Fire, this time clicking on "Random Seed."
Hit okay.
Highlight the top candle layer. Apply Fire again, and again click on "Random Seed."
Hit okay.
Selections > Select none.
Close out the top two candle layers, leaving the bottom candle layer open.
Resize your tag to a size with which you're comfortable.
Edit > Copy merged
Open Animation Shop, right-click on the desktop area, and paste as a new animation.
Return to PSP. Close out the bottom candle layer, and open the middle candle layer.
Edit > Copy merged.
Return to Animation Shop and Edit > Paste > After Current Frame.
Back to PSP. Close out the middle candle layer, and open the top candle layer.
Edit > Copy merged.
And, back to Animation Shop. Edit > Paste > After Current Frame.
In Animation Shop, Edit > Select All.
Right-click on the top bar of your animation and choose "Frame Properties." Change this number to 17.
View > Animation. Et, voila! We're done! I hope you've enjoyed this tutorial! Thanks for trying my tut!
.


No comments:
Post a Comment