
You will also need:
Animation Shop. This is from CNET, so it's a safe download.
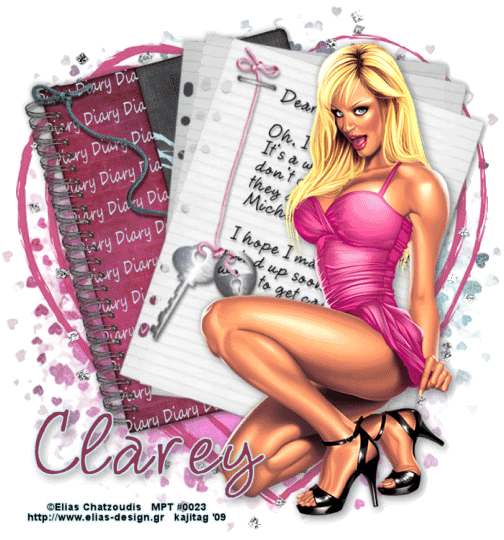
A tube of your choice. I'm using the great work of Elias Chatzoudis. You must have a license to use his artwork. You can get that license and his art at My PSP Tubes.
Scrap kit is by Clarey, of Clarey's Designz. This is a PTU kit, available through Clarey's Designz Digital Scrapbook Shop, and is called Dear Diary.
Filters: Eye Candy 4000 > HSB Noise
Font: I used 2Peas Fancy Free.
Supplies: The mask. I seem to have collected this mask from various places under various names, so I honestly do not know to whom it should be credited. If it is yours, or you recognize whose it is, please let me know so that I can give proper credit! This mask is in .pspimage format. Those using an earlier version of PSP may not be able to use it. If this is your case, let me know and I'll convert it to .jpg for you and send it to you that way!
Also, please, if you have problems with the download link for supplies, drop me a line via e-mail. Leaving a comment without a way for me to contact you back doesn't help. If you e-mail me, I'll send you the supplies.
Okay let's go! My mojo's been on a vacation of late, and I'm trying to get back into the swing of things, so.... onward!
Open a new image, 700 x 750, white.
Open diary1. Copy and paste as a new layer. Rotate 15° left. Position as you like. Drop shadow.
Open notepaper1. Copy and paste as a new layer. Okay, on this one I began by rotating 5° left, so the lines would be straight to write on.
Choose your font and write what you feel like writing as a diary entry. This can get tricky, dependent upon placement of your text, as there is a "cut out" charm added to this notepaper. I needed to use my lasso tool, set on point-to-point, to select the areas where the text overlapped the charm and delete those areas. I then added a small drop shadow to the text. Merge your text layer down to your notepaper1 layer. Now, rotate 20° right and position. Drop shadow your notepaper.
Add your tube. Resize, position and drop shadow to your taste.
Open glittercluster. Copy and paste as a new layer. Rotate 90° right. I used my pick tool to stretch the sides and top of this glittercluster, so it would show up all over the canvas. Drag this layer down below your diary and notepaper layers.
Open scribbledheart. Copy and paste as a new layer. Resize 135%. This layer should be below the glittercluster layer.
Highlight your white background layer.
Open paper11. Resize to 750 x 750 pixels. Copy and paste as a new layer.
Apply your mask. Delete the mask layer, answer "yes" to the pop-up question, and merge group.
Go back to the top layer and add your name. I used color #903853 for the fill, color #cad5d9 for the stroke, stroke set at 2.5.
Drop shadow your name.
Add your copyright, license information if applicable, and taggers'/watermark.
Resize your tag to the size with which you're most comfortable.
If you're NOT going to animate, you can just merge and save. You're done!
A N I M A T I O N
Highlight your glittercluster layer. Duplicate this layer twice, for a total of three glittercluster layers.
[NOTE: When I was done with this tag, I thought perhaps it might look a bit better if I'd used FOUR glittercluster layers instead of just three. You may duplicate that layer once more if you like, and apply the filter that fourth time. Up to you.]
Still on the bottom glittercluster layer...
Effects > Plugins > Eye Candy 4000 > HSB Noise, with the default settings.
Hit okay.
Highlight the middle glittercluster layer. Again, apply HSB Noise, clicking on "Random Seed" once.
Hit okay.
Highlight the top glittercluster layer. Apply HSB Noise again, and again click "Random Seed."
Hit okay.
Close out the top two glittercluster layers, leaving the bottom glittercluster layer open.
Edit > Copy merged
Open Animation Shop, right-click on the desktop area, and paste as a new animation.
Return to PSP. Close out the bottom glittercluster layer, and open the middle glittercluster layer.
Edit > Copy merged.
Return to Animation Shop and Edit > Paste > After Current Frame.
Back to PSP. Close out the middle glittercluster layer, and open the top glittercluster layer.
Edit > Copy merged.
And, back to Animation Shop. Edit > Paste > After Current Frame.
Still in Animation Shop, Edit > Select All
Right-click on the top bar of your animation and choose "Frame Properties." Change this number to 25.
View > Animation. And, we're done! I hope you've enjoyed this tutorial! Thanks for trying my tut!!
.


No comments:
Post a Comment