
You will also need:
Animation Shop. This is from CNET, so it's a safe download.
A tube of your choice. A sitting tube would be best for this one. I'm using the fun artwork of Pinuptoons. You must have a license to use this artwork. You can get that license and art at C.I.L.M..
Scrap kit is by Rockin', of Rockin's Ruckus. This is a FTU kit, a few months old now. Free is free, right?? This kit is called Azure 'n Sand. Be sure to leave some love for the freebies!!
[NOTE: I made the tag for "Ruckus," as I guess I wasn't awake while doing this. It should say "Rockin'." Oh, well, so sorry Rockin'!!]
Filters: Eye Candy 4000 Gradient Glow, Eye Candy 4000 HSB Noise
Font: I used 2Peas Flea Market
Supplies: Again, just the mask. This is yet another by my fave mask-maker (it seems, anyway), Essex Girl! Thanks so much for sharing your work with the PSP community!
Also, please, if you have problems with any download link for supplies, drop me a line via e-mail. Leaving a comment without a way for me to contact you back doesn't help. If you e-mail me, I'll send you the supplies.
Okay let's do it! I wish you luck! :)
Open a new image, 750 x 700, white.
Open frame1. Resize 75%. Copy and paste as a new layer.
Highlight your white background layer.
Open flowergem1. Resize 200%. Copy and paste as a new layer, below the frame layer. Resize again, another 110%.
Again highlight your white background layer.
Open paper7. Copy and paste as a new layer. Resize 110%.
Apply the mask. Delete the mask layer, answer "yes" to the pop-up question, and merge group.
Go to the top layer and add your tube. Resize, position and drop shadow as you like. This layer should be above the frame layer.
Drop shadow your tube and frame layers.
Open the wireheart2. Resize 65%. Copy and paste as a new layer. Position as you wish. You can use my example for placement reference, if you like. Drop shadow the wireheart.
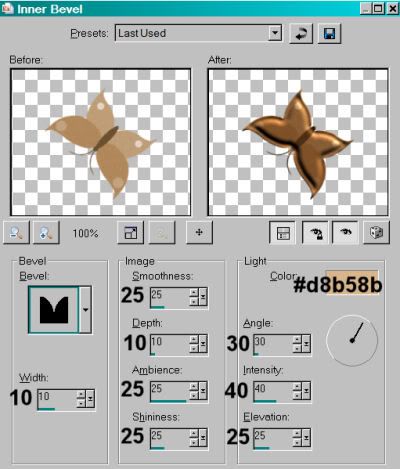
Open the bfly3. Resize 25%. Rotate 135° left. Copy and paste as a new layer. Position as you wish. I chose to add a bevel to the butterfly, so I did so, using the following:
Drop shadow the butterfly.
Go back to the top layer and add your name. I used color #61331c for fill and stroke, stroke set at 2. I added a Gradient Glow, settings 3 - 0 - 100, color white. Drop shadow the name.
Add your copyright, license information if applicable, and taggers'/watermark.
Resize your tag to the size with which you're most comfortable.
If you're NOT going to animate, you can just merge and save. You're done!
A N I M A T I O N
Highlight your mask layer. Duplicate this layer twice, for a total of three mask layers.
Still on the bottom mask layer...
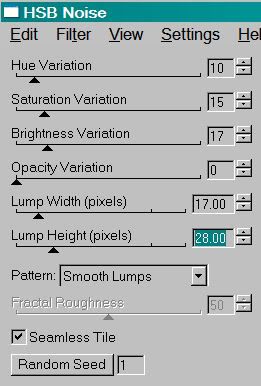
Effects > Eye Candy 4000 > HSB Noise with the settings shown below:
Hit okay.
Highlight the middle mask layer. Again, add HSB Noise, and click on "Random Seed."
Hit okay.
Highlight the top mask layer. Add HSB Noise again, clicking "Random Seed" once more.
Hit okay.
Close out the top two mask layers, leaving the bottom mask layer open.
Edit > Copy merged
Open Animation Shop, right-click on the desktop area, and paste as a new animation.
Return to PSP. Close out the bottom mask layer, and open the middle mask layer.
Edit > Copy merged.
Return to Animation Shop and Edit > Paste > After Current Frame.
Back to PSP. Close out the middle mask layer, and open the top mask layer.
Edit > Copy merged.
And, back to Animation Shop. Edit > Paste > After Current Frame.
Edit > Select All.
Right-click on the top bar of your animation, and choose "Frame Properties." Change that number to 25.
View > Animation. If you like what you see, save! And, we're done! I hope you've enjoyed this tutorial! Thanks for coming by!!
.


No comments:
Post a Comment