
You will also need:
Animation Shop. This is from CNET, so it's a safe download.
I just checked to make sure the above link was still valid, and was surprised to see that they're now charging $19 for Animation Shop! (This written August 31, 2009.) I'm so sorry, I didn't realize it. It's been free for ages. I don't know when they started charging....
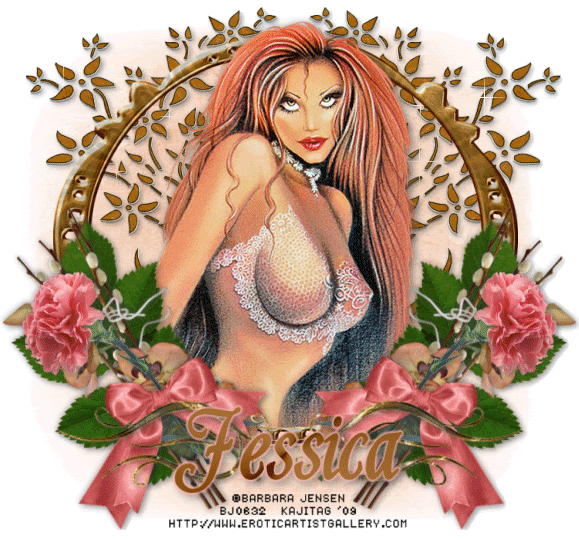
A tube of your choice. I'm using the sexy artwork of Barbara Jensen. You must have a license to use her artwork. You can get that license and art at Barbara's web site!
Scrap kit is by Jessica, of Scraps by Jessica. This is a FTU kit, called Moments Like This. Be sure to leave some love for the freebies!! She's not been active in a while, but I'm sure she'd appreciate the love!
Filters: Eye Candy 4000 > Gradient Glow, VM Natural > Sparkle
Font: I used Shardee.
Supplies: I've included the gradient used in the name, the "doodley branch" file and the mask, here. I do not know the origin of these files. None of them! So, as always, if any of you know, let me know so that I may give credit where credit is due!
The gradient file is a .jgd file, which is an older PSP file, but usable at least up to version 10. The mask is a .pspmask file, which is a newer PSP file. If you find you can't use it, let me know and I'll make a .jpg version. The "doodley branches" file is a .pspimage file -- another newer PSP type of file.
Also, please, if you have problems with any download link for supplies, drop me a line via e-mail. Leaving a comment without a way for me to contact you back doesn't help. If you e-mail me, I'll send you the supplies.
Okay let's begin!! There will be a lot of repetition to this, just to warn you!
Open your supplies in PSP and minimize. Alternatively, you could file your mask into your masks file, your gradient into your gradient file, and your doodle wherever you keep your embellishments! Up to you!
Open a new image, 750 x 700, white.
Open goldframe1. Resize 85%. Copy and paste as a new layer. Position as you would like. I found I had to move mine up higher as I got into the tag.
Add your tube. Resize, position and drop shadow to your taste.
Highlight your frame layer. Grab your magic wand, and click inside the frame.
Selections > Modify > Expand by 1. Selections > Invert.
Highlight your tube layer. Grab your eraser brush, and erase any of your tube that overhangs the frame. Selections > Select none.
Open leaves3. Resize 50%. Copy and paste as a new layer. Rotate 20° left. Position at the bottom left of your frame. See my tag for placement reference, if you like.
Duplicate this layer. Image > Mirror. Merge down the two leaves layers. Drop shadow.
Open branches1. Resize 40%. Copy and paste as a new layer. Rotate 30° left. Position over the leaves.
Duplicate this layer. Image > Mirror. Merge down the two branches layers and drop shadow.
Open flowers1. Resize 35%. Copy and paste as a new layer. Rotate 30° left. Position over the leaves and branches.
Duplicate this layer. Image > Mirror. Merge down the two flowers1 layers and drop shadow.
Open flowers3. Resize 50%. Copy and paste as a new layer. Position over the left leaves, branches and other flowers.
Duplicate the flowers3 layer. Image > Mirror. Merge down the two flowers3 layers and drop shadow.
Open bow1. Resize 65%. Copy and paste as a new layer. Rotate 30° left. Place your bow strategically (lol) over the rest of the flowers and leaves.
Duplicate the bow layer. Image > Mirror. Merge down the two bow layers and drop shadow.
Whew!
Now, open metalswirls1. Resize 150%. Copy and paste as a new layer. Move the metalswirls down to the bottom center of the frame and flowers. It will barely be seen, but it's there! You can leave this step out, if you like. I just liked the extra. Drop shadow.
Highlight your white background layer.
Open Paper7. Resize 750 x 750. Copy and paste as a new layer.
Apply the mask. Delete the mask layer, answer "yes" to the pop-up question, and merge group.
Now, to try and keep the mask background layer from ending too abruptly when you're showing off your tag, we'll have to fiddle with it a bit.
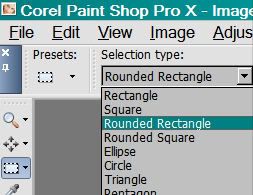
Grab your selection tool, set on "Rounded Rectangle." As follows:
Draw this rounded rectangle so that there's about ½ inch between the edge of your tag and your selection. Selections > Invert. Selections > Modify > Feather > 17. Hit delete. Selections > Select none.
Open the "doodley branches." Copy and paste as a new layer. Position as you like it. I started positioning it on the left side of the tag. I later also moved it up a bit.
Duplicate this layer. Image > Mirror. Merge down these two layers. Drop shadow.
Go back to the top layer and add your name. I used the provided gradient for fill and the stroke, stroke set at 3.
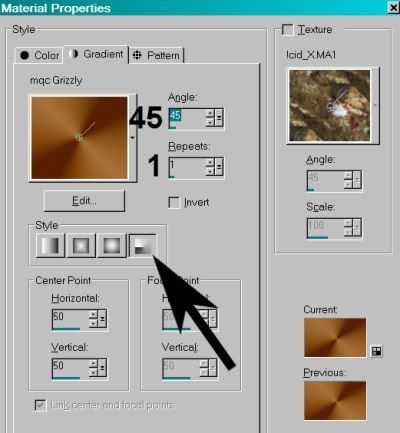
I added a Gradient Glow, settings 4 - 0 - 100, color #fbb2b2. Drop shadow the name.
Add your copyright, license information if applicable, and taggers'/watermark.
Resize your tag to the size with which you're most comfortable.
If you're NOT going to animate, you can just merge and save. You're done!
A N I M A T I O N
Highlight your "doodley branches" layer. Duplicate this layer three times, for a total of four "doodley branch" layers.
Highlight the bottom doodley branch layer...
Effects > VM Natural > Sparkle with the settings shown below:

I believe these are the default settings.
Hit okay.
Highlight the second branches layer. Again, add Sparkle, but move your top and bottom settings to some random thing. Makes no difference what. Just as long as it's a change.
Hit okay.
Highlight the next layer up of branches. Add Sparkle again, and again move the slider bars on the top and bottom settings.
Hit okay.
Highlight the top branches layer. Once more, add Sparkle, moving the slider bars as you like.
Hit okay.
Whenever I use VM Natural > Sparkle, I do everything twice. So repeat all the above animation steps.
Close out the top three branches layers, leaving the bottom branches layer open.
Edit > Copy merged
Open Animation Shop, right-click on the desktop area, and paste as a new animation.
Return to PSP. Close out the bottom branches layer, and open the next branches layer.
Edit > Copy merged.
Return to Animation Shop and Edit > Paste > After Current Frame.
Back to PSP. Close out the second branches layer, and open the third branches layer.
Edit > Copy merged.
And, back to Animation Shop. Edit > Paste > After Current Frame.
Last time, close out the third branches layer and open the top.
Edit > Copy merged.
And last time, Edit > Paste > After Current Frame.
Edit > Select All.
Right-click on the top bar of your animation and choose "Frame Properties." Change this number to 37.
View > Animation. If you like what you see, save! And, we're done! I hope you've enjoyed this tutorial! Sorry for all the repetition. I know it's difficult to keep your place when it all looks the same. Thanks for trying it out and sticking with it!
.


No comments:
Post a Comment