
You will also need:
Animation Shop. This is from CNET, so it's a safe download.
I checked to make sure the above link was still valid, and was surprised to see that they're now charging $19 for Animation Shop! I'm so sorry, I didn't realize it. It's been free for ages. I don't know when they started charging....
Multiple tubes of your choice. Choosing a main tube that is sitting might work best for this one. I'm using the old-style pinup artwork of Ralph Burch. You must have a license to use his artwork. You can get that license and art at My PSP Tubes.
Scrap kit is by Patty, of Honored Scraps. This is a another FTU kit!! This kit is called At The Movies. This is part of an "At The Movies" blog train back in June. There are other sites listed with lots more freebies, so take advantage, if you'd like to! And be sure to thank those that share their work for free, okay?
Filters: Mura's Meister > Copies, Eye Candy 4000 HSB Noise
Font: I used Aragon.
Supplies: Just the mask. Again, I do not know from whom I acquired this mask. I have so many from over the years, and when I began collecting I had NO clue I'd one day be writing tuts! So, again, if you know whose work this is, let me know so that I might give credit where it's due!
Also, please, if you have problems with any download link for supplies, drop me a line via e-mail. Leaving a comment without a way for me to contact you back doesn't help. If you e-mail me, I'll send you the supplies.
Okay! Let's get at it again!
Open your mask and minimize in PSP. Alternatively, you could file it in your masks file as I did, and forget later from whence it came!! LOL. But it'd be there for your use!!
Open a new image, 700 x 700, white.
Open star. Resize 10%. Copy and paste as a new layer.
Effects > Mura's Meister > Copies with the settings shown below:
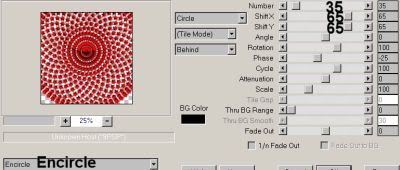
[Those numbers on the right say 35, 65, and 65. I know it's hard to see.]
Hit okay.
Selections > Select All > Float > Defloat
Grab your Flood Fill tool and use color #e21a1e. Fill your stars with this color. Selections > None.
Add an inner bevel with the settings below:
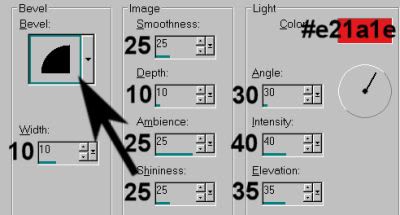
Hit okay.
Open filmstrip3. Copy and paste as a new layer. At this point I moved the star circle up and the filmstrip down. In the layer palette, the filmstrip layer should be above the stars layer.
Add your main tube so you can configure where everything belongs. :) Resize, position, and drop shadow your tube.
Okay, highlight the stars layer.
Open Paper5. Copy and paste as a new layer. (This should be below the filmstrip and above the stars.)
Open the rest of your tubes, copy and paste as new layers. These should all be under the filmstrip but above the paper layer. Resize, position in the film's frames and drop shadow to your liking. Merge your four tubes down to one layer.
Highlight your filmstrip layer.
Grab your magic wand and click inside the four frames of the film. Selections > Modify > Expand by 5. Selections > Invert.
Highlight your paper layer and hit delete.
Now highlight the tubes layer and hit delete.
Selections > Select none.
Highlight your filmstrip layer and drop shadow. You may now merge down the filmstrip, tubes, and paper layers if you wish.
Open bow1. Resize 40%. Copy and paste as a new layer. Arrange as you would like on your canvas. Use my example for placement reference if you like. To get this bow to look more like in color to the rest of the red on the tag, I brightened it up a bit with Adjust > Brightness and Contrast > Brightness/Contrast with the below settings:
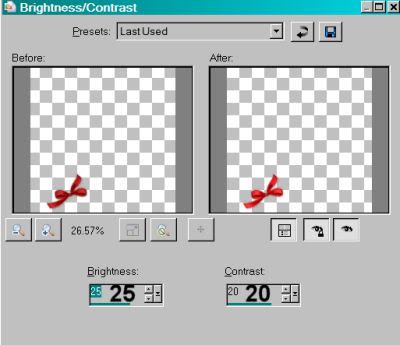
Hit okay. Drop shadow the bow.
Open clapboard5. Resize 25%. Copy and paste as a new layer. Position to your liking and drop shadow. Again, you may use my example for placement reference, if you like.
Now, highlight your white background layer.
Open paper5 again. Copy and paste as a new layer.
Apply the mask. Delete the mask layer, answer "yes" to the pop-up question, and merge group.
Go back to the top layer and add your name. I used color #e21a1e for fill. No stroke. Add the same inner bevel as we did above:
Hit okay.
Drop shadow the name.
Add your copyright, license information if applicable, and taggers'/watermark.
Resize your tag to the size with which you're most comfortable.
If you're NOT going to animate, you can just merge and save. You're done!
A N I M A T I O N
Highlight your mask layer. Duplicate this layer twice, for a total of three mask layers.
Still on the bottom mask layer...
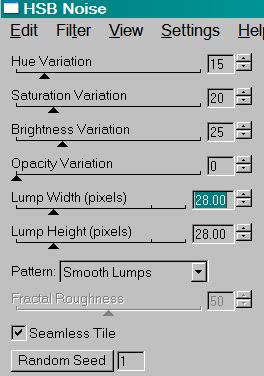
Effects > Eye Candy 4000 > HSB Noise with the settings shown below:
Hit okay.
Highlight the middle mask layer. Again, add HSB Noise, and click on "Random Seed."
Hit okay.
Highlight the top mask layer. Add HSB Noise again, clicking "Random Seed" once more.
Hit okay.
Close out the top two mask layers, leaving the bottom mask layer open.
Edit > Copy merged
Open Animation Shop, right-click on the desktop area, and paste as a new animation.
Return to PSP. Close out the bottom mask layer, and open the middle mask layer.
Edit > Copy merged.
Return to Animation Shop and Edit > Paste > After Current Frame.
Back to PSP. Close out the middle mask layer, and open the top mask layer.
Edit > Copy merged.
And, back to Animation Shop. Edit > Paste > After Current Frame.
Edit > Select All.
Right-click on the top bar of your animation, and choose "Frame Properties." Change that number to 30.
View > Animation. If you like what you see, save! And, we're done! I hope you've enjoyed this tutorial! Thanks for coming by!!
.


No comments:
Post a Comment