
You will also need:
Animation Shop. This is from CNET, so it's a safe download. However, it costs. That changed pretty recently. I don't know why!!
Okay, so.... a LOVELY person named solshne wrote to let me know that one might find Animation Shop for free at this location. This is an FTP link and I have no idea if it's safe or not. So keep your antivirus handy to scan it after download!
A tube of your choice. I'm using the glamorous artwork of Jennifer Janesko. You must have a license to use her artwork. You can get that license and art at CILM.
Scrap kit is again by Lissa, of Lissa E Designz. This is a FTU kit, called Mint Mayhem. Be sure to leave your thanks for the freebies!! Again, this is one in the set of seven she posted as a freebie, so as always, leave thanks for the free stuff! This one's the third row down, second kit. This is the last kit from here for me for a while!!
Filters: Eye Candy 4000 > Gradient Glow, dsb Flux > Bright Noise
Font: I used Beau Rivage One.
Supplies: The mask, again by Wee Scots Lass. She has a lot of masks there, right on the front page. So if you'd like her collection, there you go! Be sure to thank her for her generosity!
Also, please, if you have problems with any download link for supplies, drop me a line via e-mail. Leaving a comment without a way for me to contact you back doesn't help. If you e-mail me, I'll send you the supplies.
Okay let's begin!!
Open your mask in PSP and minimize. Alternatively, you could file it in your PSP masks file for use at a later date. Totally up to you!
Okay, let us begin! This one's not too ornate at all....
Open a new canvas, 700 x 800, white.
Open Frame1. Rotate 90° right. Resize 85%. Copy and paste as a new layer.
Add your tube. Resize, position and drop shadow to your liking.
Highlight your frame layer. Grab your magic wand, and click inside the frame. Selections > Modify > Expand by 1. Selections > Invert.
Highlight your tube layer. Grab your eraser brush and delete the portions of your tube that you do not want showing at the bottom (and/or sides) of the frame.
Selections > Select none.
Highlight your white background layer.
Open Paper7. Copy and paste as a new layer.
Apply your mask. Delete mask layer, answer "yes" to the pop-up question, and merge group.
Highlight your frame layer.
Open GemDoodle1. Copy and paste as a new layer. Position on the top right corner of your frame. See my example for placement reference, if you like. Duplicate this layer. Image > Mirror, Image > Flip. Merge these two layers down.
Go to the top layer and add your name. I used color #3c3c3c for the fill and stroke, stroke set at 2.
Effects > Eye Candy 4000 > Gradient Glow with settings 4 - 25 - 100, color #429e9d.
Add an extra Gradient Glow in white.
Drop shadow your name. I rotated mine 25° left and positioned on the bottom right corner of the frame. (On the layer palette, the name layer is just below the GemDoodle layer.)
Resize your tag to a size with which you are comfortable.
Add your copyright, license information if applicable, and taggers'/watermark.
If you choose not to animate, you can merge your layers here and be done! Congrats!
A N I M A T I O N
Highlight your GemDoodle layer. Duplicate three times, for a total of four GemDoodle layers.
Concentrate now on the bottom GemDoodle layer.
Effects > dsb Flux > Bright Noise with the following settings:
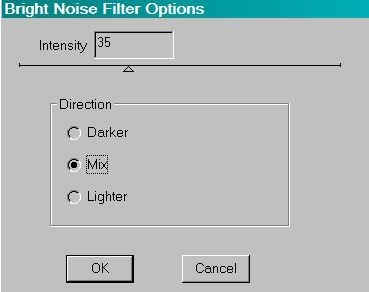
Hit okay.
Move up to the next GemDoodle layer. Again, add Bright Noise, but change the intensity to 37. Hix mix a couple times.
Hit okay.
Move up to the next GemDoodle layer. Adding Bright Noise again, but this time change the intensite to 40. Hit mix a couple times.
Hit okay.
Now, on the top GemDoodle layer. Add Bright Noise again, with the intensity at 42 and hit mix a time or two for the last time.
Hit okay.
Close out the top three GemDoodle layers, leaving the bottom GemDoodle layer open.
Edit > Copy Merged.
Open Animation Shop. Right-click on the desktop area and paste as a new animation.
Return to PSP. Close out the bottom GemDoodle layer and open the next GemDoodle layer up.
Edit > Copy merged.
Back to Animation Shop. Edit > Paste > After Current Frame.
Return again to PSP. Close out the open GemDoodle layer and open the next GemDoodle layer up.
Edit > Copy merged.
Again, back to Animation Shop. Edit > Paste > After Current Frame.
One last time, return to PSP. Close out the open GemDoodle layer and open the top GemDoodle layer.
Edit > Copy Merged.
Finally, back to Animation Shop. Edit > Paste > After Current Frame.
View > Animation.
Et, voila, we are done! I hope you enjoyed doing this tutorial, and I thank you for stopping by!!
.


No comments:
Post a Comment