
You will also need:
Animation Shop. This is from CNET, so it's a safe download.
I checked to make sure the above link was still valid, and was surprised to see that they're now charging $19 for Animation Shop! I'm so sorry, I didn't realize it. It's been free for ages. I don't know when they started charging....
A tube of your choice. I'm again using the glamorous artwork of Jennifer Janesko. You must have a license to use her artwork. You can get that license and art at C.I.L.M.
Scrap kit is by Bluey, of Bluedream Designs. This is a FTU kit, called Love or Lust. Be sure to leave your thanks for the freebies!!
Filters: Eye Candy 3,1 > Glass, VM Natural > Sparkle
Font: I used AThelindaRook.
Supplies: The mask. This is the 20-20 mask, and it was all the rage a few years back. But from whom it originated, I just don't know. Please let me know if it is yours, and I'll surely give you the credit you so richly deserve!
Also, please, if you have problems with any download link for supplies, drop me a line via e-mail. Leaving a comment without a way for me to contact you back doesn't help. If you e-mail me, I'll send you the supplies.
Okay let's begin!! There will be a bit of repetition to this, just to warn you!
Open your mask in PSP and minimize. Alternatively, you could file your mask into your masks file, for use in the future. It is, of course, up to you!
Open a new image, 700 x 700, white.
Open Frame5. Copy and paste as a new layer.
Add your tube. Resize, position and drop shadow to your taste. I didn't do the eraser brush trick on this one. I thought perhaps having the full torso showing might work out, but in the end it mostly got covered. lol. So, again, up to you!
Open the Ornament. Copy and paste as a new layer. Position to whichever side you wish on your tag, toward the top. Duplicate this layer and Image > Mirror.
Merge these two layers down, and duplicate that layer. Image > Flip.
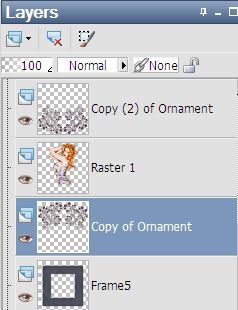
In your layer palette, the top Ornaments should be below the tube layer, but above the frame layer. the bottom Ornaments should be above the tube layer.
Drop shadow the Ornament layers.
Open BowWrap1. Copy and paste as a new layer. Use your pick tool
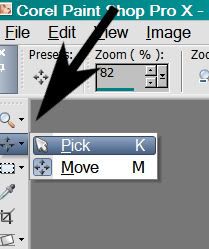
... and stretch the wrap until it fits well around the frame. Move the BowWrap down a bit, again so that it's around the frame portion and not blocking the tube. (This layer should be above your tube layer and the bottom Ornament layer.) Drop shadow your BowWrap.
Open Flower4. Copy and paste as a new layer. Resize 75%. Rotate 15° left. Place on the left side of your frame. Use my example for placement reference, if you like.
Duplicate this layer and Image > Mirror. Merge these two layers down, and drop shadow.
Open Flower3. Copy and paste as a new layer. Resize 60%. Rotate 20° left. Position over your left Flower4 layer.
Duplicate this layer and Image > Mirror. Merge these two layers down, and drop shadow.
Highlight the white background layer.
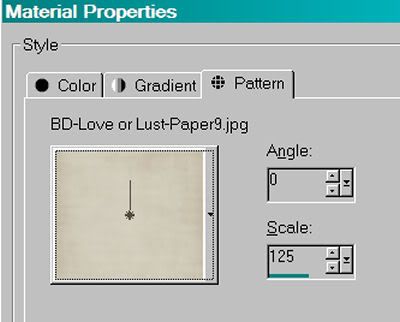
Open Paper7. Copy and paste as a new layer. Resize so it covers the entire background. I resized 125%.
Apply your mask. Delete the mask layer, answer "yes" to the pop-up question, and merge group.
Because I'd resized the original paper layer so much, the mask layer was now "hanging over" the edge of the canvas. I didn't want that, so I resized the mask layer 90%.
Go back to the top layer and add your name. I opened Paper9 and used that as the color for the name.
I didn't have a stroke color - there was no stroke measurement.
I then added the Glass filter, as shown below:
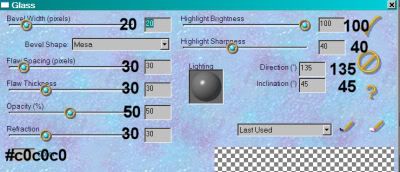
Hit okay.
I then rotated the name to the left 30% and placed it in the bottom right corner. Drop shadow the name.
Resize your tag to the size with which you're most comfortable.
Add your copyright, license information if applicable, and taggers'/watermark.
If you're NOT going to animate, you can just merge and save. You're done!
A N I M A T I O N
This is confusing. Please forgive the confusing part!! It would have been so much easier to put the bottom ornaments on the same layer as the top ones!!
Highlight your top Ornament layer. Duplicate this layer two times, for a total of three Ornament layers.
Do this with your bottom Ornament layer as well. Duplicate that twice, for a total of three.
Highlight the bottom Ornament layer of the bottom group...
Effects > VM Natural > Sparkle with the settings shown below:
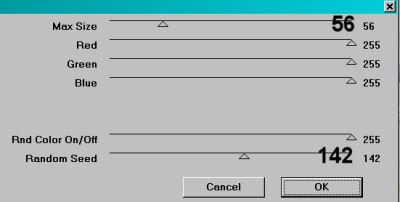
Hit okay.
Repeat this with the bottom layer of your top group.
I know this can be confusing, but that's the way to do it. I'm sorry if I confuse you here!
Highlight the middle Ornament layer of your top group, while you're there. Again, add Sparkle, but move your top and bottom settings to some random thing. Makes no difference what. Just as long as it's a change.
Hit okay.
Repeat this with the middle Ornament layer of your bottom group.
Now, highlight the top Ornament layer of your bottom group. Add Sparkle again, and again move the slider bars on the top and bottom settings.
Hit okay.
Repeat with the top Ornament layer of your top group.
Whenever I use VM Natural > Sparkle, I do everything twice. So repeat all the above animation steps.
Close out the top two Ornament layers in each group, leaving the bottom Ornament layer open in each group of three.
Edit > Copy merged
Open Animation Shop, right-click on the desktop area, and paste as a new animation.
Return to PSP. Close out the bottom Ornament layers, and open the middle Ornament layers in both groups.
Edit > Copy merged.
Return to Animation Shop and Edit > Paste > After Current Frame.
Back to PSP. Close out the middle Ornament layers, and open the top Ornament layers in both groups.
Edit > Copy merged.
And, back to Animation Shop. Edit > Paste > After Current Frame.
Right-click on the top bar of your animation and choose "Frame Properties." Change this number to 30.
View > Animation. If you like what you see, save! And, we're done! I hope you've enjoyed this tutorial! Sorry for all the repetition. I know it's difficult to keep your place when it all looks the same. Thanks for trying it out and sticking with it!
.


No comments:
Post a Comment