
You will also need:
Animation Shop. This is from CNET, so it's a safe download.
I checked to make sure the above link was still valid, and was surprised to see that they're now charging $19 for Animation Shop! I'm so sorry, I didn't realize it. It's been free for ages. I don't know when they started charging....
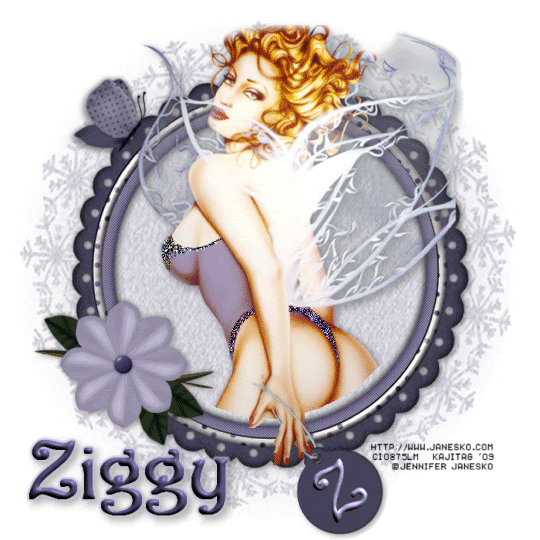
A tube of your choice. I'm using the glamorous artwork of Jennifer Janesko. You must have a license to use her artwork. You can get that license and art at C.I.L.M..
Scrap kit is by Ziggy, of ZiggyFan Scrap Designs. This is a FTU kit, called Purple Daydream. Be sure to leave your thanks for the free sharing of Ziggy's work!!
Filters: Eye Candy 4000 > Gradient Glow, dsb Flux > Bright Noise
Font: I used Bouquet.
Supplies: The mask with the weird name, again by whom I do not know! Let me know, the usual! I'll be sure to give proper credit when told it belongs to someone!
Also, please, if you have problems with any download link for supplies, drop me a line via e-mail. Leaving a comment without a way for me to contact you back doesn't help. If you e-mail me, I'll send you the supplies.
Okay! Let's begin, shall we? :)
Open your mask and minimize in PSP. Alternatively, you could file it in with your existing masks file, so that it would be available to be used later.
A note about the scrap kit: Ziggy has closed all the actual element and paper layers, leaving her copyright showing on each piece. You will have to go through and open up the elements to use them. Also, there are some elements that are three or four to a file. It may help to separate those that are of differing colors a little bit. You know, move the layers around a bit so you can see the color differentiations.
Open a new image, 700 x 700, white.
Open Scallopedframe. Resize 110%. Copy and paste as a new layer.
Add your tube of choice. Resize, position and drop shadow to your liking.
Highlight your frame layer. Grab your magic wand and click inside the frame.
Selections > Modify > Expand by 1. Selections > Invert.
Highlight your tube layer. Grab your eraser brush, and erase the lower portion of your tube -- the parts you don't want showing. In my case, I wanted her hand to be showing, so it was tricky, but you see what I mean.... right?? :)
Highlight your white background layer.
Open Paper3. Copy and paste as a new layer. Enlarge so that it covers the entire background.
Adjust > Hue and Saturation > Colorize with the following settings:
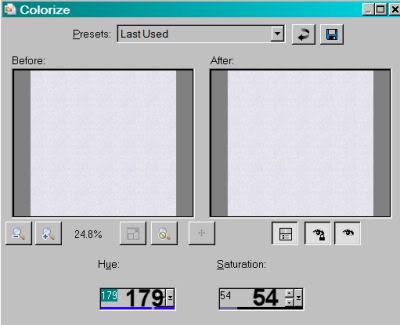
Hit okay.
Apply your mask. Invert transparency!!! Delete mask layer, answer "yes" to the pop-up question, and merge group.
Change the tonality of your mask layer by going Adjust > Brightness and Contrast > Brightness/Contrast with settings below:
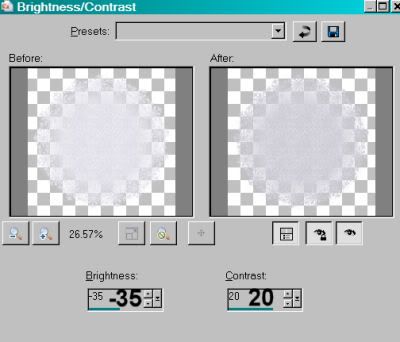
Hit okay.
Open "Tags". Choose the tag of your liking (whichever color works best for you). Copy and paste as a new layer. Resize 50%. Position where you'd like it on your tag. I have mine dangling from the tube's hand. To do this, I first rotated it by 35° left. I then put one layer of the tag below her hand, and one above. I then deleted portions of the string on the top layer so that it appears she's carrying it and it's swinging beside her.
Drop shadow your bottom tag.
Here, I put the first initial on the tag. Choose your font, size as necessary, and type your initial. Convert to raster layer. Rotate 35° left. I applied the following inner bevel:
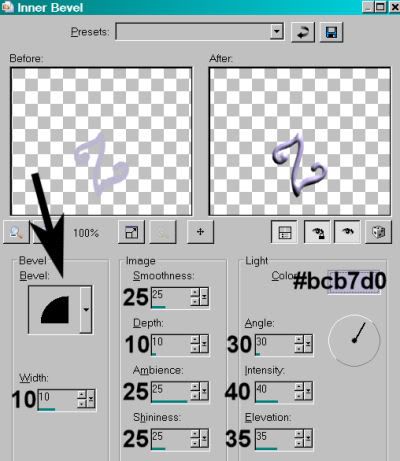
Hit okay. Drop shadow your initial.
Open "Flowers." Pick the flower you'd like to use. Resize 50%. Position as you'd like. I chose the lower left side of the frame. Drop shadow your flower.
Open your choice of butterflies. I chose the Polka Dot variety.
Grab your lasso, set on point-to-point, and select the butterfly you'd like to use. Edit > Copy.
Then paste onto your canvas. Resize 40%. Position where you'd like it. I went Image > Mirror and placed it on the upper left portion of the frame. Drop shadow your butterfly.
Go back to the top layer and add your name. I used color #bcb7d0 for the fill and no stroke. I added the same inner bevel that we used above, on the initial.
Hit okay.
I then added a Gradient Glow of 4 - 0 - 100, color #bcb7d0. Drop shadow the name.
Add your copyright, license information if applicable, and taggers'/watermark.
Resize your tag to the size with which you're most comfortable.
If you're NOT going to animate, you can just merge and save. You're done!
A N I M A T I O N
Highlight your tube layer. Zoom in a few times to get the detail right. I went to 250%. Yours may differ. All up to you.
Grab your lasso tool, set on point-to-point, mode is Add/Shift, and draw around the dark purple and sparkly areas on the angel's ... bodysuit? Is that what she's wearing? LOL! Like so:
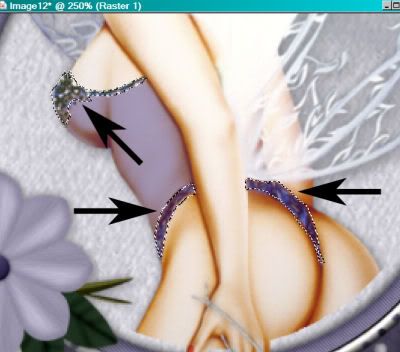
When you've got that done, go back to normal size. Duplicate your tube layer twice, for a total of three tube layers.
On the bottom tube layer...
Effects > dsb Flux > Bright Noise with the settings shown below:
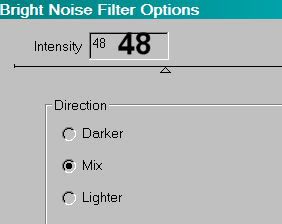
Hit "mix" a time or two, then hit okay.
Highlight the middle tube layer. Again, add Bright Noise, and click on "mix" a few times, then hit okay.
Highlight the top tube layer. Add Bright Noise again, clicking "mix" a few times more.
Hit okay.
In order to get a REAL good effect, I did all the above twice. But the second time I went through the layers I had my dsb Flux intensity set to 58.
Selections > Select none.
Close out the top two tube layers, leaving the bottom tube layer open.
Edit > Copy merged
Open Animation Shop, right-click on the desktop area, and paste as a new animation.
Return to PSP. Close out the bottom tube layer, and open the middle tube layer.
Edit > Copy merged.
Return to Animation Shop and Edit > Paste > After Current Frame.
Back to PSP. Close out the middle tube layer, and open the top tube layer.
Edit > Copy merged.
And, back to Animation Shop. Edit > Paste > After Current Frame.
View > Animation. If you like what you see, save! And, we're done! I hope you've enjoyed this tutorial! Thanks for trying it out!
.


No comments:
Post a Comment