You will also need:
Animation Shop. This is from CNET, so it's a safe download. However, it costs. That changed pretty recently. I don't know why!!
BUT..... a LOVELY person named solshne (and another named Chris) wrote to let me know that one might find Animation Shop for free at this location. This is an FTP link and I have no idea if it's safe or not. So keep your antivirus handy to scan it after download!
A tube of your choice. I'm using the fantastic artwork of Elias Chatzoudis. You must have a license to use his artwork. You can get that license and art at My PSP Tubes.
The scrap kit is by Brandi of Grunge & Glitter Scraps. This is a FTU *FULL SIZED* kit, called Trick or Treat. As always, leave thanks for the freebies!
Filters: Eye Candy 4000 > HSB Noise
Font: I used Halloween_ScriptanaREG.
Supplies: The mask. This is by Ali, of Designs By Ali. She seems now to have a store, a tut web site and a tut blog. I could not find her mask, so I left her a note in her chat box. But I thank you Ali for the verrrry useful mask!
Also, please, if you have problems with any download link for supplies, drop me a line via e-mail. Leaving a comment without a way for me to contact you back doesn't help. If you e-mail me, I'll send you the supplies.
Let's get it started! Let's get it started in here!! (LOL, care to dance?)
Open your mask and minimize in PSP. Alternatively, you could file it in your PSP masks file for use at a later date.
Open a new canvas, 700 x 750, white.
Open frame2. Resize 75%. Copy and paste as a new layer. I moved mine up a bit, it's up to you. Remember, if you move your frame up, you might need to move the mask down a bit. I've covered it, below.
Add your tube. Resize, position, and drop shadow to your taste.
Highlight your frame layer. Grab your magic wand, and click inside the center of the frame. Selections > Modify > Expand by 1. Selections > Invert.
Highlight your tube layer. Grab your eraser brush and erase any of the tube that overhangs the bottom of the frame.
Selections > Select none.
Highlight your white background layer.
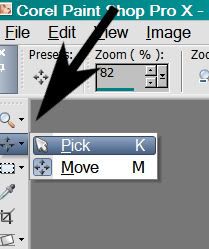
Open paper2. Copy and paste as a new layer. I needed the pick tool

To stretch the paper to fill the top and bottom of the canvas.
Apply your mask. Delete mask layer, answer "yes" to the pop-up question, and merge group.
I moved my mask down just a bit. And to keep the bottom part of the mask from butting up to the bottom of the tag....
Grab your lasso tool, set on freehand. Feather set to 17.
Be sure you're on your mask layer. Draw a curve from left to right, curve going downward, and then bring the line back, below the area of the first curve. It should look like a smile, of sorts.
Hit delete. Selections > Select none.
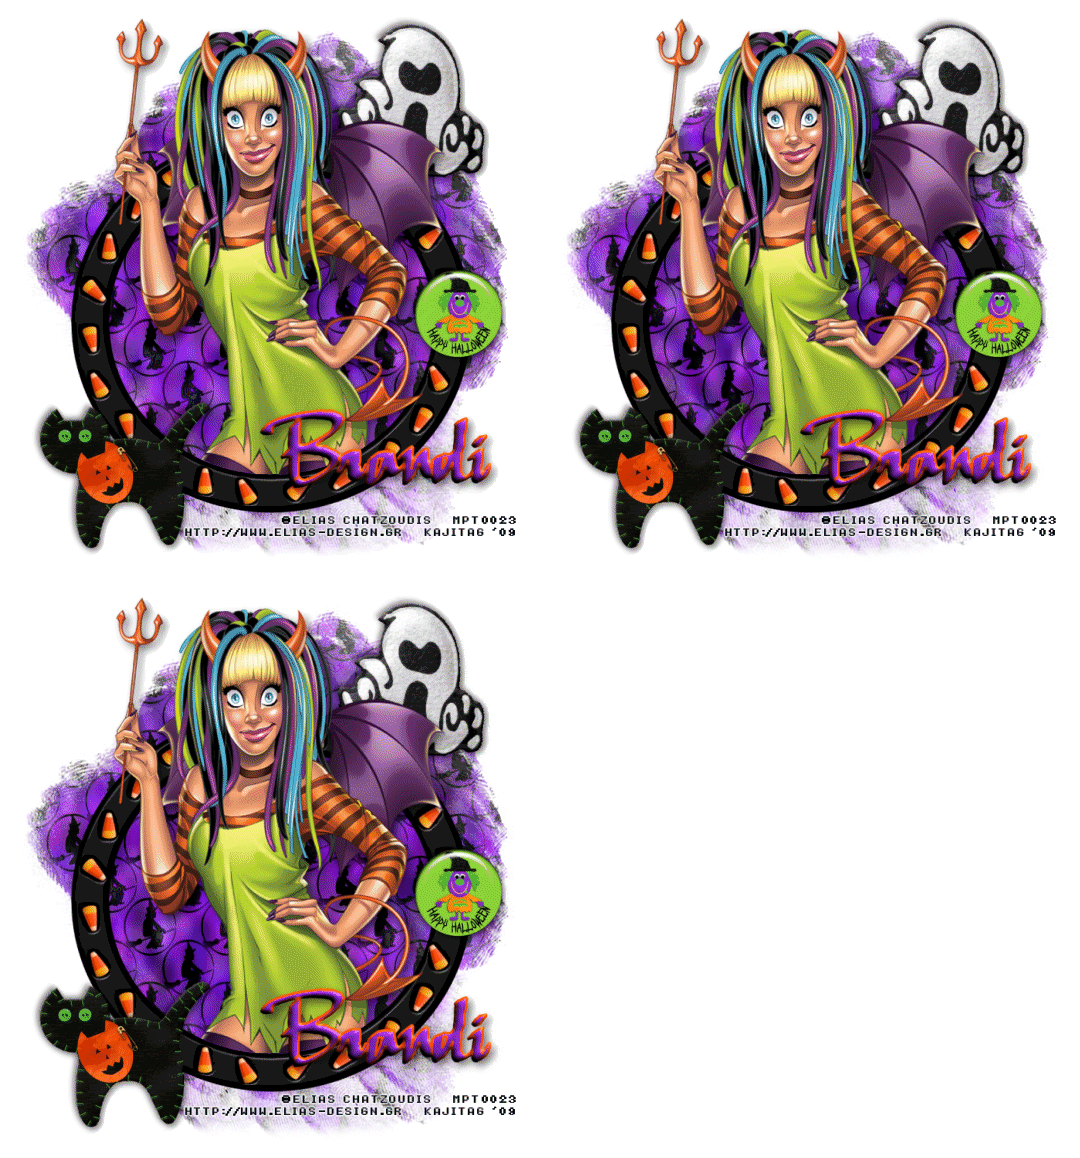
Open feltghost. Resize 35%. Copy and paste as a new layer. I chose to put mine behind my tube, in the upper right corner. See my example for placement reference. Drop shadow your ghost.
Open button3. Resize 20%. Copy and paste as a new layer. I put mine on the right side of the frame. See my example for placement reference. Drop shadow your button.
Open feltkitty. Resize 35%. Copy and paste as a new layer. I put mine on the bottom left of the canvas area. Again, see my example if you wish. Drop shadow your kitty.
Go to your top layer and add your name. I used color #7926b5 for the fill and #eb4305 for the stroke, stroke set at 3.
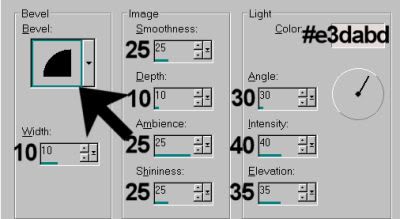
I then added a small a bevel as follows:

Drop shadow your name.
Resize your canvas to a size with which you are comfortable.
Add your copyright, license information if applicable, and taggers'/watermark.
If you choose not to animate, you're now done, and you can merge your layers and save!
A N I M A T I O N
Highlight your mask layer. Duplicate twice, for a total of three mask layers.
Highlight your bottom mask layer.
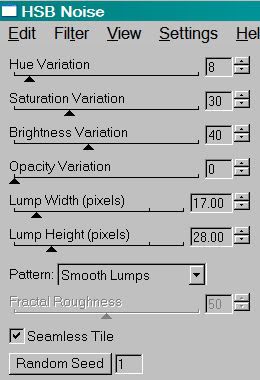
Effects > Eye Candy 4000 > HSB Noise with the following settings:

Hit okay.
Highlight the middle mask layer.
Add HSB Noise again, this time hitting "Random Seed" once.
Hit okay.
Now, on the top mask layer. Add HSB Noise one last time, again hitting "Random Seed."
Hit okay.
Close out the top two mask layers, leaving the bottom mask layer open.
Edit > Copy Merged.
Open Animation Shop. Right-click on the desktop area and paste as a new animation.
Return to PSP. Close out the bottom mask layer and open the middle mask layer.
Edit > Copy merged.
Back to Animation Shop. Edit > Paste > After Current Frame.
Return again to PSP. Close out the middle mask layer and open the top mask layer.
Edit > Copy merged.
Again, back to Animation Shop. Edit > Paste > After Current Frame.
Edit > Select All.
Right-click on the top bar of your animation and choose "frame properties."
Change this number to 35.
View > Animation.
And we are done! I hope you enjoyed this tutorial! Thank you for stopping by!!
.


No comments:
Post a Comment