
You will also need:
A tube of your choice. I'm using the fantastic artwork of Elias Chatzoudis. You must have a license to use his art. You may obtain that license and his art from My PSP Tubes.
The scrap kit is by LauraMarie, from, of all things, LauraMarie Scraps! This is a FTU kit in a FULL SIZE, titled "Dark Night." Leave some love for the freebies!!
Supplies: You can find here. They include the mask, by Sophisticat Simone! A big thanks to Simone for sharing her great work! I'm also including the moon, the HauntedCreepyMtn file and the word art. I know the word art was done by Melissa, formerly of Scrappy Expressions. Not sure how to get in touch with her, but she's the one who did it! Great font, too -- wish I knew which one she used! The others, I have no knowledge about.
Filters: No outside filters used in this tut!
Font: I used Blood Omen.
Okay, let us begin! This one took me a while to finish, but it's not a difficult tut do... My power kept going off over the weekend, and I'd never saved it, any of the times the power blew. Today, re-building it, I saved it step-by-step!!!
Open your supplies in PSP and minimize. Alternatively, you could file them in with the rest of your PSP files for use at a later date. Totally up to you!
Open a new canvas, 800 x 700, white.
Remember, the scrap kit is full-sized, so the resizing is going to be major!
Open Spider Web Frame. Resize 16%. Copy and paste as a new layer. You can position this later. Helps to.....
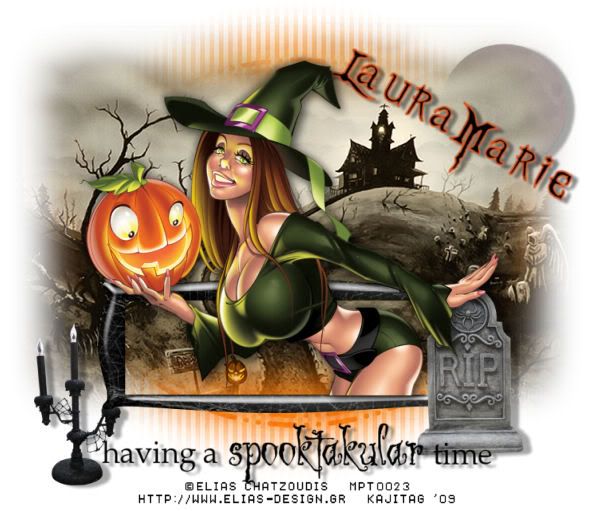
Add your tube. Resize, position and drop shadow to your liking. I put mine as though she was popping out of that "frame." That was quite easy to do with this particular tube, but if yours happens to be a full body, then....
Highlight your frame layer. Grab your magic wand, and click inside the frame. Selections > Modify > Expand by 1. Selections > Invert.
Highlight your tube layer. Grab your eraser brush and delete the portions of your tube that you do not want showing at the bottom (and/or sides) of the frame.
Selections > Select none.
Highlight your white background.
Open paper7. Resize to 800 x 800. Copy and paste as a new layer.
Apply your mask. Delete mask layer, answer "yes" to the pop-up question, and merge group. Now, rotate your mask 90° either way.
Open your HauntedCreepyMtn. Copy and paste as a new layer. This should be below your tube and above your mask layer.
At this point, you can move your elements around to where they fit the best, according to your eye. Mine all came up a bit, I think it was. I used the pumpkins in the Haunted image as a focus point. I wanted at least one of them to show through the frame.
Open the moon. Change the "aura" of the moon by Adjust > Brightness and Contrast > Brightness/Contrast with the following settings:
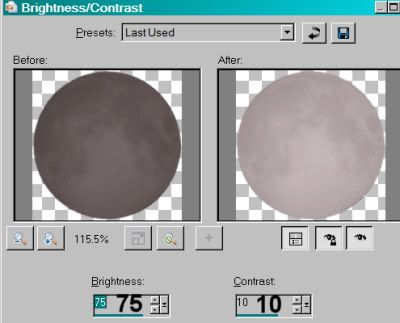
Hit okay.
Move the moon to wherever you'd like, in relation to the tube, etc., that you're using. I put mine in the top right area of the canvas. I drug it down to under the HauntedCreepyMtn layer and above the mask layer. Drop shadow your moon.
Open the gravestone. Resize 10%. Copy and paste as a new layer. Position where you'd like it. I have it so it looks like my tube is trying to lean on it, or was just leaning on it, or something! For that reason, I have it, in the layer palette, below the tube. Drop shadow your gravestone.
Open the candles. Resize by 10%. Copy and paste as a new layer. Position where you'd like it. You can use my example for placement reference, if you like. Drop shadow your candles.
Open the word art. Copy and paste as a new layer. Position at the bottom center of your canvas. Again, you can use my example for placement reference if you want to. Drop shadow your word art.
Using your selection tool set on rectangle, crop out any of the excess white you feel just doesn't need to be in the finished product. (You may use the crop tool if you like. I never quite got the hang of that, and have always done the large selection, then gone Image > Crop to Selection.)
Go to the top layer and add your name. I used black for the fill and #d75625 for the stroke, stroke set at 2.
Rotate the name 30° right and place between your house and the moon, kinda-sorta. See my example to see what I mean. lol.
Drop shadow your name.
Resize your canvas to a size with which you're comfortable.
Add your copyright, license information if applicable, and taggers'/watermark.
Layers > Merge > and save! We are done!
Thanks for trying my tut!! I hope it was easy to understand and follow! Have a grrrrrreat day!
.


I can't get the haunted creepy Mt and the moon files to open. Can you help? Thnx debibusiness@gmail.com
ReplyDelete