
You will also need:
Animation Shop. This is from CNET, so it's a safe download. However, it costs. That changed pretty recently. I don't know why!!
HOWEVER!! .... a LOVELY person named solshne (and another named Chris) wrote to let me know that one might find Animation Shop for free at this location. This is an FTP link and I have no idea if it's safe or not. So keep your antivirus handy to scan it after download!
A tube of your choice. I'm using the fantastic artwork of Dominic Marco. You must have a license to use his artwork. You can get that license and art at C.I.L.M.
The scrap kit is by Grazy of Creation by Grazy. This is a PTU tagger-sized kit, available at Scraps With Attitude, and called Frightened Night.
Filters: Eye Candy 4000 > Gradient Glow, for the name only. Not essential for the tut, if you don't want it.
Font: I used Escrita.
Supplies: I'm using two masks on this one. I don't know from where I got either of them! So if someone out there recognizes one or both, let me know and I'll give credit where it's due. You can find these masks here.
Also, please, if you have problems with any download link for supplies, drop me a line via e-mail. Leaving a comment without a way for me to contact you back doesn't help. If you e-mail me, I'll send you the supplies.
Let's begin!
Open your masks and minimize in PSP. Alternatively, you could file them in your PSP masks file for use at a later date.
Open a new canvas, 800 x 700, white.
The pieces of this scrap kit are not named, but numbered. It got kind of confusing when I was copying things, so I will also refer to them as the names I labeled my layers to get me by.
Open 5, house. Copy and paste as a new layer. Drop shadow.
Open 28, the shorter, squatter grass. Resize 50%. Copy and paste as a new layer. Drop shadow.
Open 4, the tall grass. Resize 25%. Copy and paste as a new layer. Drop shadow.
Position these grasses, making the copies you feel you want there, along the bottom of the house. You'll want a couple of the tall grasses for the lamplight....
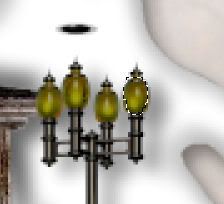
Open 36, the lamplight. Resize 10%. Copy and paste as a new layer. Position wherever you'd like it along the edge of the house. I duplicated mine and positioned another one by the right corner of the house. Merge down these two layers. Drop shadow the lamplights.
Now, the tall grasses in front of the lamplights, and sprinkled among the short grasses along the edge of the house, as you see fit. See my example for reference purposes, if you like.
Add your tube. Resize, position, and drop shadow to your taste.
Highlight your white background layer.
Open the paper labeled 10. Resize 800x800. Copy and paste as a new layer.
Apply the Halloween mask. Invert transparency!! Delete mask layer, answer "yes" to the pop-up question, and merge group. Apply the same mask again, again deleting the mask layer, saying "yes," yada-yada.
Now, apply mask FireCN. Delete the mask layer, answer "yes" to the pop-up question and merge group.
If you've done a few of my tuts, you know I don't like it when the edges of the finished product aren't feathered to white before the edges. I could NOT find a good way to do that with this tag, without taking completely away from the "ambiance" or "environment" of the tag. So I made this one exception! Sorry if you're anal about that, like me. I don't like it when I see the edges like that, but the overall results, I do like. So you can play with that all you like, and if you figure out a way that would work drop me a note!
Now, back to the tag...
Open 28, the ghost. Resize 50%. Position where you'd like it on your tag and drop shadow your ghost.
Open 37, the skeleton coming out of the concrete coffin. Resize 27%. Copy and paste as a new layer. Drop shadow.
Open 25, the pot. Resize 45%. Copy and paste as a new layer. I still think that pot looks a bit out of place, so if you think that too, you can try one of the other elements Grazy created in the kit. But, if you did select the pot, then...
Open 6, the contents of the pot. Resize 50%. Position on the top of the pot, so that it looks as if the pot is full and boiling. I did have to crop out a teeny portion of the contents "in" the pot to make it the right size.
Drop shadow your pot and its contents.
Open 9, the pumpkin. Resize 18%. Copy and paste as a new layer. I played around with places to put them, and found that around the railing on the porch was best for me. You can do it another way if you like. Duplicate the pumpkin and position it where you'd like it. Drop shadow both pumpkins. Merge the two pumpkin layers down.
Go to the top layer and add your name. I used color #4b3834 for the fill, #f86226 as the stroke, and stroke set at 2.
Effects > Eye Candy 4000 > Gradient Glow set at 3-0-100 in the color #fdba9f. I also added a slight bevel to the name, that's up to you.
Drop shadow your name.
You don't need to do this next part if you're not going to animate.
Now, grab your lasso tool, set on point-to-point, mode in add/shift. Scroll your mouse ball to zoom in on your lamplights. Draw a selection around the bulb area of the lamps... however many you like. I ended up with three on each lamplight.
Now, do the same thing on your pumpkins. Draw around their eyes and mouth.
DO NOT DESELECT!
Zoom back out and resize your canvas to a size with which you are comfortable.
Add your copyright, license information if applicable, and taggers'/watermark.
If you choose not to animate, you're now done, and you can merge your layers and save!
A N I M A T I O N
Highlight your pumpkin layer. Duplicate twice, for a total of three pumpkin layers.
Highlight your lamplight layer. Duplicate this twice as well, for a total of three lamplight layers.
I find it easiest when doing this to just start at the bottom, so highlight the bottom of the set of three of either one. We'll say, pumpkins.
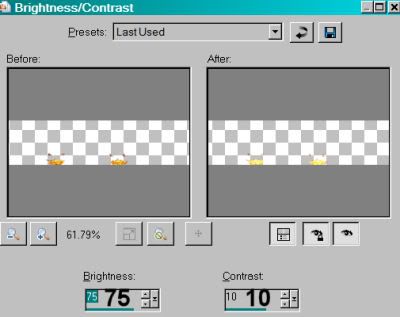
Adjust > Brightness and Contrast > Brightness/Contrast with the following settings:
Hit okay.
Now, highlight the bottom layer of the lamplights. Do the same thing with the brightness and contrast.
Highlight the middle layer of lamplights. Do the adjust brightness and contrast again, but this time change the first number to 50.
Now do that same thing to the middle pumpkin layer.
Highlight the top pumpkin layer. Adjust brightness and contrast again, but change the first number to 25.
Repeat on the lamplights, top layer.
Selections > Select none.
Now, close out the top two layers for both the lamplights and the pumpkins.
Actually, that's not necessarily so. If you want the flickering to NOT be in unison like in my example, close out different layers on, say, the pumpkin than you did the lamplight. Just keep track of what you're doing. Do it with all three layers of lamplights and pumpkins. Just choose one layer different than you have for the other set.
Geez, this sounds so dang weird as I type it. I sure hope you're understanding!
After you've closed out the two layers in each set that you've chosen....
Edit > Copy merged.
Open Animation Shop. Right-click on the desktop area and paste as a new animation.
Return to PSP. Close out the open layers in both the lamplight and pumpkin "sets." Open another one.
Edit > Copy merged.
Back to Animation Shop. Edit > Paste > After Current Frame.
Return again to PSP. Close out the open layers and open the layers you've not yet used.
Edit > Copy merged.
Again, back to Animation Shop. Edit > Paste > After Current Frame.
Edit > Select All.
Right-click on the top bar of your animation and choose "frame properties."
Change this number to 37.
View > Animation.
And we are done! I hope you could understand my meanderings on this one. I'm afraid I made a mess of it, while trying to put into words what I was thinking. Let me know if you're all "HUH?" on it! LOL.
I've decided to add the one I made for myself, which shows a bit what you can accomplish by using the random layers in the animation, instead of going bottom, middle, top on both the lamplight and the pumpkin layers. It's very subtle, but it's there. If you're choosing to look at the bigger example, just click on this one. Just skip the top pic of the tool bar. That was for a different tut!
.

.


No comments:
Post a Comment