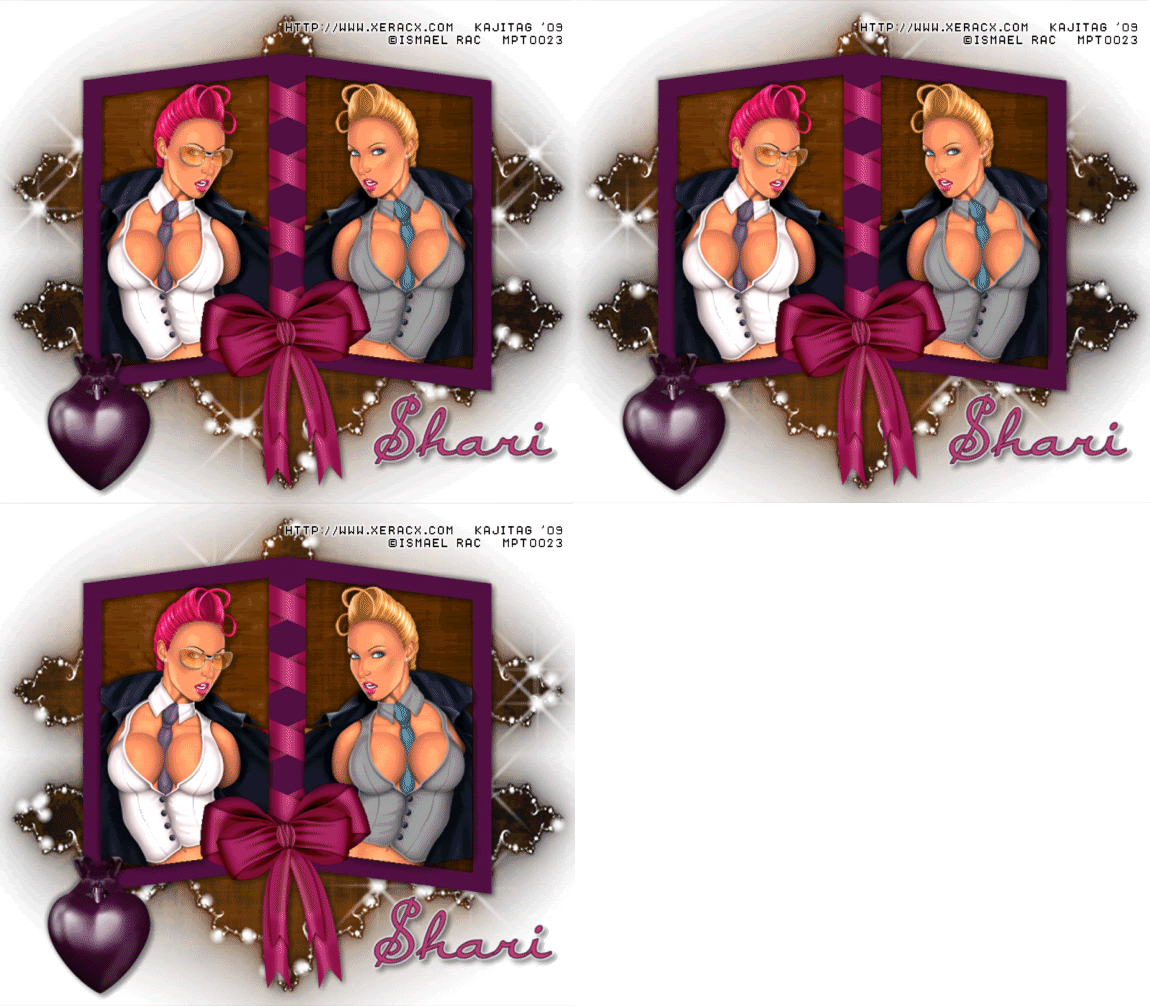
You will also need:
Animation Shop. This is from CNET, so it's a safe download. However, it costs. That changed pretty recently. I don't know why!!
BUT..... a LOVELY person named solshne wrote to let me know that one might find Animation Shop for free at this location. This is an FTP link and I have no idea if it's safe or not. So keep your antivirus handy to scan it after download!
A tube (or two) of your choice. I'm using the great art of Ismael Rac. You must have a license to use his artwork. You can get that license and art at Artistic Minds, Inc. (I have used my MPT license with this one, as Ismael was with MPT when I bought these tubes.)
The scrap kit is by Shari of Shari Ez's Scrapez Scrap Kits. This is a FTU *FULL SIZED* kit, called Grunge. This is part of a collaberation called, apparently, "Total Disorder Blog Train." As always, leave thanks for the freebies!
Filters: Xenofex 2 > Constellation
Font: I used BayernHandschriftNF.
Supplies: The mask, again by from the great mask-maker, Essex Girl! A great big thanks for these great masks!
Also, please, if you have problems with any download link for supplies, drop me a line via e-mail. Leaving a comment without a way for me to contact you back doesn't help. If you e-mail me, I'll send you the supplies.
Let's get this started!
Open your mask and minimize in PSP. Alternatively, you could file it in your PSP masks file for use at a later date.
Open a new canvas, 800 x 700, white.
Open doublewrappedframe1. Resize 25%. Copy and paste as a new layer.
Add your tubes. Resize, position, and drop shadow each tube to your taste.
Highlight your frame layer. Grab your magic wand, and click inside both open areas of the frame. Selections > Modify > Expand by 1. Selections > Invert.
Highlight one of your tube layers. Hit delete. Highlight your next tube layer. Hit delete.
Selections > Select none.
Highlight your white background layer.
Open grungebkg3. Resize to 800x800. Copy and paste as a new layer. Twice (two layers of grungebkg3).
Highlight your frame layer again. Click inside each area of the frame with your magic wand. Selections > Modify > Expand by 10. Selections > Invert.
Highlight your top layer of grungebkg3. Hit delete. Selections > Select none.
Highlight the next grungebkg3 layer. Apply your mask. Delete mask layer, answer "yes" to the pop-up question, and merge group.
Open hearthanger1. Resize 35%. Copy and paste as a new layer. Position where you'd like it. I chose the bottom left corner of the double frame. Drop shadow.
Drop shadow your frame.
Go to your top layer and add your name. I used color #c4407a for the fill and #58284c for the stroke, stroke set at 2.
I then added a small Gradient Glow of 3 - 0 - 100, color white. Drop shadow your name.
Resize your canvas to a size with which you are comfortable.
Add your copyright, license information if applicable, and taggers'/watermark.
If you choose not to animate, you're now done, and you can merge your layers and save!
A N I M A T I O N
Highlight your mask layer. Duplicate twice, for a total of three mask layers.
Highlight your bottom mask layer.
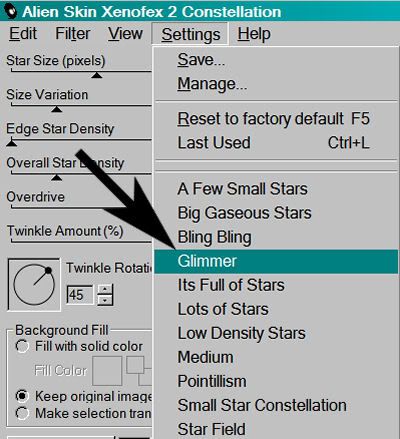
Effects > Xenofex 2 > Constellation set at Glimmer:

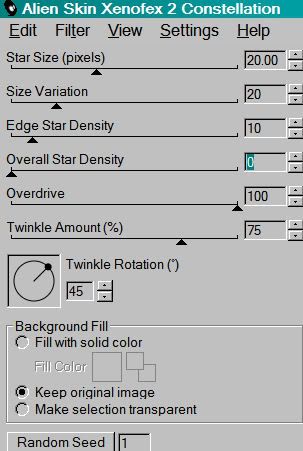
With the following settings:

Hit okay.
Highlight the middle mask layer.
Add Constellation again, this time hitting "Random Seed" once.
Hit okay.
Now, on the top mask layer. Add Constellation one last time, again hitting "Random Seed."
Hit okay.
Close out the top two mask layers, leaving the bottom mask layer open.
Edit > Copy Merged.
Open Animation Shop. Right-click on the desktop area and paste as a new animation.
Return to PSP. Close out the bottom mask layer and open the middle mask layer.
Edit > Copy merged.
Back to Animation Shop. Edit > Paste > After Current Frame.
Return again to PSP. Close out the middle mask layer and open the top mask layer.
Edit > Copy merged.
Again, back to Animation Shop. Edit > Paste > After Current Frame.
Edit > Select All.
Right-click on the top bar of your animation and choose "frame properties."
Change this number to 27.
View > Animation.
Et, voila, we are done! I hope you enjoyed doing this tutorial, and I thank you for stopping by!!
.


No comments:
Post a Comment