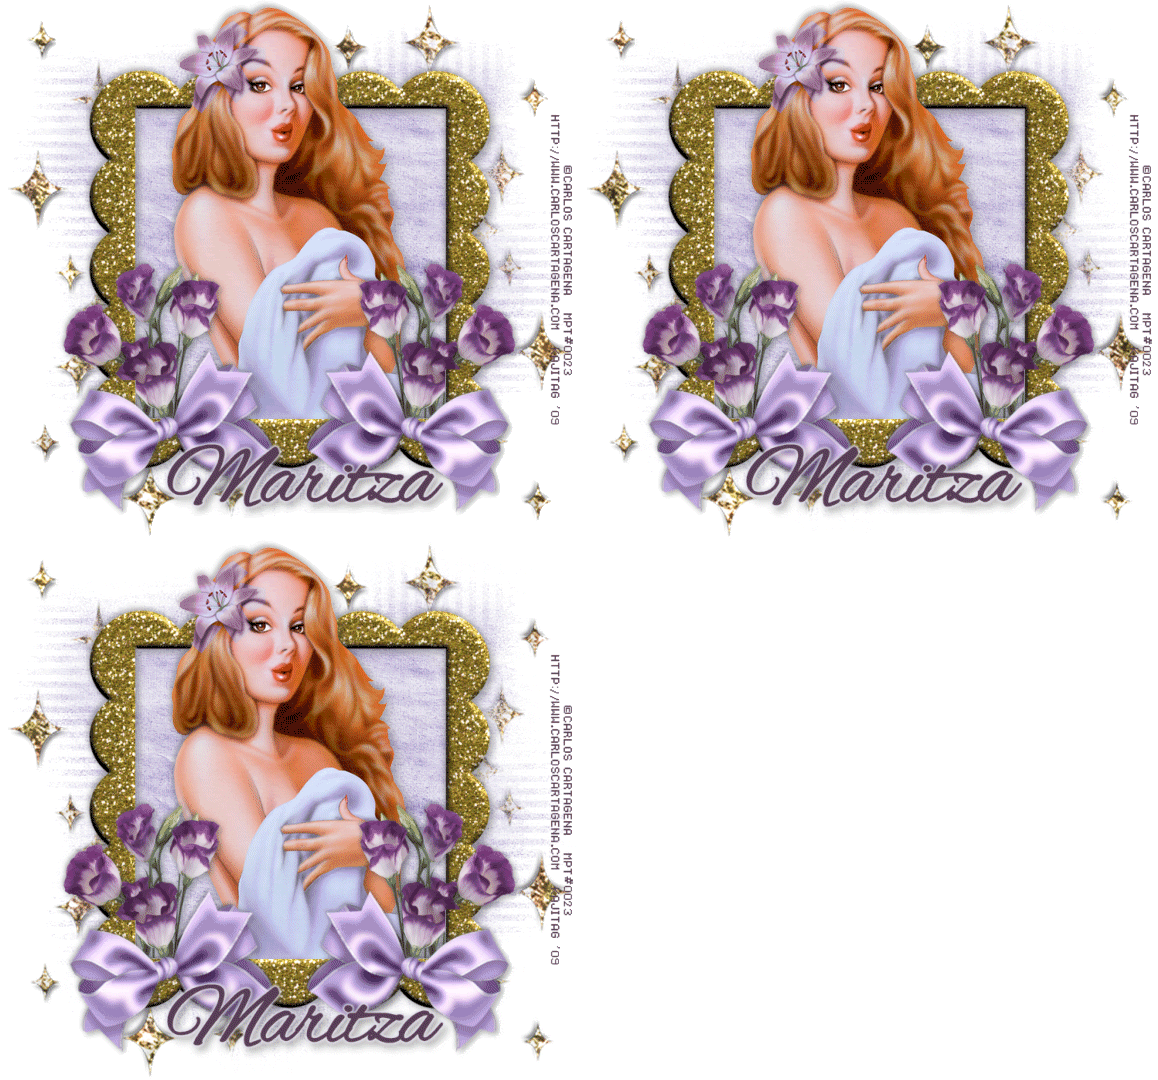
[PLEASE NOTE!! IT WAS BROUGHT TO MY ATTENTION THAT THE SCRAP KIT USED IN THIS TUTORIAL IS NO LONGER AVAILABLE. THE ENTIRE BLOG HAS DISAPPEARED. I'M SURE THERE ARE OTHER KITS YOU MAY HAVE THAT WILL DO NICELY FOR THIS TUT, IF YOU TRY!!! SORRY ABOUT THAT, AND 'THANK YOU' ELLIE FOR BRINGING THIS TO MY ATTENTION!]
'

You will also need:
Animation Shop. This is from CNET, so it's a safe download. However, it costs. That changed pretty recently. I don't know why!!
Okay, so.... a LOVELY person named solshne wrote to let me know that one might find Animation Shop for free at this location. This is an FTP link and I have no idea if it's safe or not. So keep your antivirus handy to scan it after download!
A tube of your choice. I'm using the great art of Carlos Cartagena. You must have a license to use his artwork. You can get that license and art at My PSP tubes.
Scrap kit is by Maritza, of Scrappy Lover Scraps. This is a FTU kit, and I don't believe it actually has a name! You can find it here. Be sure to leave your thanks for the freebies!!
Filters: Eye Candy 4000 > Gradient Glow, Eye Candy 4000 > HSB Noise
Font: I used Alex Brush.
Supplies: The mask, again by Wee Scots Lass. She has a lot of masks there, right on the front page. So if you'd like her collection, there you go! Be sure to thank her for her generosity!
Also, please, if you have problems with any download link for supplies, drop me a line via e-mail. Leaving a comment without a way for me to contact you back doesn't help. If you e-mail me, I'll send you the supplies.
Okay let's begin!!
Open your mask in PSP and minimize. Alternatively, you could file your mask into your masks file, for use in the future. It is, of course, up to you!
Open a new image, 750 x 700, white.
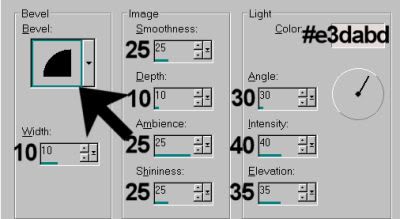
Open Frame2. Resize 65%. Copy and paste as a new layer. Add the following bevel:

Add your tube. Resize, position, and drop shadow to your taste.
Highlight your frame layer. Grab your magic wand, and click inside the frame. Selections > Modify > Expand by 1. Selections > Invert.
Highlight your tube layer. Grab your eraser brush and delete the portions of your tube that you do not want showing at the bottom of the frame.
Selections > Select none.
Drop shadow your frame.
Open Flowers. Resize 65%. Copy and paste as a new layer. Move to the bottom left of your frame. Duplicate this layer. Image > Mirror. Merge down these two layers and drop shadow.
Open Bow4. Resize 65%. Rotate 20° left. Copy and paste as a new layer. Position over the bottom of your left flowers tube. Duplicate this layer, and Image > Mirror. Merge these two layers down and drop shadow.
Highlight your white background.
Open Paper7. Copy and paste as a new layer.
Apply your mask. Delete mask layer, answer "yes" to the pop-up question, and merge group.
Highlight white background layer again.
Open GoldGlitter. Resize 175%. Copy and paste as a new layer. Position to the upper left background of your canvas. Duplicate this layer. Image > Mirror. Image > Flip. Merge these two layers down.
Your GoldGlitter layer should be below your mask layer.
Go to the top of your layer palette and add your name. I used color #593f54 for stroke and fill, stroke set at 1.5.
Effects > Eye Candy 4000 > Gradient Glow set at 4 - 0 - 100, color #e4e0ee.
Drop shadow your name.
Resize your canvas to a size with which you're most comfortable.
Add your copyright, license information where applicable, and taggers'/watermark.
If you choose not to animate, you can merge layers and save, and you're done!
A N I M A T I O N
Highlight your GoldGlitter layer. Duplicate this layer twice, for a total of three layers.
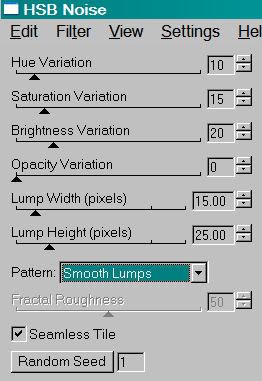
On the bottom GoldGlitter layer, Effects > Eye Candy 4000 > HSB Noise with the following settings:

Hit okay.
Highlight the middle GoldGlitter layer. Apply HSB Noise again, clicking on "Random Seed" once or twice... to your liking.
Hit okay.
Highlight the top GoldGlitter layer. Apply HSB Noise once again, and again click on "Random Seed" some more.
Close out the bottom two GoldGlitter layers, leaving the bottom layer open.
Edit > Copy merged.
Open Animation Shop. Right-click on the desktop area and paste as a new animation.
Return to PSP. Close out the bottom GoldGlittler layer and open the middle GoldGlitter layer.
Edit > Copy merged.
Back to Animation Shop. Edit > Paste > After Current Frame.
Return again to PSP. Close out the middle GoldGlitter layer and open the top GoldGlitter layer.
Edit > Copy merged.
Once again, back to Animation Shop. Edit > Paste > After Current Frame.
Edit > Select All.
Right-click on the top bar of your animation and choose "Frame Properties." Change this number to 35.
View > Animation. If you like it, save it, and now, voila, we are done! Thank you for trying this tutorial! I'd love to see your results! :)
.


No comments:
Post a Comment