

You will also need:
Animation Shop. This is from CNET, so it's a safe download.
I checked to make sure the above link was still valid, and was surprised to see that they're now charging $19 for Animation Shop! I'm so sorry, I didn't realize it. It's been free for ages. I don't know when they started charging....
A tube of your choice. I'm using the amazing artwork of Maxine Gadd. You must have a license to use her artwork. You can get that license and art at My PSP tubes.
Scrap kit is by Lissa, of Digital Scrap'n Designz. This is a FTU kit, called Colors of Fall. This is one in a seven-pack of freebie kits she's posted in that one post. First row, second kit. Be sure to leave your thanks for the freebies!!
Filters: Alien Skin > Xenofex 2 > Constellation, Eye Candy 4000 > Gradient Glow
Font: I used Coiled Uncial.
Supplies: The mask, by Zuzzanna. She has a lot of beautiful masks there, so look around! Thank you, Zuzzanna!!
Also, please, if you have problems with any download link for supplies, drop me a line via e-mail. Leaving a comment without a way for me to contact you back doesn't help. If you e-mail me, I'll send you the supplies.
Okay let's begin!! This is a very quick tut. I found at the end, (after only three steps), that it looked fine the way it was. So if you choose not to put the "bling" on it in the animation, it's perfectly fine.
Open your mask in PSP and minimize. Alternatively, you could file your mask into your masks file, for use in the future. It is, of course, up to you!
Open a new image, 750 x 700, white.
Open Frame1. Copy and paste as a new layer.
Add your tube. Resize, position and drop shadow to your taste.
Highlight your frame layer. Grab your magic wand and click inside the frame. Selections > Modify > Expand by 1. Selections > Invert.
Highlight your tube layer. Grab your eraser brush and erase any of the tube that overlaps the frame, which you do not want to be showing. I chose to let a rose from my chosen tube to hang over, but erased the rest.
Drop shadow your tube and your frame.
Highlight the white background layer.
Open Paper8. Copy and paste as a new layer.
Apply your mask. Delete mask layer, answer "yes" to the pop-up question, and merge group.
Looks good just like that, does't it? But I went and added more. First!!! ....
Add your name. I used color #6b3504 as the fill, #ee8d6f -- stroke size 3.
I then added the following bevel:
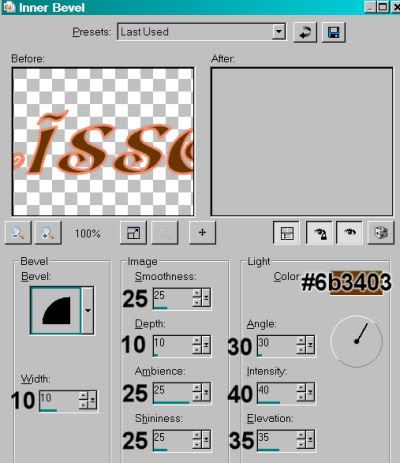
I then added Eye Candy 4000 > Gradient Glow, settings 3 - 0 - 100, color #ee8d6f.
Drop shadow your name.
Resize your tag to the size with which you're most comfortable.
Add your copyright, license information if applicable, and taggers'/watermark.
If you're NOT going to animate, you can just merge and save. You're done!
A N I M A T I O N
Highlight your frame layer. Duplicate this layer twice, for a total of three frame layers.
Highlight the bottom frame layer ...
Effects > Alien Skin > Xenofex 2 > Constellation, choosing the following settings first:
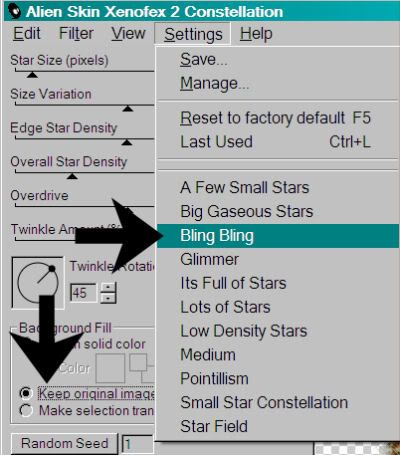
Hit okay.
Xenofex 2 > Constellation again, this time changing the numerical settings as shown, except your "random seed" will be at 1. That's okay, leave it there:
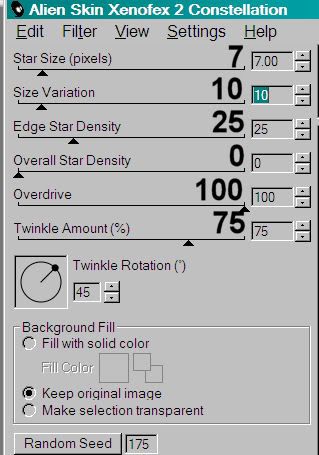
Hit okay.
Now, highlight the middle frame layer. Add the Constellation again, but click on "random seed" as many times as you like. I usually click a few times to get the look I want. Up to you!
Hit okay.
Repeat this with the bottom frame layer.
Close out the top two frame layers, leaving the bottom frame layer open.
Edit > Copy merged
Open Animation Shop, right-click on the desktop area, and paste as a new animation.
Return to PSP. Close out the bottom frame layer and open the middle frame layer.
Edit > Copy merged.
Return to Animation Shop and Edit > Paste > After Current Frame.
Back to PSP. Close out the middle frame layer, and open the top frame layer.
Edit > Copy merged.
And, back to Animation Shop. Edit > Paste > After Current Frame.
Right-click on the top bar of your animation and choose "Frame Properties." Change this number to 35.
View > Animation. If you like what you see, save! And, we're done! I hope you've enjoyed this tutorial!
.


No comments:
Post a Comment