
You will also need:
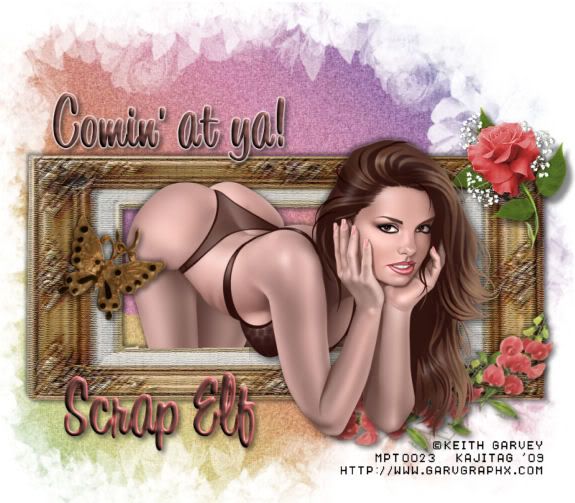
A tube of your choice. I'm using the fantastic artwork of Keith Garvey. You must have a license to use his art. You may obtain that license and his art from My PSP Tubes.
The scrap kit is by ScrapElf, from, of all things, Scrap Elf! This is a FTU kit in her shop, titled "Truely." You will have to register to get it, but it *is* free, so.... as always, leave thanks for the free stuff!
Supplies: The mask, from the great mask-maker, Essex Girl! Once again, a big thanks to her for these great masks! I'm also including the curved garland of begonias and the rose. The begonias are by Cari Lopez, from her scrap kit of 2007 titled Begonia's Garden. You'll see there that there is (or was, I haven't tried it) a freebie frame to go with it, too. The scrap kit is no longer available, either, so that's why I thought it would be okay to share it with you separately. For the rose, I'm afraid, I was unable to find the artist. If you know who it is, or it's YOU, let me know, so that I might give you credit!
Filters: Eye Candy 4000 > Gradient Glow
Font: I used 1 BeanSprout DNA.
Open your supplies in PSP and minimize. Alternatively, you could file them in with the rest of your PSP files for use at a later date. Totally up to you!
Okay, let us begin! This one took me a while to build, but I don't think the tut will be that difficult to do... There was a tutorial like this (with the tube kneeling, popping out of a long skinny frame) when I first started following tuts, and I really liked it. So, though I don't remember that author, this is a tribute to her! I hope YOU like it!
(It's also the first time I've volutarily used a brunette instead of blondes, without a holiday dictating the hair colors. Just HAD to use this tube with this frame!)
Open a new canvas, 800 x 700, white.
Open element 10. Resize 50%. Copy and paste as a new layer.
Add your tube. Resize, position and drop shadow to your liking.
Highlight your frame layer. Grab your magic wand, and click inside the frame. Selections > Modify > Expand by 1. Selections > Invert.
Highlight your tube layer. Grab your eraser brush and delete the portions of your tube that you do not want showing at the bottom (and/or sides) of the frame.
Selections > Select none.
Highlight your white background.
Open background2. Resize to 800 x 800. Copy and paste as a new layer.
Once again, highlight the frame layer. Click inside the frame with your magic wand. Selections > Modify > Expand by 5. Selections > Invert.
Highlight your background2 layer. Hit delete. Selections > Select none.
Sorry for the repetition, but again highlight the white background layer.
Again, open background2. I'm presuming you saved it at 800x800. If not, resize again. Copy and paste as a new layer. Rotate 90° either way.
Apply your mask. Delete mask layer, answer "yes" to the pop-up question, and merge group.
Open Garden embell2. Rotate 45° right. Position in the bottom right corner of your frame.
Open FRubyR. Copy and paste as a new layer. Position in the top right corner of your frame.
Drop shadow all your flowers! :)
Open element 3. Resize 15%. Copy and paste as a new layer. Rotate 20° right. Position on the inside, left area of your frame. Drop shadow.
Drop shadow your frame.
Go to the top layer and add your name. I used color #6b4742 for the fill and #cc6265 for the stroke, stroke set at 2.
Choose the text you'd like to use. Since this one POPS so well out of the frame, I chose "Comin at ya!"
Effects > Eye Candy 4000 > Gradient Glow with settings 3 - 0 - 100, color white.
Drop shadow your text and your name.
Resize your canvas to a size with which you're comfortable.
Add your copyright, license information if applicable, and taggers'/watermark.
Layers > Merge > and save! We are done!
Thanks for trying my tut!! I hope it was easy to understand and follow! Have a grrrrrreat day!
.


No comments:
Post a Comment