
You will also need:
Animation Shop. This is from CNET, so it's a safe download.
I checked to make sure the above link was still valid, and was surprised to see that they're now charging $19 for Animation Shop! I'm so sorry, I didn't realize it. It's been free for ages. I don't know when they started charging....
However!!! A LOVELY person named solshne (and another named Chris) wrote to let me know that one might find Animation Shop for free at this location. This is an FTP link and I have no idea if it's safe or not. So keep your antivirus handy to scan it after download!
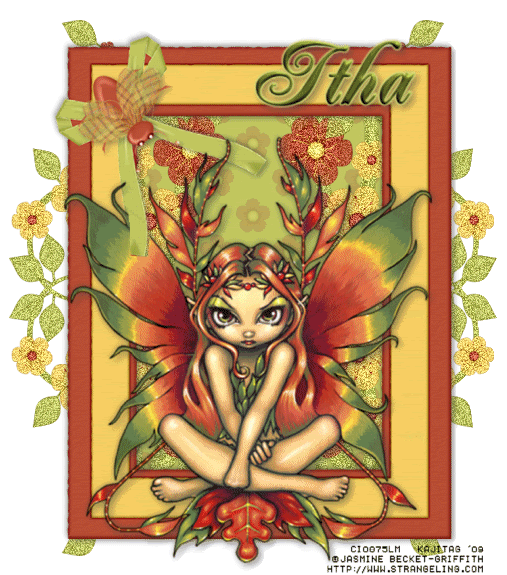
A tube of your choice. I'm using the beautiful and moody artwork of Jasmine Becket-Griffith. You must have a license to use her artwork. You can get that license and art at C.I.L.M..
Scrap kit is by Itha, of Itha's Scrap Chest. This is a FTU kit, called 3 Color. Be sure to leave your thanks for Itha sharing her talent with us for free!!
Filters: Eye Candy 4000 > Gradient Glow, dsb Flux > Bright Noise
Font: I used Jacoba.
Supplies: No outside supplies used in this tutorial! It's not very intricate at all!
Okay! Let's begin! :)
Open a new image, 700 x 800, white.
Open frame02. Resize 120%. Copy and paste as a new layer.
Add your tube of choice. Resize, position and drop shadow to your liking.
You'll see in my example that the ribbon on frame02 is hanging over my tube. Here's how I did that:
Lower the opacity of your tube layer so that you can see through it, to the ribbon part that it's overlapping.
Stay on the tube layer. Grab your lasso tool, set on point-to-point, and draw around the outside of the ribbon area that you want showing over your tube. Hit delete. Bring the opacity back up to 100%. Now, the ribbon hangs over your tube (if you have a tube that is "overflowing," like mine is)!
Highlight your frame layer. Grab your magic wand and click inside the frame.
Selections > Modify > Expand by 5. Selections > Invert.
Highlight your white background layer.
Open paper12. Copy and paste as a new layer. Hit delete. Selections > Select none.
Open element11. Resize 40%. Copy and paste as a new layer. I rotated mine 15° left and placed it atop the ribbon on the frame.
Drop shadow everything. lol.
Open element03. Copy and paste as a new layer. Position on the upper left of your canvas. This layer should be above your paper layer and below your tube layer. Duplicate this layer and Image > Mirror. Merge these two layers down and then duplicate that layer. Image > Flip. Merge these two layers down.
Go back to the top layer and add your name. I used color #677445 for the fill, wth no stroke. I added the following inner bevel:
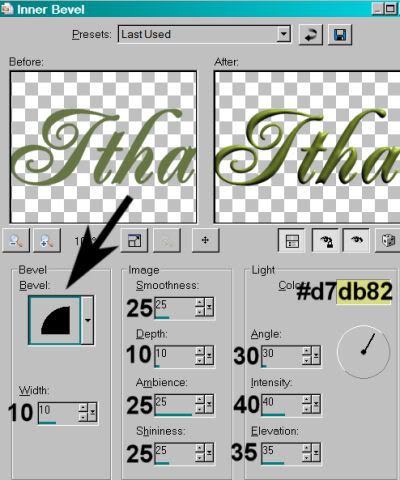
Hit okay.
I then added a Gradient Glow of 4 - 0 - 100, color #d7db82. Drop shadow the name.
Add your copyright, license information if applicable, and taggers'/watermark.
Resize your tag to the size with which you're most comfortable.
If you're NOT going to animate, you can just merge and save. You're done!
A N I M A T I O N
Highlight your elemet03 layer. Selections > Select All.
Selections > Float. Selections > Defloat.
Duplicate this layer twice, for a total of three element03 layers.
On the bottom element03 layer...
Effects > dsb Flux > Bright Noise with the settings shown below:
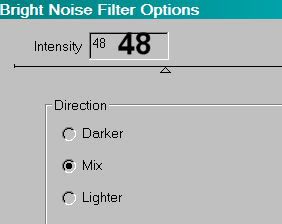
Hit "mix" a time or two, then hit okay.
Highlight the middle element03 layer. Again, add Bright Noise, and click on "mix" a few times, then hit okay.
Highlight the top element03 layer. Add Bright Noise again, clicking "mix" a few times more.
Hit okay.
Selections > Select none.
Close out the top two element03 layers, leaving the bottom element03 layer open.
Edit > Copy merged
Open Animation Shop, right-click on the desktop area, and paste as a new animation.
Return to PSP. Close out the bottom tube layer, and open the middle tube layer.
Edit > Copy merged.
Return to Animation Shop and Edit > Paste > After Current Frame.
Back to PSP. Close out the middle elemen03 layer, and open the top element03 layer.
Edit > Copy merged.
And, back to Animation Shop. Edit > Paste > After Current Frame.
View > Animation. If you like what you see, save! And, we're done! I hope you've enjoyed this tutorial! Thanks for trying it out!
.


Love your tut, thanks so much.
ReplyDeleteAnimation Shop can be downloaded for free directly from Jasc. Here is the link:
http://ftp.jasc.com/pub/en/ani311en.exe
Chris