

You will also need:
Animation Shop. This is from CNET, so it's a safe download.
I checked to make sure the above link was still valid, and was surprised to see that they're now charging $19 for Animation Shop! I'm so sorry, I didn't realize it. It's been free for ages. I don't know when they started charging....
A tube of your choice. I'm again using the great artwork of Ismael Rac. You must have a license to use his artwork. You can get that license and art at Artistic Minds, Inc.
Scrap kit is again by Bluey, of Bluedream Designs. This is a FTU kit, called Girly. Scroll down a bit and you'll find it. Be sure to leave your thanks for the freebies!!
Filters: Mura's Meister > Copies, Eye Candy 5000 > Gradient Glow
Font: I used Brock Script.
Supplies: [NOTE: 10-20-2009] I just received notice from 4shared that these files have been reported as an abuse of some sort, so they are no longer available. I apologize. As you can see, below, I asked for anyone whose work I'd included to let ME know. I don't get it. But I did identify the mask, so you may have it. Also, the chain is just a miscellaneous chain I'd picked up along the way. Perhaps you have one or two, as well? My apologies, again. I have no CLUE what's up with this.
The chain and the mask, here. This again is the 20-20 mask. I don't know who made either of these files. If you know who, or if it's YOU, let me know! I'll give you credit! :)
Also, please, if you have problems with any download link for supplies, drop me a line via e-mail. Leaving a comment without a way for me to contact you back doesn't help. If you e-mail me, I'll send you the supplies.
Okay let's begin!! Just to warn you, this swinging effect is a bit tricky. I'll explain it the best I can. Good luck!
Open your supplies in PSP and minimize. Alternatively, you could file your mask into your masks file, for use in the future. Same for the chain, of course. Up to you!
Open a new image, 800 x 700, white.
Open Butterfly3. Resize 25%. Copy and paste as a new layer.
Effects > Mura's Meister > Copies, with settings below:
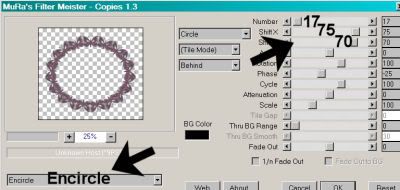
Hit okay.
Add your tube. Resize, position and drop shadow to your taste. Place it to one side or the other of your frame. If you happen to have a tube that either kneels with her legs apart like mine, or stands the same way, and you'd like to have it "step out" of the frame you just made, then....
Still on the butterfly copies layer, Selections > Select All. Selections > Float. Selections > Defloat. Selections > Modify > Contract by 1. Selections > Invert.
Highlight the tube layer. Grab your eraser brush and delete the area of your tube that overlaps the frame. Selections > Select none. There! :)
Highlight the white background layer.
Open Paper14. Copy and paste as a new layer. Using your pick tool, stretch the edges of your paper so that it just fills your canvas.
Apply your mask. Delete the mask layer, answer "yes" to the pop-up question, and merge group.
If you, like me, are picky enough to not want your fading mask effect to come to an abrupt edge, then this is what I did:
Grab your lasso tool, set at Freehand, feather 17. Draw a curve over each of the four sides. For instance, the curve on the bottom would look somewhat like a "smile." I'm sorry I didn't take screen shots for this. Do this for each of the four edges where it looks like the fade is too wide. Hit delete. Selections > Select none.
Open the Flowerpot. Resize 65%. Copy and paste as a new layer. Position to your liking. Drop shadow.
Open the Gem. Copy and paste as a new layer. Position, again, where it looks best for your creation. lol. Drop shadow.
Open Heart1. Resize 35%. Copy and paste as a new layer. Rotate 25° right. Drop shadow.
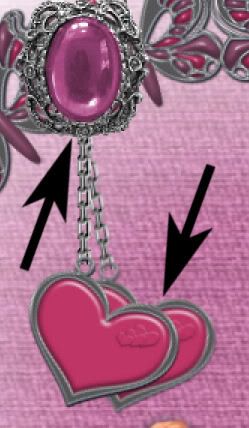
Open the chain2 tube I supplied with the mask. Copy and paste as a new layer.
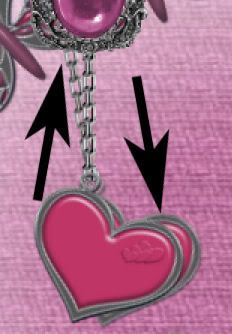
Now, line up the Gem, chain and heart layers, In the layer palette, the chain should be below both the gem and the heart. Make it look like the chain is attached to the heart's little charm hole (for lack of a better term), while hanging from perhaps a pin in the back of the gem.
Highlight your chain layer. To make it look the same color as the rest of the metal in this tag....
Adjust > Brightness and Contrast > Brightness/Contrast with the following settings:
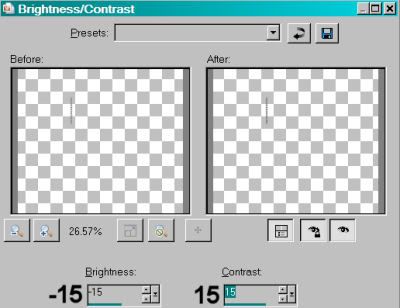
Hit okay.
Merge your heart layer down with your chain layer.
Go back to the top layer and add your name. I used color #c06e9e. No stroke color nor measurement. I then added the Gradient Glow, settings at 3 = 0 = 100, color #5e5e5e.
Hit okay. Drop shadow your name.
Resize your tag to the size with which you're most comfortable.
Add your copyright, license information if applicable, and taggers'/watermark.
If you're NOT going to animate, you can just merge and save. You're done!
A N I M A T I O N
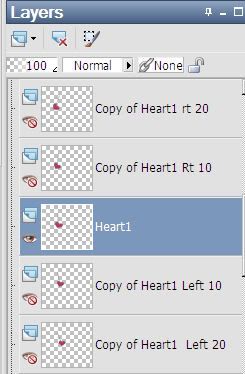
Duplicate your heart/chain layer four times, for a total of five heart/chain layers. To help me keep track in this process, I always put the original heart/chain layer in the center of the five in the layer palette.
If that helps... hope it does!!!
This may be confusing. It's much easier to do than it is to write out he steps!
Okay, I just took a HUUUUGE break because I'm so intimidated by the possibility no one will understand what I'm trying to explain. Which is stupid, because I've done two other tuts with this same type of animation and I don't recall those affecting me this way! (On a positive note, I found a lot more freebie kits for upcoming tuts for y'all. That new search engine from Microsoft? Bing? Really found me lots more stuff than Google ever does!)
So, here we go... I'm presuming here that you put the main heart/chain layer in the middle, as I said earlier.
Highlight the first layer down from the main heart/chain layer. Rotate this 10° left. Now, you'll notice that things have shifted and this won't turn out right at all, right?
So, you need to move that heart/chain element you just rotated so that the TOP of the chain lines up as closely as you can possibly get it with the main layer in the middle.
See? Move it so it's hanging from the same point behind the Gem.
Highlight the bottom heart/chain layer. Rotate this 20° left. DO THE SAME THING WITH THIS ONE! Line it up with the top of the chain in the center, under the gem, so it all seems it's coming from the same place.
Now, highlight the layer that is just above the "main" heart/chain layer. Rotate this 10° right. Line it up.
And finally, highlight the top heart/chain layer, and rotate it 20° right. Line it up as well.
Capice? I sure hope so!!
Now, I complicated matters even more by having my Gem sparkle. I just thought the tag needed something extra. If you don't want to do this part, it will make it a lot easier for you. It's all up to you. But I *AM* going to be giving the instructions for this, in case you want yours to sparkle, too.
Highlight the Gem layer. Duplicate this layer four times, for a total of five Gem layers.
Go to the bottom Gem layer.
Adjust > Add/Remove Noise > Add Noise with the Noise set at 35 and the Uniform button clicked. Also, make sure the Monochrome option is checked off. (I tried to get a screen shot of this for you guys, but my PSP kept crashing, so I hope I got that across alright.)
Hit okay.
Highlight the next up from the bottom Gem layer and Add Noise again, this time changing the reading to 40.
Hit okay.
Highlight the middle Gem layer, adding Noise again, this time changing the reading to 45.
Hit okay.
Now highlight the next Gem layer. Add Noise once more, this time changing the reading back to 40.
Hit okay.
And finally the top Gem layer. Add noise one last time with the reading set at 35.
And hit okay. Whew!!
Now, we're doing two clusters of animation here. You have the five layers of the heart/chain and five layers of the gem. Close out the top four layers of each layer cluster. (For lack of a better term...)
Edit > Copy merged.
Open Animation Shop, right-click on the desktop area, and paste as a new animation.
Return to PSP. Close out the bottom layers of both the gem and the heart/chain layers. Open the next layer up in both.
Edit > Copy merged.
Return to Animation Shop and Edit > Paste > After Current Frame.
Back to PSP. Close out the just-used layers, and open the middle layers in both groups.
Edit > Copy merged.
And, back to Animation Shop. Edit > Paste > After Current Frame.
Back again to PSP. Close out the middle layer of both groups of layers, and open the next-to-the-top layer in each.
Edit > Copy merged
Return to Animation Shop and Edit > Paste > After Current Frame.
Again, return to PSP. Close out the open layers of these two groups and open the top layers of each.
Edit > Copy merged
Back to Animation Shop and Edit > Paste > After Current Frame.
We're not done yet!! Return again to PSP.
Close out the top layer of each group and re-open the next layer down of each.
Edit > Copy merged
Return again to Animation Shop. Edit > Paste > After Current Frame.
Now, back to PSP. Close out the open heart/chain and gem layers, and open the middle layers of both.
Edit > Copy merged.
In Animation Shop, Edit > Paste > After Current Frame.
Finally, return to PSP. Close out the middle layers of each group and open the layer below. (NOT the bottom layer!)
Edit > Copy merged.
And return to Animation Shop and Edit > Paste > After Current Frame.
NOW WE'RE DONE!
In Animation Shop, Edit > Select All.
Right-click on the top bar of your animation and choose "Frame Properties." Change this number to 17.
View > Animation. If you like what you see, save! And, we're done! I hope you liked this tut better than I liked writing the steps down! And I sincerely hope you're not just completely confused!! Sorry for all the repetition. Thanks for trying it out and sticking with it!
.


No comments:
Post a Comment