
You will also need:
Animation Shop. This is from CNET, so it's a safe download.
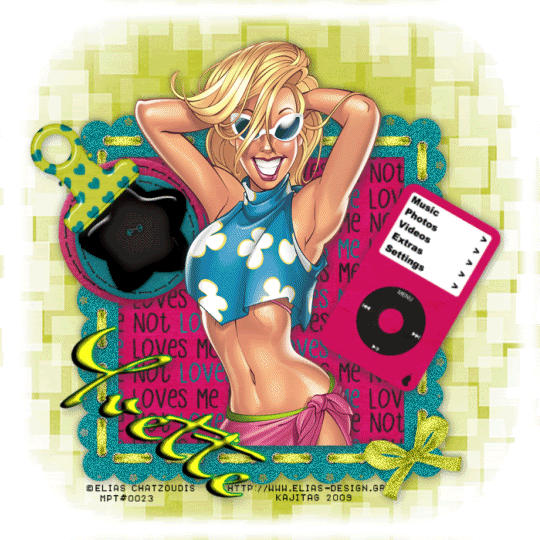
A tube of your choice. I'm using the crazy-wonderful artwork of Elias Chatzoudis. You must have a license to use his artwork. You can get that license and his art at My PSP Tubes.
Scrap kit is by Yvette, of Misfits Scrapz. This is a FTU kit, a few weeks old now, but I'm just getting back to it, so forgive me. The kit is called A Bit of Attitude. Be sure to leave lots of love for these wonderful free things Yvette is doing for us!!
Filters: dsb Flux > Bright Noise
Font: I used Dr. Sugiyama.
Supplies: The mask. I do not know who shared this mask in the beginning. It begins gh_ so if you know that person, let me know so that I might give credit where it's due!!
Also, please, if you have problems with any download link for supplies, drop me a line via e-mail. Leaving a comment without a way for me to contact you back doesn't help. If you e-mail me, I'll send you the supplies.
Okay let's do it! It's been a long time, but I mean to get back, full steam. Wish me luck! Yay!!
Open a new image, 700 x 700, white.
Open frame1. Copy and paste as a new layer. Resize 125%. Position as you like.
Add your tube. Resize, position and drop shadow as you like. This layer should be above the frame layer. If you're using a full-length tube and want to have it "popping out" of the frame, then highlight the frame layer, grab your magic wand and click inside the frame. Selections > Modify > Expand by 1. Selections > Invert. Highlight your tube layer. Grab your eraser brush and erase that portion of the tube you want to be gone from the bottom. Selections > Select none.
Highlight your white background layer.
Open paper 3. Copy and paste as a new layer.
Highlight the frame layer.
Grab your magic wand and click inside the frame. Selections > Modify > Expand by 5. Selections > Invert.
Highlight your paper 3 layer. Hit delete. Selections > Select none.
Drop shadow your tube and frame layers.
Highlight your white background again.
Open paper 7. Resize 125%. Copy and paste as a new layer.
Apply your mask. Delete the mask layer, answer "yes" to the pop-up question, and merge group.
Now, to try and keep the mask background layer from ending too abruptly when you're showing off your tag, we'll have to futz with it a bit.
Grab your selection tool, set on Rounded Rectangle. Like so:
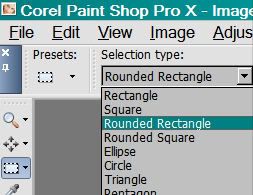
Draw this rounded rectangle so that there's about ½ inch between the edge of your tag and your selection. Selections > Invert. Selections > Modify > Feather > 15. Hit delete. Selections > Select none.
Open the iPod. Copy and paste as a new layer. Resize 65% or so. Rotate 30° right. Place as you desire. Drop shadow.
Open Binder Clip 1. Resize 65%. Copy and paste as a new layer. Rotate 30° left. Drop shadow.
Open Button. Copy and paste as a new layer. Drag this layer below the binder clip layer, place so it seems the binder clip is holding it onto the frame. See my tag for placement reference. Drop shadow your button.
Go back to the top layer and add your name. I used color #bcc137 for the fill, #0b8c8f for the stroke, stroke set at 2. I then added an inner bevel, rotated 35° right, and drop shadowed the name.
Add your copyright, license information if applicable, and taggers'/watermark.
Resize your tag to the size with which you're most comfortable.
If you're NOT going to animate, you can just merge and save. You're done!
A N I M A T I O N
Highlight your frame layer. Duplicate this layer twice, for a total of three frame layers.
Still on the bottom frame layer...
Effects > Plugins > dsb Flux > Bright Noise, with intensity set at 28. Click on "mix" a few times.
Hit okay.
Highlight the middle frame layer. Again, apply Bright Noise, clicking on "mix" a few times.
Hit okay.
Highlight the top frame layer. Apply Bright Noise again, and click "mix" a few times.
Hit okay.
Close out the top two frame layers, leaving the bottom frame layer open.
Edit > Copy merged
Open Animation Shop, right-click on the desktop area, and paste as a new animation.
Return to PSP. Close out the bottom frame layer, and open the middle frame layer.
Edit > Copy merged.
Return to Animation Shop and Edit > Paste > After Current Frame.
Back to PSP. Close out the middle frame layer, and open the top frame layer.
Edit > Copy merged.
And, back to Animation Shop. Edit > Paste > After Current Frame.
View > Animation. If you like what you see, save! And, we're done! I hope you've enjoyed this tutorial! Thanks for coming back and trying my tut!! Nothing too intricate to start... it's been since June 1!! Can you guys believe that??
.


No comments:
Post a Comment