

You will also need:
Animation Shop. This is from CNET, so it's a safe download.
A tube of your choice. I'm using some of the great new artwork of Jennifer Janesko. You must have a license to use her work. You may purchase that license at C.I.L.M..
Scrap kit is by someone named Annu. This is but one portion of a collection of kits made FTU as an idea from Creative Misfits Creations. It's the last kit shown at that page. It has a label that says "Springtime Bonanza," so that's what I've called it!! I hope that's correct. Feel free to download and use any of the other kits there, too. These ladies were extra generous, using one color palette and people who had not ever made kits before participated, too!! Leave them love!!
Filters: VM Natural > Sparkle, and Eye Candy 4000 > Gradient Glow (for name only)
Font: I used Acadian.
Supplies: The mask, again by Essex Girl, and the leafy branch, from where I don't know. If it is yours, let me know, and I will give you proper credit!! The supplies are available here.
Also, please, if you have problems with the download link for supplies, drop me a line via e-mail. Leaving a comment without a way for me to contact you back doesn't help. If you e-mail me, I'll send you the supplies.
And another note: I use a program called WinRAR for my compression of files. It has the capacity to save things as a .rar file OR a .zip file. I have been saving the supplies within this program, as .zip files. On this tutorial, I'm using a .rar file. I want to see if people have less problems getting supplies with this type of file. Wondering if, because the program is called WinRAR, maybe making .zip files with it is screwing people up? You can find WinRAR free at CNET Downloads. I hope this helps! I think I'll be doing this, and keeping this paragraph in as a boilerplate, while I see if it fixes the problem. *Fingers crossed!*
[SPECIAL NOTE: I got a comment on this tut, saying that the leaf image I've provided is not a valid PSP file. As I answered in comments, it most certainly *IS* a proper PSP file. It is in the .pspimage file format. If you are using a version of PSP that is lower than X I think it is, it will not work. Again, if the commenter had e-mailed me, I could have converted the file format and sent it to her. So for anyone else, if a problem, e-mail me. I'll convert. Or, hey. I'll convert anyway and add it to the .rar file. Voila! File converted, both file formats are in the above-referenced .rar file! Enjoy!]
Okay,then! It's been a while, so let's begin!
Open your supplies in PSP and minimize. Alternatively, you could load the mask into your PSP masks file. This way, you'd have it to use later on....
Open a new image, 700 x 700, white.
Open Round Scalloped Frame-02. Copy and paste as a new layer.
Add your tube. Resize, position, and drop shadow as you like.
Highlight the frame layer. Grab your magic wand and click inside the frame. Selections > Modify > Expand by 1. Selections > Invert.
Highlight your tube layer. Take your eraser brush and erase any of your tube that overlaps the bottom/side areas of your frame.
Selections > Select none.
Highlight your white background layer.
Open "papers18." Copy and paste as a new layer.
Apply your mask. Delete mask layer, answer "yes" to the pop-up question and merge group.
Open the leafy branch included with your supplies. Copy and paste as a new layer. I brightened up the color a bit by Adjust > Brightness and Contrast > Brightness/Contrast with settings on 25 and 0.
Position the branch to the left bottom corner area of your frame. See my tag for placement reference. Drop shadow your branch. You can fiddle with this placement later, of course.
Open flower2. Resize 50%. Copy and paste as a new layer. Position over the leafy branch. Duplicate this flower. Rotate the duplicate 30° right. Position with the other flower, grouping them and the branch as you like. Drop shadow both flower layers.
Add your name. I used color #d89a7d for the fill and the stroke, stroke set at 2. I then applied Eye Candy 4000 > Gradient Glow with settings of 5 - 0 - 100, preset medium, and color #f8e0d6. Drop shadow your name.
Add your copyright, license information if applicable, and taggers'/watermark.
Resize your tag to a size with which you're comfortable. At this point, you can just merge and save, if you choose not to animate!!
A N I M A T I O N
Highlight your mask layer. Duplicate this layer three times, for a total of four layers.
Still on the bottom mask layer...
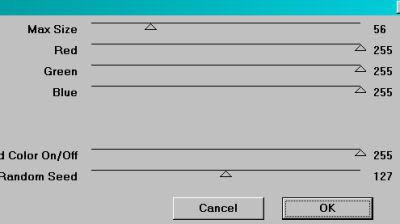
Effects > Plugins > VM Natural > Sparkle with the following settings:
Hit okay.
Highlight the next mask layer up. Again, apply Sparkle, this time moving the slider on "Random Seed" to a different number. There is no secret way to use the slider. Just so it's different.
Hit okay.
Highlight the next higher mask layer. Apply Sparkle again, moving the slider on "Random Seed" to yet a different number.
Hit okay.
Highlight the top mask layer. Apply Sparkle for a fourth time, moving the slider on "Random Seed" one more time.
Hit okay.
I explain this every time, but not everyone sees all the "Sparkle" tuts I do, so I'm sorry if this is a repeat, BUT....
Whenever I use this filter, I go over all the layers twice, so I'll get more sparkle effect. So, go back down to the bottom mask layer and redo all the above steps again until all four have been "sparkled" twice.
Close out the top three mask layers, leaving the bottom mask layer open.
Edit > Copy merged
Open Animation Shop, right-click on the desktop area, and paste as a new animation.
Return to PSP. Close out the bottom mask layer, and open the next mask layer up.
Edit > Copy merged.
Return to Animation Shop and Edit > Paste > After Current Frame.
Back to PSP. Close out that mask layer, and open the NEXT mask layer up.
Edit > Copy merged.
And, back to Animation Shop. Edit > Paste > After Current Frame.
Finally, return to PSP again, closing out the open mask layer and opening the top mask layer.
Edit > Copy merged.
Back to Animation Shop one more time. Edit > Paste > After Current Frame.
In Animation Shop, Edit > Select All.
Right-click on the top bar of your animation and choose "Frame Properties." Change this number to 35.
View > Animation. Et, voila! We're done! I hope you've enjoyed this tutorial! Thanks for stopping by!
.


The leaf branch in your supplies was not a valid psp file. Thanks, had to look for something else. But I knew you would want to know. I love this tag, so I wished it had been, lol.
ReplyDeleteTo Jazzy Peggy: It most certainly *IS* a proper PSP file. It's in the .pspimage file format, exclusive to PSP. It is probably your version of PSP that is the culprit. If you'd left me you e-mail address, I could have converted it for you and sent it to you. But, alas.
ReplyDelete