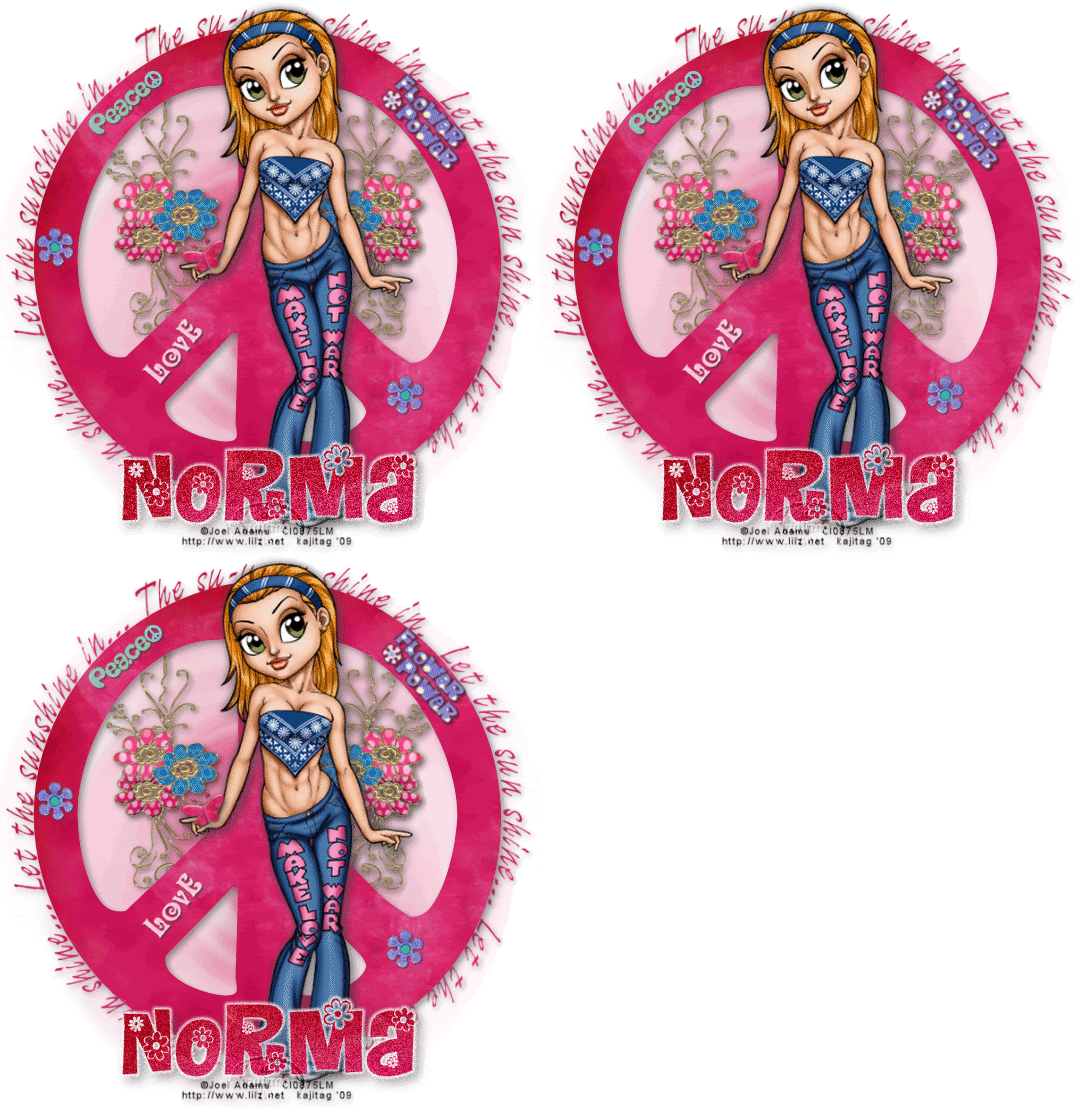
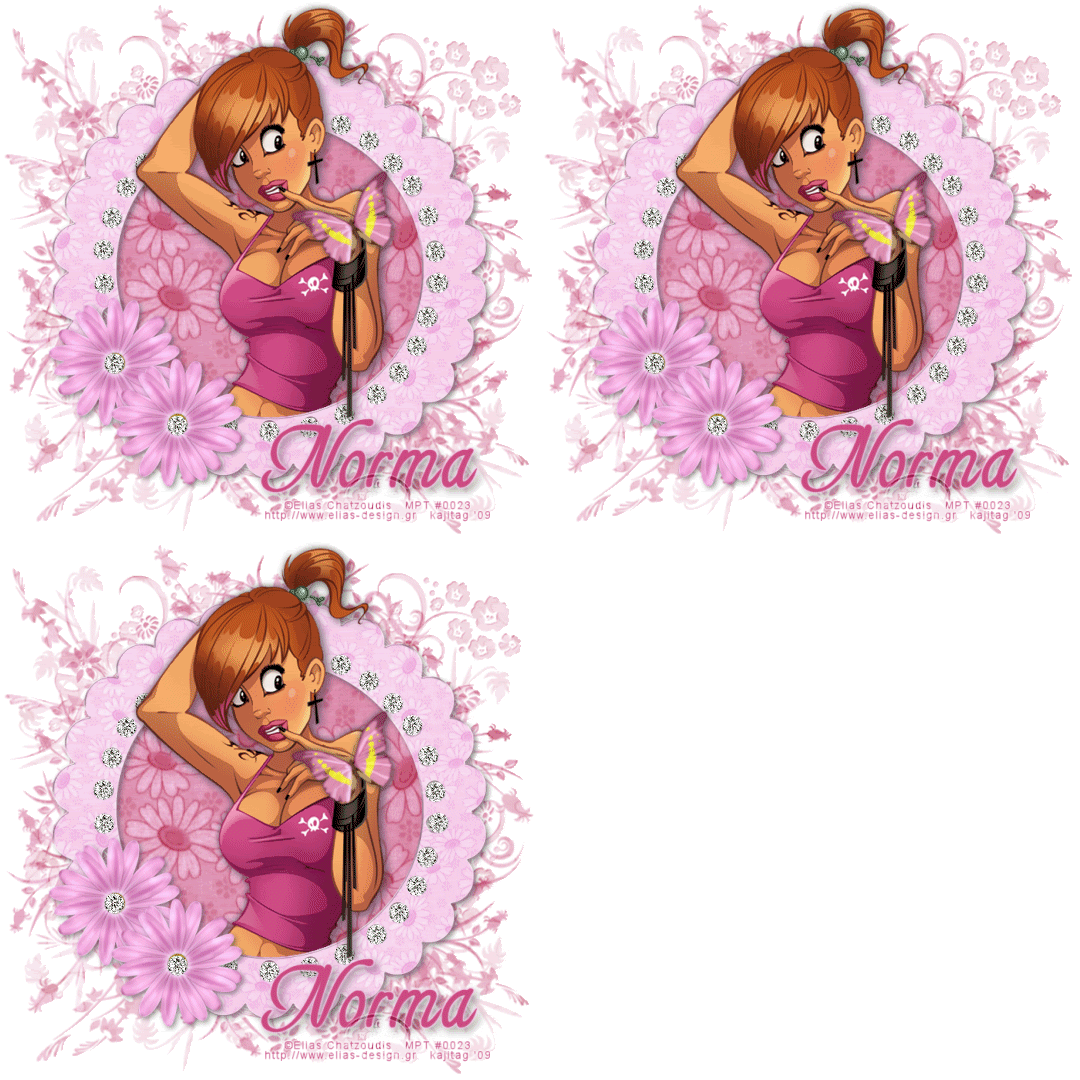
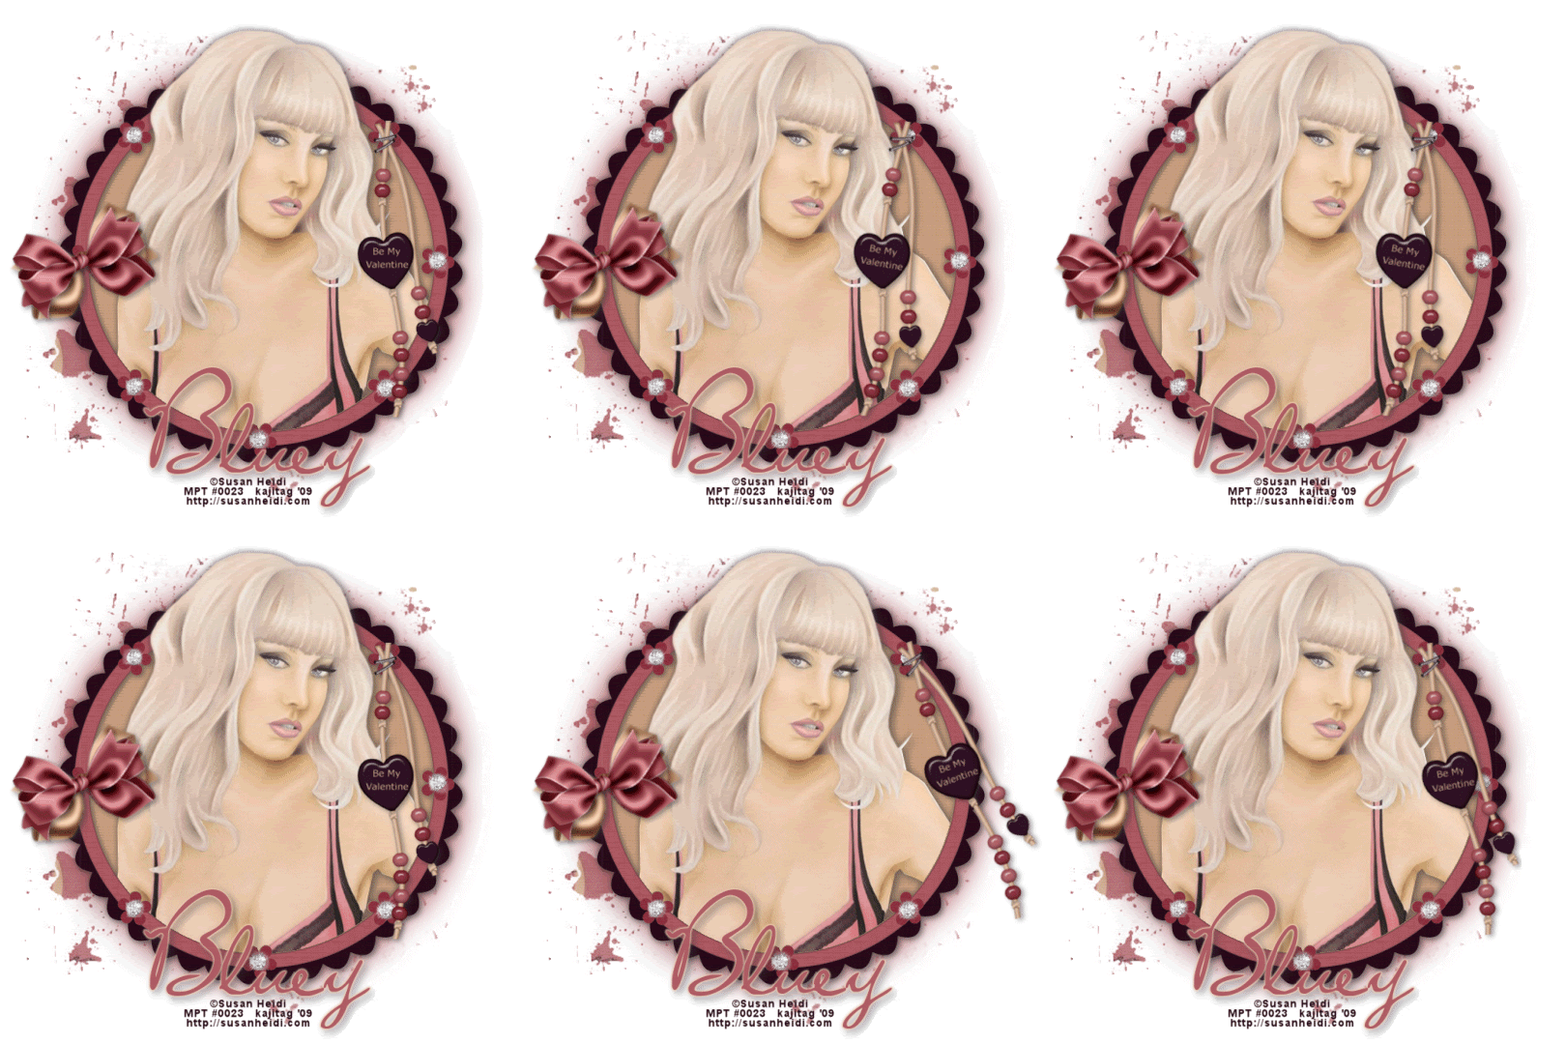
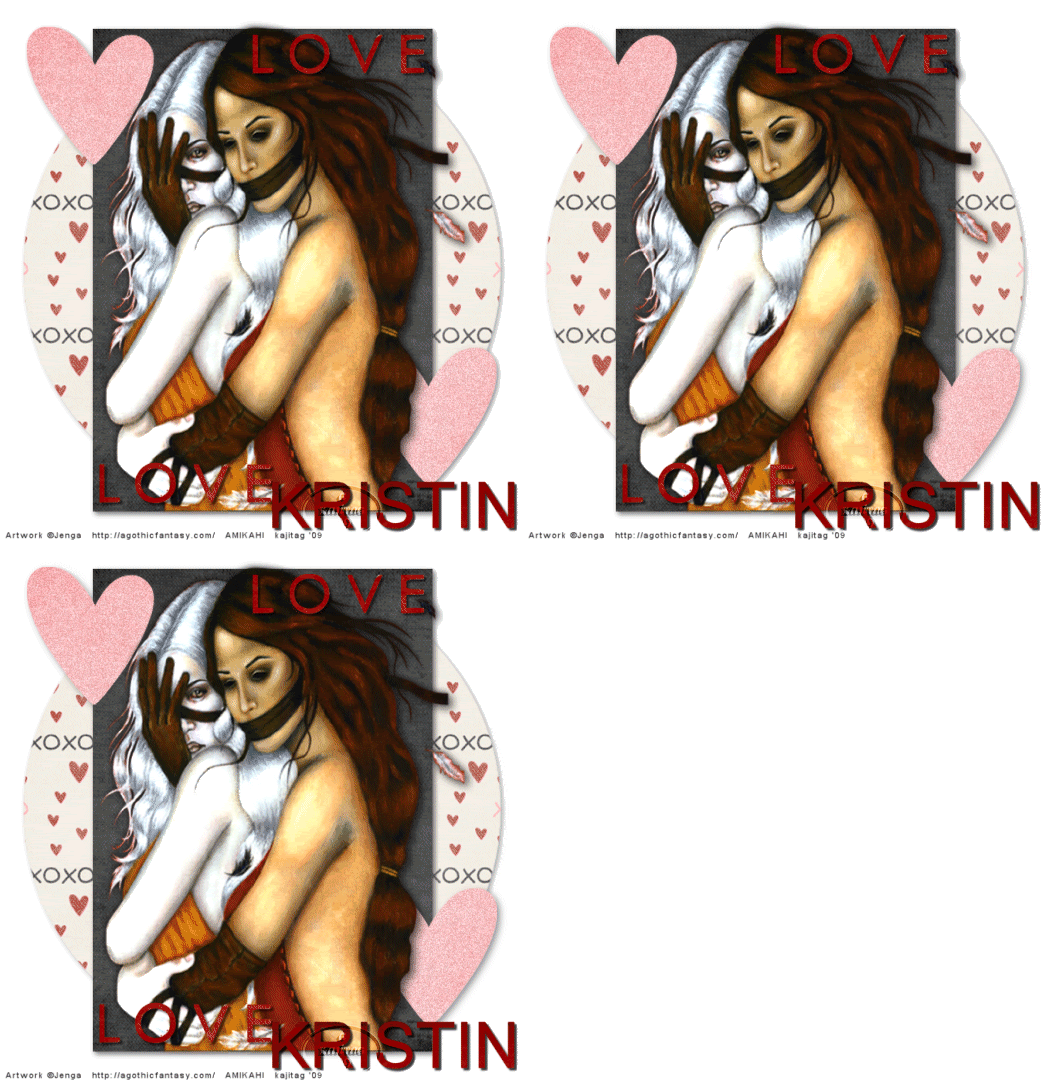
You can download these here.
Saturday, January 31, 2009
Some Random Word Art...
.
Hi there. I just made one of these for the next tut I'm posting, and thought, "Hey, why not offer up the word art you've done?" So, there's only three, and they're all very different (not in style, but in content). But here they are.
You can download these here.
Labels:
Word Art
Peace & Love
.
[Click image above to go to full sized image.]
This tutorial was written on January 31, 2009, using Paint Shop Pro, version X.03. It should be okay to do with other versions as well. I just find X.03 more comfortable for me. You may download a free trial of Paint Shop Pro, version X2, from Corel. Any similarities between this tut and any others you may see are purely coincidental.
You will also need:
Tube of your choice. I've chosen to use the always cute artwork of Joel Adams. You must have a license to use his work. You may purchase that license at CILM.
Animation Shop - at this time, I'm not sure where you can get this program, if you don't already have it. You may, however, save the tut as a static (non-animated) image if you like.
Scrap kit by Swheat Creations. The kit I'm using is called Whole Lotta Love. Thanks, Norma! This is a PTU kit, but there is a freebie at her site as well. You can get that here.
Filter: Eye Candy 4000 -- Gradient Glow
Font: I used Floralies for the name and L850 Script Regular for the circular text.
Supplies: Some "hippie" supplies. I picked this up along the way. If it is yours, let me know so I can either give you credit or take it down. Also, the preset shape for the peace sign. You can find these supplies here.
Ready? Let's do it again! LOL
Load your preset shapes. Open the hippie stuff in PSP and minimize.
Open new file, 700 x 700, white.
Open Bkgd8. In your materials palette, click on fill color and choose "pattern." Choose this paper as your pattern and hit "OK."
Open your preset shapes and locate the peace sign. Draw out peace sign to a size that you like and then Objects > Align > Center in Canvas. Convert to raster layer. Drop shadow.
Add your tube of choice. Position where you'd like it to be, and drop shadow.
Open the "hippie stuff" from my supplies. Select those that you'd like to us. Copy and paste onto peace sign, and arrange in a way that works for you. I resized mine larger, just FYI. Drop shadow these elements.
Open Splat6. Copy and paste below the peace sign layer. Resize to your liking (I believe I used 115%)
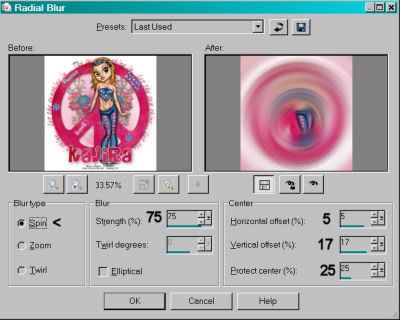
Adjust > Blur > Radial Blur, with the following settings:
Open the flower doodles from the kit. Place where you like. I put mine to the left empty spot in the peace symbol and under peace symbol layer in palette. Duplicate this layer and Image > Mirror. Drop shadow both.
Open butterfly1 if desired. Re-size and position as desired. I used it very small and put it on my tube's outstretched hand.
Go to a layer somewhere in the middle of your layer palette.
Preset shapes: Ellipse. Close off file color. Line width 2. I used black, it's okay to use any color.
Draw out a circle until just on the edge of your peace symbol. If off a bit, use re-size until the desired size.
Go to top of layer palette. Choose font tool. I used L850 Script Regular for my text. I also used the Bkgd8 as my fill color for the text. Hover your font tool until it intersects with the vector circle you just made. You will notice a small curve appear in your cursor. Apply text. I used words from the song "Aquarius," to keep with the theme...
Add your name. I used Floralies, and again used the Bkgd8 as fill. Add Eye Candy Gradient Glow at a setting of 4 -25 -100. Color white. Drop shadow your name.
Add your copyright, license if applicable, and tagger's/watermark.
Resize your tag now. I cropped out a lot of white space before I finally resized.
Duplicate your name layer two times, for a total of 3 layers. X out the top two layers and highlight the bottom one.
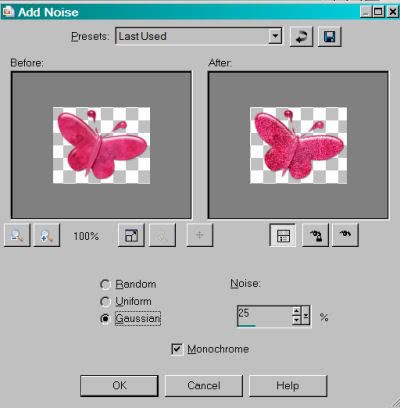
Adjust > Add/Remove Noise > Add Noise with settings below:
X out that layer and open and highlight the middle one.
Adjust > Add/Remove Noise > Add noise with the same everything, except change the number to 30.
X out that layer and open and highlight the top layer.
Again, Adjust > Add/Remove Noise > Add noise and use the number 35.
X out the top two layers again, and open the bottom layer of your name.
Edit > Copy merged
Open Animation Shop. Paste as new animation.
Back to PSP, X out the bottom layer and open the middle. Edit > Copy merged
Going back to Animation Shop, Edit > Paste > After current frame
Then once more back to PSP, X out the middle name layer and open the top. Edit > Copy merged
Back in Animation Shop. Edit > Paste > After current frame.
Then just View > Animation. If you like what you see, save as a .gif! And we're done!
I hope you enjoyed this tut. And I hope you're enjoying your weekend! Have a wonderful day!
Labels:
Tutorial
Thursday, January 29, 2009
My Sweet Thanks
.
[Click image above to go to full sized image.]
This tutorial was written on January 29, 2009, using Paint Shop Pro, version X.03. It should be okay to do with other versions as well. I just find X.03 more comfortable for me. You may download a free trial of Paint Shop Pro, version X2, from Corel.
You will also need:
Tube of your choice. I've chosen to use the great artwork of Elias Chatzoudis. You must have a license to use his work. You may purchase that license at My PSP Tubes.
Animation Shop - at this time, I'm not sure where you can get this program, if you don't already have it. You may, however, save the tut as a static (non-animated) image if you like.
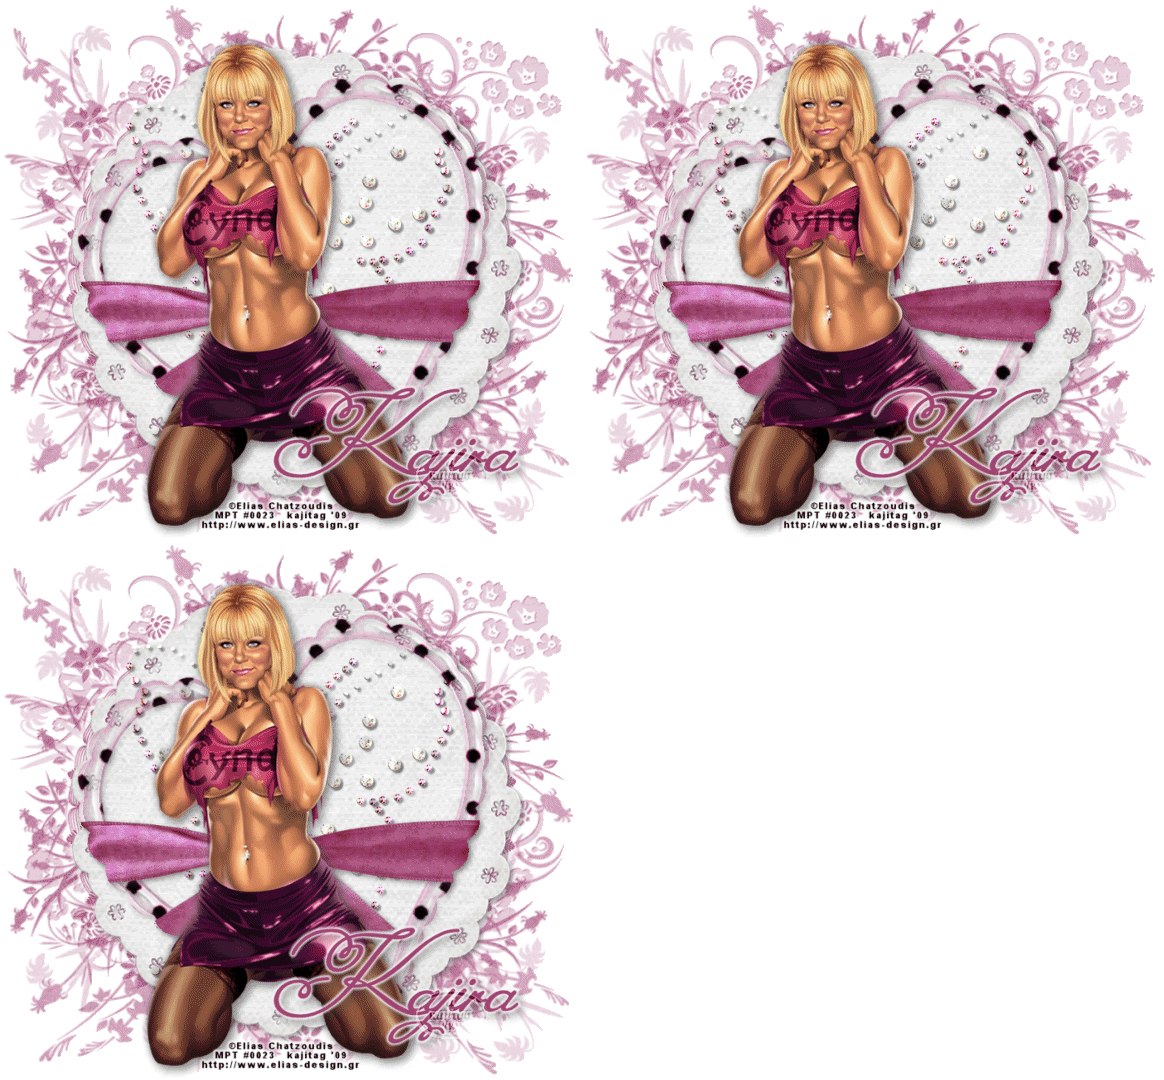
Scrap kit by Pimp'd Tags Scraps. The kit I'm using is called My Thanks to You.
Filter: Eye Candy 4000 -- HSB Noise
Font: I used MissFajardose
Supplies: The mask, which is by Essex Girl. Thank you so much for your beautiful mask collection! You can get this here.
Ready? Let's do it again! LOL
Open a new file, 700 x 650. Surprised you, didn't I?
New raster layer. Selections > Select all.
Open paper 11. Copy and paste into selection. Selections > Select none.
Apply your mask. Delete mask layer, answer "yes" to pop-up question, and merge group.
Open the paper matte. Copy and paste as a new layer. Resize by 115%. Drop shadow.
Open the bling butterfly. Copy and paste as a new layer. Drop shadow applied : 3-3-55-3
Open your acrylic heart. Copy and paste as new layer. Resize by 115%. Colorize if needed. I used the settings 233 & 175. Add a soft, light drop shadow.
Open the big wrap bow 01. Copy and paste as new layer. Position as desired, see my tag for reference. I resized by 75% and moved down toward the bottom of the heart. Use your pick tool to extend it out past the edges of the heart.
Highlight the heart layer. Grab your magic wand and click outside the heart. Go back to your bow layer and hit delete. Selections > Select none. Drop shadow the bow wrap.
Add your tube of choice. Resize if necessary. Position as desired. Drop shadow.
Add your name, copyright information, license info if applicable, and your tagger's/water mark.
Resize to your liking. You can merge now and save as .jpg if you'd rather not animate.
A N I M A T I O N
Duplicate your butterfly bling layer twice, for a total of three layers. X out the top two layers, highlight the bottom layer.
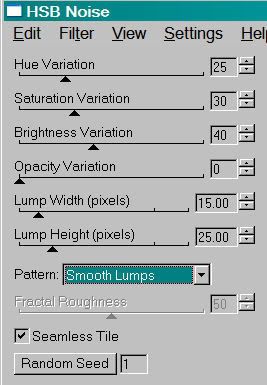
Apply Eye Candy 4000 > HSB Noise with the following settings:
Click ok. X out your bottom layer and open & highlight the middle layer. Apply HSB Noise again, same settings, but click the "random seed" button. Click ok.
X out your middle layer and open & highlight the top layer. Re-apply HSB Noise, same settings, but again, clicking "random seed." Click ok.
Close out the top two butterfly bling layers and open the original.
Edit > Copy merged
Open Animation Shop. Right click the desktop area in A.S. and paste as new animation.
Back to PSP. Close the bottom layer and open the middle.
Back to Animation Shop. Edit > Paste > After current frame.
Back to PSP. Close the middle layer and open the top.
Again, back to Animation Shop. Edit > Paste > After current frame.
Edit > Select All. Right click on the top bar of the animation and change frame properties to 25.
View > Animation. Like what you see? Save it as a .gif, and you're done!
Thanks again for stopping by. Drop me a line if you have any questions. And leave me a comment if you liked the tut!!
.
Labels:
Tutorial
Wednesday, January 28, 2009
Overheard in the Office
.
This was one of my favorite blogs a couple years ago when I was blogging elsewhere. (The Overheard in the Office blog, that is.) I thought I'd go looking for it and found a web site, as opposed to a blog, had been put up. I don't know if that's the same person and/or source, but it's still a bit funny. I've been thinking for a while that I should share some of these beauties, so here I go! These are quoted from Overheard in the Office.
Perky coworker: Hello! Are you still impressed by my pants?
Uppsala
Sweden
Excited office lady #1: Hey Sandy! Huge baby clothing sale at Macy's today!
Excited office lady #2: Really?
Office guy, under his breath: Kill me.
Melville, New York
This one's X-rated!! Just a warning!!
Developer on phone with admin: Yeah, just add it to the list. The account name is 'consumer', password 'buttfucker'. Thanks.
Chicago, Illinois
And this one is religious! Another warning!
Male sales rep: He's nice. You'll like him. Oh, he's religious, so watch what you say--not that you cuss or anything...
Female sales rep: No, it's cool. I can throw in some baby Jesus references. Whatever.
Irving, Texas
Manager, about co-worker's brother: He really should've started with the mafia at a younger age.
Boylston Street
Boston, Massachusetts
Employee #1, reading a list of names: Johnson?
Employee #2: I don't have a Johnson.
Columbus, Ohio
Female accountant: I'll work on that when I feel less bitchy.
Saskatoon
Saskatchewan
Office girl #1: She talks about him like he poops gold or something. Wouldn't it be great to poop gold?
Office girl #2: Um, no not really.
Office girl #1: Think about it. It's gold.
Office girl #2: Okay, I guess so. But, I mean, would it still smell?
Charleston, South Carolina
HR boss to intern: I need your screwing skills now!
Philadelphia, Pennsylvania
Tech support: Good morning, this is Steve* from technical support. I think that I have got to the problem of your bottom.
Slough
England
Okay, that's it for the day. I hope you enjoyed. I'll try to visit this more often. Have a happy day!
Labels:
Overheard in the Office
Monday, January 26, 2009
Touchdown!
.
[Click image above to go to full sized image.]
This tutorial was written on January 26, 2009, using Paint Shop Pro, version X.03. It should be okay to do with other versions as well. I just find X.03 more comfortable for me. You may download a free trial of Paint Shop Pro, version X2, from Corel.
You will also need:
Tube of your choice. I've chosen to use the artwork of Lon Ryden. He used to be licensed through CILM, but has since gone FTU, I believe.
Animation Shop - at this time, I'm not sure where you can get this program, if you don't already have it. You may, however, save the tut as a static (non-animated) image if you like.
Scrap kit is FTU by Hezalin of HezaScraps & Tags. The kit I'm using is called Football Freebie.
Filters used are Eye Candy 3.1 - Glass and Eye Candy 4000 - Gradient Glow. These filters were only used on the name in this tut. You may choose to do something different, it's all up to you.
My Supplies: Mask 007 and the fireworks file a240a.gif. You can get those here.
Font: I used Brady Bunch Remastered
Put your fireworks .gif file where you keep your animations. Load the mask, or open in PSP and minimize.
Let's do it to it!
Open a new file, 700 x 700, white.
Open Paper 6. Copy and paste it onto your new canvas.
Apply Mask 007. Delete mask layer. Answer "yes" to the pop-up question. Merge group.
Open the round frame. Copy and paste it onto your canvas. Move it around 'til it seems centered.
Open Paper 4. Copy and paste, below the frame and above the mask.
Grab your magic wand. Click inside of frame. Selections > Modify > Expand by 7.
Click your green paper layer. Selections > Invert. Hit delete. Selections > Select None.
Now move your mask layer to be centered under the frame and green layers.
Open Word Art 3. Copy and paste inside frame area. Drop shadow.
Apply your tube of choice. The one I used looks as though it is stepping out of the frame. To do that:
Grab your magic wand again. Click inside frame. Selections > Invert.
Get your eraser brush, and, making sure you're on the tube layer, erase the foot (or whatever if you're doing this with another tube) that's hanging over the frame. Selections > Select None.
Open the megaphone. Copy and paste, arranging as desired. I rotated mine right by 15°. Drop shadow.
Open all the flags, and resize them 50%. Copy and paste in the order you find works for you. I did four, then merged those four together. Duplicated that layer, then moved the duplicate to be flush with the first four. Then merged those two layers together. Drop shadow.
On the frame layer again, grab the magic wand. Click inside frame, Selections > Modify > Expand by 7. Selections > Invert.
Go back to the flags frame and delete. Selections > Select None.
Drop shadow your frame at this time.
Add your name, copyright, license info if applicable. And don't forget your tagger's/watermark!
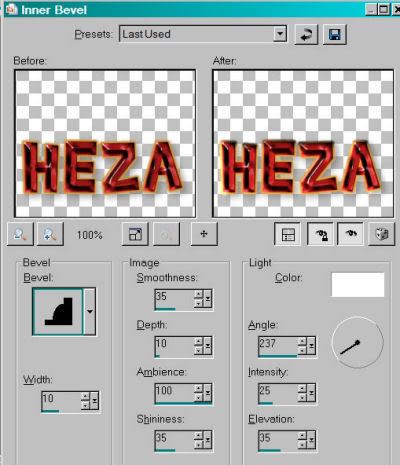
For the name on this tag, I used the following Inner Bevel:
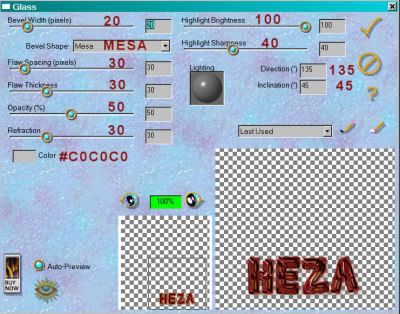
I then used Eye Candy 3.1 > Glass with the following settings:
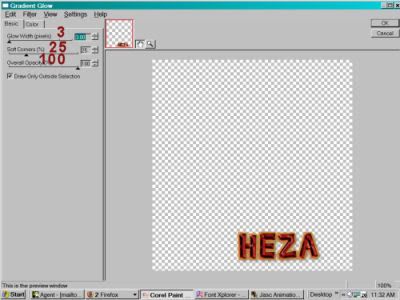
And Eye Candy 4000 > Gradient Glow:
I used the gold from the "Touchdown" word art, and did the gradient effect twice.
Resize tag.
You may save and use this tag as is, or elect to go on to animate.
A N I M A T I O N
Close all layers above the frame, and including the frame.
Edit > Copy merged.
Over to Animation Shop. Paste as new animation.
Duplicate your frames until you have 20.
Open a240.gif
Edit > Select all. Edit > copy.
Go to your new animation and Edit > Paste > Into Selected Frame.
Center the fireworks on one of the static fireworks included with the word art we've used.
Repeat these steps until you cover all three of the fireworks.
View > Animation.
If satisfied, we're going forward! If not, Edit > Undo Paste and re-arrange to your satisfaction.
Okay, back to PSP.
Close off all open layers, and open all the closed!!
Edit > Copy Merged
Go back to Animation Shop and paste as a new animation.
Duplicate the frames until you again have 20.
Edit > Select All. Edit > Copy
Go to your working animation and Edit > Paste > Into Selected Frame
Make sure you have it all lined up correctly before your make your mouse click!
View > Animation.
We're done! Save as .gif file!
Thank you once again for trying my tuts! I appreciate it, and as always Drop me a line if you have any questions!
.
Labels:
Tutorial
Sunday, January 25, 2009
Sweet on Valentine's
.
[Click image above to go to full sized image.]
This tutorial was written on January 25, 2009, using Paint Shop Pro, version X.03. It should be okay to do with other versions as well. I just find X.03 more comfortable for me. You may download a free trial of Paint Shop Pro, version X2, from Corel.
You will also need:
Tube of your choice. I've chosen to use the SUPER artwork of Ismael Rac. You must have a license to use his work. You may purchase that license at My PSP Tubes.
Scrap kit is by Loyal of A Dash of Whimsical Creations. The kit I'm using is PTU and called Cupid Caught!. If it helps defray costs at all, I'm posting another tut using the same kit today. So you get two for the price of one scrap kit. And it's on sale right this moment for $1.65 at Treasured Scraps. Not bad! Be sure to catch the sale!
No filters used in this tut! Quick and dirty again!
Font: I used Bramble
Supplies: Two masks -- Heart-burst, and mask 020. I have the first one repeated under different names in my mask folder. I don't know where I got either of these masks. If one or both are yours, please let me know so you can get credit! Get the masks here.
Okay, back to it! Again, I colorized my papers and elements to go with the tube. You may not need to do that. Whatever is your choice.
Open your masks and minimze in PSP. Alternatively, load masks into your PSP masks file.
Open a new image, 700 x 700, white.
Open Papers_002. Copy and paste as new layer. Colorize if desired.
Apply heart-burst mask. Right click on mask layer in palette, delete. Answer "yes" to the pop-up question. Merge group.
Open Papers_005. Copy and paste as new layer. Colorize if desired.
Apply mask 020. Delete and merge as above.
Open Elements_033. Copy and paste as new layer. Resize and colorize to taste. Drop shadow.
Add your tube of choice. Drop shadow.
Open Elements_018. Copy and paste. Position on the top right corner of the frame-like element. Colorize if desired and drop shadow.
Open Elements_024. Repeat the steps above.
Open Elements_017. Copy and paste as new layer. Colorize if needed and Image > Rotate > Left 90%. Place as desired. Duplicate and mirror. Place as desired. Drop shadow your word art if you like.
Go to your tube layer. If it's a cut-off tube on the bottom like mine is, try grabbing your lasso tool, with feather set on 17. Freehand, not point-to-point. Go ahead and do a quick curve toward the bottom of your tube, with the curve pointing downward. Draw the lasso to the bottom of the layer and meet back at the beginning if your curve. Delete. Selections > Select none. Voila!
Add your name, your copyright and license info (if license info is applicable). Add your tagger's or watermark so you can take credit for what you've created.
Merge your layers and save as desired! Like I said, quick & dirty!
Thanks again for stopping by and trying out a tut or two. Please don't hesitate to Drop me a line if there are any questions or comments.
.
My Gothic Valentine
.
[Click image above to go to full sized image.]
This tutorial was written on January 25, 2009, using Paint Shop Pro, version X.03. It should be okay to do with other versions as well. I just find X.03 more comfortable for me. You may download a free trial of Paint Shop Pro, version X2, from Corel.
You will also need:
Tube of your choice. I've chosen to use the great artwork of Misty Benson. You must have a license to use his work. You may purchase that license at My PSP Tubes.
Scrap kit is by Loyal of A Dash of Whimsical Creations. The kit I'm using is PTU and called Cupid Caught!. If it helps defray costs at all, I'm posting another tut using the same kit today. So you get two for the price of one scrap kit. And it's on sale right this moment for $1.65 at Treasured Scraps. Not bad! Be sure to catch the sale!
Only filter used is Greg's Factory Output Vol. II -- Pool Shadow. That will be optional, dependent upon whether you want it on your name in the tag.
Font: I used Brahn Muffin
Supplies: Mask -- Heart-burst. I have this one repeated under different names in my mask folder. If it is yours, please let me know so you can get credit! here.
Okay, let's do it! Quick and dirty, as they say. I colorized my papers and elements to go with the tube. You may not need to do that. Whatever is your choice.
Open the mask in PSP and minimize, or load into your masks file. Whichever you like.
Open a new file, 700 x 700, white.
Get Papers_005. Copy and paste onto your new file as new layer.
Apply your heart-burst mask. Right click on your mask layer in the layer palette and delete. Answer "yes" to the pop-up question. Merge group.
Open Elements_008. Copy and paste as a new layer. Resize by 150%, and then again by 130%. Colorize to match the tube. If you're using the same tube, it will go like this:
Adjust > Hue & Saturation > Colorize. My settings are 223 & 127.
Arrange the flower to your liking. Drop shadow.
Add your tube of choice. Place on flower as you like. Drop shadow.
Open Elements_011. Copy and paste onto your canvas as new layer. Position to the right of the tube. Colorize as needed.
Get your magic wand and click in the center of the frame. Selections > Modify > Expand 7 > Invert
Open Papers_003. Copy and paste as new layer and arrange below the frame layer. Delete. Selections > Select none. Colorize the paper as needed.
Duplicate your tube layer, and Image > Mirror. Position this layer to your liking within the frame. Arrange so this layer is below frame, and above the paper background.
Change the layer properties to Luminance (Legacy). Reduce the opacity of this frame to about 60.
Open Elements_018. Copy and paste as new layer. Colorize as needed. Position to the top right corner of the frame. Drop shadow.
Open Elements_035. Copy and paste as new layer. Move to the area of the frame. Colorize as needed.
Use your pick tool (In PSP X.03, it's under the move tool -- just click on that little arrow, and you'll find it) to stretch the word art to fit the frame as you like. Drop shadow word art.
Drop shadow your frame.
Add your name. On my name, I used a stroke of 3 with black as the stroke color and the dominant color from my tube as the fill. After your name is done, and placed as you like, go:
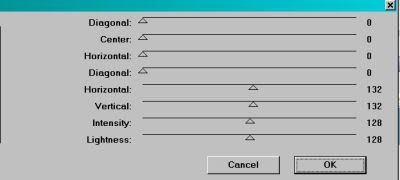
Effects: Greg's Factory Output Vol. II > Pool Shadow
In case you cannot see the numbers, the settings are: 0-0-0-0-132-132-128-128
Drop shadow your name. Add your copyright info, license info if applicable, and your tagger's and/or watermark. Be sure to give yourself credit!
Resize to taste and save as desired!
Thank you so much for trying my tut! Drop me a note if you have any problems at all. Have a great day!!
.
Labels:
Tutorial
Saturday, January 24, 2009
Butterfly Surprise
.
[Click image above to go to full sized image.]
This tutorial was written on January 24, 2009, using Paint Shop Pro, version X.03. It should be okay to do with other versions as well. I just find X.03 more comfortable for me. You may download a free trial of Paint Shop Pro, version X2, from Corel.
You will also need:
Tube of your choice. I've chosen to use the great artwork of Elias Chatzoudis. You must have a license to use his work. You may purchase that license at My PSP Tubes.
Animation Shop - at this time, I'm not sure where you can get this program, if you don't already have it. You may, however, save the tut as a static (non-animated) image if you like.
Scrap kit by Norma of Swheat Creations. The kit I'm using is called Daisy Pink.
Only filter used is DSB Flux - Bright Noise. That will be optional, dependent upon whether you want the sparkly diamonds all around your frame. That takes a lot of repetition.
Font: I used Marnie Regular
Supplies: The diamond, and the mask, which is by Essex Girl. You can get these here.
Ready? Let's do it again! LOL
Open your supplies and minimize in PSP. You may load your mask if you wish.
Open a new image 700 x 700 white.
Open Pink Bkg10. Copy and paste onto your canvas. Apply your mask. Delete mask layer, answer "yes" to the pop-up question, and merge group.
Open Frame 4. Copy and paste onto your canvas.
Open Pink Bkg10 again. Copy and paste onto your canvas, above the mask and below the frame.
Grab your magic wand and click inside the frame. Selections > Modify > Expand by 5. Selections > Invert
Move to your Pink Bkg10 layer and hit delete. Selections > Select none.
The following is the way I do tubes in frames. You may have learned a different way. I just found this more efficient for me.
Add your tube as the top layer. Position as you like. Drop shadow your tube.
Go back to your frame layer and again grab the magic wand and click inside frame. Selections > Invert
Grab your eraser brush and highlight your tube layer. Click your eraser brush along the bottom of the tube, where it overhangs the frame. Selections > Select none.
Drop shadow your frame.
Open Daisy 5. Resize 65%. Copy and paste onto the frame, bottom left area. Duplicate and arrange flowers as you like. Drop shadow your flowers. At this point I merge them down as one layer, it's up to you.
Grab your diamond, which I supplied. Copy and paste twice, and move into the centers of the flowers. Merge these two diamonds down and re-name "flower diamonds."
Open the butterfly3. Resize by 50%, then by 75%. Copy and paste onto your canvas as you like. I chose to put it on the hand of the tube. I rotated it left by 25°. Drop shadow.
Now, you can leave it like this, or you can copy and paste all the diamonds to fill the holes around the frame. It takes a while, but that's what I did for the example above. If you decide to do this, when you're done, merge all these diamond layers together and re-name "frame diamonds."
Add your name, copyright info, license if applicable, and your tagger's mark and/or watermark.
Resize your tag to your preference.
You may save now if you like, or go ahead with animation.
ANIMATION
Duplicate your frame diamonds twice, for a total of three layers. Close out the top two layers.
Do the same for the flower diamonds.
Highlight the open diamond layer of choice. Effects > Plug-Ins > DSB Flux > Bright Noise. Set intensity to 30. Hit "mix" once.
Do the same for the other bottom diamond layer, if you've done the frame as well.
Close out those two diamond layers, and open the middle layers of both the frame diamonds and the flower diamonds.
DSB Flux again, hit "mix" twice. Do the same for the other middle layer. Then close out the middle layers and open the third layers.
Repeat DSB Flux. Hit "mix" three times for both layers. Close out your top effect layers and re-open the first of both sets.
(This sounds horribly confusing to me, writing this. I hope you're following! Drop me a line if you get lost!)
Edit > Copy Merged
Go to Animation Shop and right click the blank area, paste as new animation.
Back to PSP. Close out the bottom layers of both the "frame diamonds" and "flower diamonds," and open the middle layers in both.
Edit > Copy Merged
Go to Animation Shop. Edit > Paste > Past after current frame
Back to PSP. Close out the middle layers of both the "frame diamonds" and "flower diamonds," and open the top layers in both.
Go to Animation Shop. Edit > Paste > Past after current frame
View > Animation. If happy, go ahead and save as a .gif!
Thank you again for trying my tut. Please let me know on this one. It's quite confusing, I bet!!
Hope you're having a wonderful day/night/wherever you are!
.
Travelin' On
.
[Click image above to go to full sized image.]
This tutorial was written on January 24, 2009, using Paint Shop Pro, version X.03. It should be okay to do with other versions as well. I just find X.03 more comfortable for me. You may download a free trial of Paint Shop Pro, version X2, from Corel.
You will also need:
Tube of your choice. I've chosen to use the great artwork of Keith Garvey. You must have a license to use his work. You may purchase that license at My PSP Tubes.
PTU Scrap kit by Heza, called "Peppermint Twist." Also, I used elements from the freebie add-on kit that is offered with the PTU at Terminally Unique Designs.
Only filter used is Eye Candy 4000 Gradient Glow -- for the name, purely optional.
Font: I used Inscription LET Plain 1.0
Ready? Let's do it!
Open a new image, 700 x 700 white.
In your add-on kit, open Bracket Mat 3. Resize by 85%, all layers UNchecked. Copy and paste to your canvas.
In your add-on kit, open Bracket Mat 1. Resize by 85%, all layers UNchecked. Resize again by 80%, all layers UNchecked. Copy and paste over your first mat on your canvas. Drop shadow this second mat.
In your main kit, open Flower 8. Resize by 75%. Copy and paste over both your mats on your canvas. Drop shadow your flower.
In your main kit, open Bow 2. Resize by 50%, then resize again by 65%. Copy and paste in the upper left corner of your mats. Duplicate. Image > Mirror. Merge down. Duplicate. Image > Flip. Position to your liking. Merge all bows down. Drop shadow bows. Bring the bow layer below the flower layer.
Click on your background (white) layer. Go to your main kit and open Paper 2. Copy and paste to your canvas.
Click on your Bracket Mat 3 layer (the green mat).
Selections > Select All > Float > Defloat > Modify > Feather 17 > Invert
Click on Paper 2 layer. Delete. Selections > Select None.
Adjust > Blur > Gaussian Blur 20. Resize this layer by 105%.
Add your tube of choice. Drop shadow. You may also drop shadow your green bracket mat now, too.
Add your name, copyright, license if applicable, tagger's mark and watermark if you have one.
Resize.
Save your work! You're done! I hope you've enjoyed this quickie tut!! Leave me some love, please!!
Have a great day!
.
Labels:
Tutorial
Sunday, January 18, 2009
Shy Valentine
.
[Click image above to go to full sized image.]
This tutorial was written using Paint Shop Pro, version X.03. It should be okay to do with other versions as well. I just find X.03 more comfortable for me. You may download a free trial of Paint Shop Pro, version X2, from Corel.
You will also need:
Tube of your choice. I've chosen to use the artwork of Susan Heidi. You must have a license to use her work. You may purchase that license at My PSP Tubes.
Animation Shop - at this time, I'm not sure where you can get this program, if you don't already have it. You may, however, save the tut as a static (non-animated) image if you like.
Scrap kit by Bluey of BlueDream Designs. It's called "Valentine." Be sure to leave her some love! It looks like it's all FTU but please DON'T PASS ON BY when you see the donation button! That'd be BIG love for a BIG FTU scrap maker!!
No filters were used in this tut.
Font: I used PonytailScriptSSK
My Supplies here. This consists only of the mask, which came from Ali, of Designs by Ali fame. Thanks, Ali!!
This tutorial uses a lot of repetition, to get the dangle effect to run smoothly. It was confusing to write, so I hope you can make it through okay. I still think all those tut writers out there are amazing. It takes me forever to write it all out! I have found, to keep me from getting lost when doing tuts, that if the site allows it, highlighting the text of the step I'm on will keep me on the right track. If you have any problems, let me know in comments and I'll get right back to you!!
Let's get to it!
Open a new image, 700 x 700 white
Grab paper 4, copy and paste onto canvas.
Get frame 2, copy and paste that above the paper.
Using your magic wand, click inside the frame. Selections > Modify > Expand by 7. Selection > Invert
Highlight your paper layer, hit delete. Selections > Select None.
Highlight your white background layer. Add new raster layer. Selections > Select All
Paper 8, copy and paste into selection. Selections > Select None
Load your mask. INVERT TRANSPARENCY CHECKED! Delete mask layer, then answer "yes" to the question that pops up, and Merge > Group.
Grab paper 8 again, copy and paste it as new layer, above your mask layer.
Highlight frame layer. Again using your magic wand, click outside frame. Go back to your paper 8 layer you've just made and hit delete. Selections > Select None.
Adjust > Blur > Gaussian Blur set at 20.
Add your tube. Make this your top layer. Drop shadow your tube as desired.
Highlight your frame layer again. Using magic wand, click inside frame. Selections > Invert
Grab your eraser brush. Mine is set to square, size of 150, Hardness 100, Step 10, Density and Thickness 100, Rotation 0, Opacity 100.
Highlight your tube layer. Use your brush to delete the portions of your tube that are hanging out the bottom of the frame. DO NOT USE ERASER BRUSH ON TOP! When happy with your tube/frame situation (LOL), Selections > Select None. This will make your tube appear to be coming out of the frame.
Drop Shadow your frame.
Bow 4. Resize 50%. Copy and paste onto canvas. Rotate left 15%. Move to left of frame, or arrange to your liking.
Bow 1. Resize 50%. Copy and paste onto canvas. Rotate left 20%. Place atop first bow. Drop shadow both bows.
Here comes the repetition. I hope you can follow along!
Charm 1. Copy and paste on right of frame, lining it up with the top right "diamond" in the center of the flower on your frame. Drop shadow.
Duplicate this layer four times, so you have a total of five charm layers. Rename your original charm layer "Charm 1."
Highlight one of your duplicated charm layers, and re-name "Charm 2." Rotate left 10%. Line up the top of the charm to coincide with the original. This assures a smooth look to your charm dangle. You can see, even on mine, it came out sorta choppy. This can be improved -- I was just lazy!
Go to your next duplicated charm layer. Re-name "Charm 3." Rotate left 20%. Again, line it up with the tops of your other charms.
And now to your next duplicated charm. Re-name "Charm 4." Rotate right 10%. Line it up!
And finally, your last duplicated charm. Re-name "Charm 5" and rotate right 20%. Line it up.
Close out your four duplicated charms, leaving the original, "Charm 1," the only one visible.
Add your name, © and license if applicable. Don't forget your tag or watermark, so you get credit too!
Resize the tag to your pleasing.
More repetition coming up! Beware!
ANIMATION
Edit > Copy Merged
Go to Animation Shop, right click on the blank canvas and paste as new animation.
Back to PSP. Close out charm 1, reveal charm 2. Edit > Copy Merged
Back to A.S. Edit > Paste after current frame.
Back to PSP. Close out charm 2, reveal charm 3. Edit > Copy Merged
Back to A.S. Edit > Paste after current frame.
Back to PSP. Close out charm 3. Reveal charm 2 again. Edit > Copy Merged
In Animation Shop, Edit > Paste after current frame.
In PSP, close out charm 2. Reveal charm 1. Edit > Copy Merged
Back to A.S., Edit > Paste after current frame.
In PSP, close out charm 1 and reveal charm 4. Edit > Copy Merged
Back to A.S., Edit > Paste after current frame
And back to PSP, close out charm 4 and reveal charm 5. Edit > Copy Merged
Back to A.S., Edit > Paste after current frame.
Back to PSP finally, close out charm 5 and re-open charm 4. Edit > Copy Merged
And back in Animation Shop, Edit > Paste after current frame.
WHEW!! Did you make it?
Now, still in Animation Shop, Edit > Select All.
Right click on the top bar of your animation, choose Frame Properties. Change number to 15.
View > Animation
If satisfied, save as a .gif!!
I hope this wasn't too confusing, and that you're happy with your results. You're finally done!
Thank you for choosing to try my tut! It's a pleasure to see people participating!
.
Labels:
Tutorial
Friday, January 16, 2009
Sparkle & Glow
.
[Click image above to go to full sized image.]
Hello there! Time for another tut from me! I have to admit to everyone, that learning how much work goes into writing tuts has made me really REVERE tut writers everywhere. I find that it's way fiddly and it really takes some time, compared to just putting it together without writing a tut. Anyway, that said, here's my next one.
This tutorial was written using Paint Shop Pro, version X.03. It should be okay to do with other versions as well. I just find X.03 more comfortable for me. You may download a free trial of Paint Shop Pro, version X2, from Corel.
You will also need:
Tube of your choice. I've chosen to use the gorgeous artwork of Jennifer Janesko. You must have a license to use her work. You may purchase that license at CILM.
Animation Shop - at this time, I'm not sure where you can get this program, if you don't already have it. You may, however, save the tut as a static (non-animated) image if you like.
Template by Yvette. I'm using Yvette_EOC_Template51.pspimage. It's from her old blog, here.
Scrap kit by Pooker of Pooker's Creations. It's called "A Retro Thing." Be sure to leave her some love! She does FTU and PTU, so look around if you have the inclination.
Filters: VM Natural - Sparkle -=- Eye Candy 4000 - Gradient Glow
Font: I used Moskovia Script, a pay font.
My Supplies here. This is just for the doodle. It says it's "Yezdoodles" made by Yez, so if you know where I can find Yez, let me know. I've just picked a bunch of his/her doodles up over the years.
Let's get to it...
Open Yvette_EOC_Template51. Window > Duplicate. Close out original. Delete the copyright layer.
Resize all layers to 550 x 544 pixels.
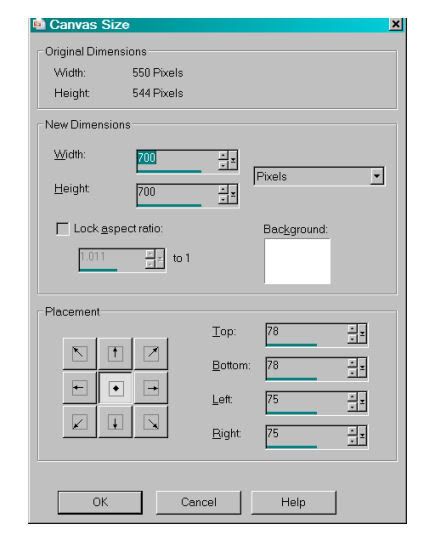
Image > Canvas Size > 700 x 700, making sure you're using the center alignment. See below.
.
Highlight template layer 4.
Selections > Select All > Float > Defloat > Modify > Expand by 1
Grab paper 2. Copy and paste onto your canvas as new layer. Selections > Invert > Delete
Select none.
Merge down the paper layer to the template layer.
Highlight layer 3. Do the same steps for this layer and layer 2, using the papers of choice or you can use what I did. Layer 3: Paper 1. Layer 2: Paper 3.
Highlight layer 1.
Selections > Select All > Float > Defloat > Modify > Contract by 15
Copy and paste Paper 1 onto your canvas. Hit delete. Selections > Invert > Modify > Expand by 16
Delete. Selections > Select None. Rename this layer "Ring" if you like for "keeping track" purposes.
Stay on the ring layer you just created.
Magic wand > Click inside of ring.
Selections > Modify > Expand by 5.
Highlight template layer 1. Grab paper 4, copy and paste to your canvas. Selections > Invert > Delete.
DO NOT DE-SELECT!!
Add the tube of your choice. Position as desired > Delete. NOW you may de-select!
Merge paper layer down to template layer 1; Drop shadow your tube as you like.
[NOTE: I chose to change the layer properties for the tube to "Luminous Legacy." You may choose to do so, or not.]
Highlight your ring layer.
Selections > Select All > Float > Defloat > Modify > Smooth > 10 and 10.
Duplicate this layer twice, for a total of 3 layers. Close off the top two layers and highlight the original.
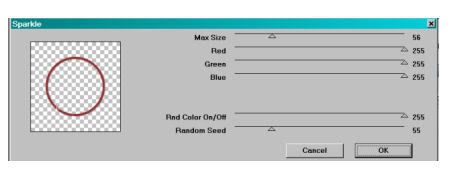
VM Natural > Sparkle, with the following settings. I'm sorry this is so small. I needed to make it fit the blog!
Basically, the top gauge is set at 56. All other gauges at 255, except the Random Seed, which is 55.
Close off this layer, and highlight your middle ring layer. Do the same with VM Natural > Sparkle, except change the random seed to 155.
Close off this layer, and highlight the top ring layer. Again with VM Natural > Sparkle, and change the random seed to 255.
[NOTE: I went back over the three rings a second time, using the settings in reverse order, to get more sparkle.]
Select none. Make sure the top two ring layers are closed off.
Grab your page of doodles. Choose raster 4. Copy and paste onto your canvas. [NOTE: I usually do this on the top layer, so I can see what I'm working with.] Move doodle to the top left of your tag. Duplicate > Mirror. Merge > Down. Duplicate > Flip. Merge down.
Move your doodle layer to just above your white background.
Selections > Select All > Float > Defloat > Invert
Grab paper 3, copy and paste onto your canvas. Hit delete. Selections > Select None.
Delete your original doodle layer, and add a drop shadow to your doodle if you like.
Drop shadow all other layers except the background in the frame (the layer behind your tube). Even the closed off ring layers!
Add your name. I added a Gradient Glow of 3 in the same shade as your doodles. Drop shadow.
Be sure to add your copyright info and watermark or note to give yourself credit as well.
Crop and resize. Here is where you would stop if you don't have Animation Shop. Voila!
ANIMATION
Edit > Copy merged. Take into Animation Shop and paste as a new animation.
Back to PSP. Close off the bottom ring layer and open the middle ring. Edit > Copy merged.
Take into Animation Shop and Edit > Paste after current frame.
Back to PSP. Close off the middle ring layer and open the top ring. Edit > Copy merged.
Take into Animation Shop and Edit > Paste after current frame.
Edit > Select all
Click on the top bar of your animation and change frame properties to 25.
View > Animation. If you're pleased, PLEASE let me know! Save as .gif.
And you're done!
I'd really appreciate some feedback on my tutorials. Not getting any makes me wonder "why?" If you have an answer for that, leave me a comment, too.
Thanks for looking and choosing to do my tut!
.
[Click image above to go to full sized image.]
You will also need:
Tube of your choice. I've chosen to use the gorgeous artwork of Jennifer Janesko. You must have a license to use her work. You may purchase that license at CILM.
Animation Shop - at this time, I'm not sure where you can get this program, if you don't already have it. You may, however, save the tut as a static (non-animated) image if you like.
Template by Yvette. I'm using Yvette_EOC_Template51.pspimage. It's from her old blog, here.
Scrap kit by Pooker of Pooker's Creations. It's called "A Retro Thing." Be sure to leave her some love! She does FTU and PTU, so look around if you have the inclination.
Filters: VM Natural - Sparkle -=- Eye Candy 4000 - Gradient Glow
Font: I used Moskovia Script, a pay font.
My Supplies here. This is just for the doodle. It says it's "Yezdoodles" made by Yez, so if you know where I can find Yez, let me know. I've just picked a bunch of his/her doodles up over the years.
Let's get to it...
Open Yvette_EOC_Template51. Window > Duplicate. Close out original. Delete the copyright layer.
Resize all layers to 550 x 544 pixels.
Image > Canvas Size > 700 x 700, making sure you're using the center alignment. See below.
.
Highlight template layer 4.
Selections > Select All > Float > Defloat > Modify > Expand by 1
Grab paper 2. Copy and paste onto your canvas as new layer. Selections > Invert > Delete
Select none.
Merge down the paper layer to the template layer.
Highlight layer 3. Do the same steps for this layer and layer 2, using the papers of choice or you can use what I did. Layer 3: Paper 1. Layer 2: Paper 3.
Highlight layer 1.
Selections > Select All > Float > Defloat > Modify > Contract by 15
Copy and paste Paper 1 onto your canvas. Hit delete. Selections > Invert > Modify > Expand by 16
Delete. Selections > Select None. Rename this layer "Ring" if you like for "keeping track" purposes.
Stay on the ring layer you just created.
Magic wand > Click inside of ring.
Selections > Modify > Expand by 5.
Highlight template layer 1. Grab paper 4, copy and paste to your canvas. Selections > Invert > Delete.
DO NOT DE-SELECT!!
Add the tube of your choice. Position as desired > Delete. NOW you may de-select!
Merge paper layer down to template layer 1; Drop shadow your tube as you like.
[NOTE: I chose to change the layer properties for the tube to "Luminous Legacy." You may choose to do so, or not.]
Highlight your ring layer.
Selections > Select All > Float > Defloat > Modify > Smooth > 10 and 10.
Duplicate this layer twice, for a total of 3 layers. Close off the top two layers and highlight the original.
VM Natural > Sparkle, with the following settings. I'm sorry this is so small. I needed to make it fit the blog!
Basically, the top gauge is set at 56. All other gauges at 255, except the Random Seed, which is 55.
Close off this layer, and highlight your middle ring layer. Do the same with VM Natural > Sparkle, except change the random seed to 155.
Close off this layer, and highlight the top ring layer. Again with VM Natural > Sparkle, and change the random seed to 255.
[NOTE: I went back over the three rings a second time, using the settings in reverse order, to get more sparkle.]
Select none. Make sure the top two ring layers are closed off.
Grab your page of doodles. Choose raster 4. Copy and paste onto your canvas. [NOTE: I usually do this on the top layer, so I can see what I'm working with.] Move doodle to the top left of your tag. Duplicate > Mirror. Merge > Down. Duplicate > Flip. Merge down.
Move your doodle layer to just above your white background.
Selections > Select All > Float > Defloat > Invert
Grab paper 3, copy and paste onto your canvas. Hit delete. Selections > Select None.
Delete your original doodle layer, and add a drop shadow to your doodle if you like.
Drop shadow all other layers except the background in the frame (the layer behind your tube). Even the closed off ring layers!
Add your name. I added a Gradient Glow of 3 in the same shade as your doodles. Drop shadow.
Be sure to add your copyright info and watermark or note to give yourself credit as well.
Crop and resize. Here is where you would stop if you don't have Animation Shop. Voila!
ANIMATION
Edit > Copy merged. Take into Animation Shop and paste as a new animation.
Back to PSP. Close off the bottom ring layer and open the middle ring. Edit > Copy merged.
Take into Animation Shop and Edit > Paste after current frame.
Back to PSP. Close off the middle ring layer and open the top ring. Edit > Copy merged.
Take into Animation Shop and Edit > Paste after current frame.
Edit > Select all
Click on the top bar of your animation and change frame properties to 25.
View > Animation. If you're pleased, PLEASE let me know! Save as .gif.
And you're done!
I'd really appreciate some feedback on my tutorials. Not getting any makes me wonder "why?" If you have an answer for that, leave me a comment, too.
Thanks for looking and choosing to do my tut!
.
Labels:
Tutorial
Thursday, January 15, 2009
Happy Thursday from California
.
Temperatures still in the 80s here. As a matter of fact, it's now 81°, according to my weather thingamajiggy that is an extra for Firefox. Y'all say it's Winter? I dunno...
Unfortunately, I have some bad news. No new tuts today, as I said I'd do. Why? I woke up sick. I didn't realize I was sick, I just got up, made the bed, then laid back down and curled up with pillows. Then I got sick. Icky. I'm recuperating fine, it seems, but I'm still very tired and I find it very difficult to get my mojo going.
Then there's this airplane news from New York. Amazing stuff, but you've just been rattling on and on, Charlie Gibson! You interrupted the soaps on a Thursday (a friend and I mutually agreed back in the 1980s that the *real* important stuff happens on Thursdays)! The people are all safe, the pilot was FANTASTIC, will likely be called a hero, because, hey: That's what he is. But stop with the prattling on and on, and saying everything over and over. It's been reported! Go back to original programming!
On a much more unfortunate note, Steven's mother fell down the stairs Tuesday night. She's done so in the past (Parkinsonism), apparently with bruising but nothing serious. This time, she broke her spine in four places (at least), one such place being in her neck. He says she's 76 years old. He said the neuologist said they advise against surgery. He's (the neurologist) concerned about the weakness of her arms. And apparently she was having trouble breathing. She has had breathing problems for quite a while, and has prescribed oxygen at home. She has solved this problem by always having her head elevated. She can sleep that way. Nobody knows if they have her flat on her back in the bed, and if so, if it's because of the break in her neck that she's not elevated, or what.
Frustratingly, Steven doesn't ask these questions of people who know, to whom he's regularly speaking. He just asks me. I ask him back if he's asked any of the doctors or the social worker and he said he just assumes stuff, so doesn't ask. Drives me nuts. I would like to know the answer. Steven is concerned that she might have a tube down her throat, attached to a respirator. I had just thought she'd have the nasal cannulas, with oxygen. I dunno.
All I know for sure is that family needs positive, healing thoughts and if you believe, prayers. I'd appreciate it if y'all could find a minute in your day to pray for Steven's family in Pennsylvania. Mom's in the hospital, unlikely to walk again. Steven just got home from a very extended stay in various hospitals -- has been home maybe 10 days -- after having his lower leg amputated. The one brother has grown up and is developmentally disabled. And as of last night, he was concerned he'd never see his mother alive again. Poor guy. The third brother is somewhat of an ass. But then, he's the only really able-bodied one in the family. He's constantly being called upon to go somewhere to pick something up for someone in the family. So he stays isolated from them as much as he cans, it seems. I call him the "phantom." Anyway, prayers begged for and appreciatively received.
Other than all that bad news, I've not much to say. I've just spent about an hour or so trying to find the best tube for a scrap challenge I've been given. As a result, I have open about 25 tubes now, minimized in Paint Shop Pro. Then, when it's time for me to add the tube, I'll go shopping within those 25 and hopefully find a good one.
I hate these long, drawn-out tube searches. Happens to me, like, at least 2 times a week.
And ::poof::!!! The soaps are back on! Jessica is apparently going under hypnosis. I hope the truth comes out and Starr's baby will be given back to... Marcie?? Hmm...
Thank you for any prayers, and I promise I'll work on at least one tut tomorrow!!
.
Labels:
Random Personal Stuff
Sunday, January 11, 2009
The Weekend Got Away From Me...
.
That, and the fact that I've learned how much work it takes to write a tutorial, has kept me from keepin' on the past two days. Then I'm doing challenges probably from Monday-Wednesday at least for the coming week. Then there will be more tutorials, I promise!
FWIW, while cleaning things up and collecting things to donate to the Salvation Army yesterday, I found a book I had *just* been wishing I had! (Or one like it.) This is about my mouse problem. I have had a mousetrap spring on my right thumb twice. I have, like a black spot at the base of the thumbnail, and it's bruising (just a bit) under the nail. I hope it's as big as it's going to get. I thought for sure I was going to lose the nail. *knock wood*
So, I've been gotten more than the mice have. The first night, I've learned, I was lucky when I caught one right out of the gate. Then the wrestling with traps and setting with cheese happened. The trap sprung on me about oh, 7 times over two days. (Only a really bad injury the first time.) So, in all that springing whilst trying to put the bait (cheese) onto it, well... it resulted in the cheese pieces flying all around. So the two nights that I set the trap successfully, there was other cheese in the area.
I've ended up realizing that there's some kind of really smart mouse (mice?) out there, and they're getting all the cheese, and not getting caught! So, in actuality, all I'm doing is feeding them, and giving them more reason to come back!
So I was reminded of these books that the shopping channels hawk once in a while that include home-made solutions to pest problems. I was really wishing I had one of those. Ta-daa! I found one on my bookshelf! Silly me. So I open it to "mice" -- a category shared with moles and gophers, btw. I found one I had most of the ingredients for. Take a pint of cold tap water, 1 tsp. peppermint oil, 1 tsp. chili powder, ½ ounce tabasco sauce, and cotton balls. Mix ingredients together (except the cotton balls, it points out, lol), then put 10 drops of the mixture on a cotton ball and place it anywhere a rodent problem exists. Rodents are allergic to peppermint and spicy peppers.
On a mission, I go into the kitchen and start to gather the needed ingredients. I was shocked to see I had no chili powder! It's a necessity for one recipe I recall from a great diet I was on once! I knew going in I had no tabasco, but I thought I'd do it with just the peppermint and the chili powder. What I was left with, was cold water and peppermint oil. Figured I'd go to the store for tabasco tomorrow and mix it properly then. So I dipped cotton balls into the water (don't have an available dropper for this purpose) and I put one of them directly into the mouse hole. Then put two next to the trap. THEN put four more in the little doorway that is formed from the cut-out portion of the doors under my sink.
I don't think it worked. I think I heard them (it?) skittering around last evening. I hate that. I mean, I know they're there, but I don't want to HEAR them. It's creepy.
OH! I heard a noise earlier that sounded like it came from the kitchen. "Mouse trap," I thought. I immediately discounted the idea, because it hadn't even been loaded. Just while typing this, I thought I'd go check and see. I GOT ANOTHER ONE! They (it?) got around the peppermint just fine, but the trap got it. That's some sort of success, anyway.
The manager of this building told me he has them now, too. His strategy of choice is something called a glue trap. I wonder if he's gotten any yet?
On another subject, it's now 81° outside! This is crazy weather, and I know the majority of the nation (U.S.A.) is hating on us right now. Probably around the world, if they're even aware of the weather in southern California. It's supposed to be a teensy bit warmer tomorrow, then 81° again Tuesday, and then we drop down by 10°. I don't want to be sounding like a whiner or anything, but I wish Mother Nature would look upon us and PICK A SEASON, PLEASE! I don't know what to wear from week to week!
Anyway, that's me, now. The battle continues. I hope your weekend has been significantly less creepy and not too frozen!
.
Labels:
Random Personal Stuff
Friday, January 9, 2009
Loving Valentine
.
[NOTE: Click on image above to see full-sized tag.]
Loving Valentine
A tutorial by kajira. Written on January 9, 2009.
What's Needed:
Tube of choice. I am using a tube by Jenga. You can find Jenga's great tubes at Artistic Minds, Inc.
Scrap Kit: Valentine by Kristin of Kristins' Wicked Scrapz.
Template, also by Kristin. It's template Kristin-KWS-Template15.png, included with two other Valentine templates, here.
Leave Kristin lots of love while you're there! Only takes a minute and it does wonders for a person's spirit!
Filter: DSB Flux, Bright Noise
Font: Arial
Let's get started!
Duplicate your template, close out the original.
My preference at this point was to resize the template with the height being 700, aspect ratio locked. Again, I just like working on a bigger space. This is entirely up to you.
Click on Circle layer.
Selections > Select All > Float > Defloat > Modify > Expand by 1
Paper 10. Copy, then paste on your canvas. Resize by 115%.
Selections > Invert > Delete > Select None.
Click on rectangle layer.
Selections > Select All > Float > Defloat > Modify > Expand by 1
Paper 4
Adjust > Brightness and Contrast > Brightness/Contrast > With the following settings:
-50 30
Copy, then paste on your canvas. Resize by 115%.
Selections > Invert > Delete > Select None.
Click on "Love" layer.
Selections > Select All > Float > Defloat > Modify > Smooth, both settings on 10.
Paper 1
Adjust > Brightness and Contrast > Brightness/Contrast > Same settings as before.
Copy, then paste on your canvas. Resize by 115%.
Selections > Invert > Delete > Select None.
Drop shadow: 3, 3, 55, 3 Black
Click on hearts layer.
Paper 2. Copy, then paste on your canvas. Resize by 115%.
Selections > Invert > Delete > Select None.
Add your tube of choice. Drop shadow.
If you have excess drop shadow under the rectangle area, you may remove it in this way. If you don't, skip down!!
Click rectangle layer.
Selections > Select All > Float > Defloat > Modify > Contract by 2
Selections > Invert
Grab your Eraser Brush, with the following settings:
Shape - Square Size: 100-150 Hardness - 100 Step - 10
Density - 100 Thickness - 100 Rotation - 0 Opacity - 100
Highlight your tube layer, and erase ONLY THE BOTTOM where the dropshadow hangs over. Again, this may not apply to you, it depends upon the tube.
Add your name. I used Arial. Drop shadow 3, 3, 55, 3 Black
Add your ©, license, WM if applicable.
Now, you can just save this as a static tag, or you may move on to animation.
Animation
Highlight the Hearts layer.
Selections > Select All > Float > Defloat >
Duplicate your hearts layer now, twice, making a total of three.
Highlight your bottom hearts layer.
Effects: DSB Flux, Bright Noise. Intensity, 25. Mix. OK.
Highlight your middle hearts layer.
Effects: DSB Flux, Bright Noise. Intensity, 25. Click Mix again, once or twice. OK.
Highlight your top hearts layer.
Effects: DSB Flux, Bright Noise. Intensity, 25. Click Mix again, once or twice. OK.
Select None.
Close out the top two heart layers, and Edit > Copy Merged
Right click on blank canvas in Animation Shop, Paste as new animation.
Back to PSP. Close bottom layer and open up the middle layer.
In Animation Shop, Click Edit > Paste > Paste after current frame.
Back to PSP. Close middle layer and open the top layer of hearts.
In Animation Shop, Click Edit > Paste > Paste after current frame.
If you wish to view your animation, Click View > Animation.
You're done! Save it and pat yourself on the back!
Thank you for trying my tutorial. It really means a lot to me. I hope it wasn't too hard to follow. If you have any questions, please don't hesitate to notify me, and I'll do the best I can to re-write the confusing parts!!
.
Labels:
Tutorial
Devilicious, My First Tutorial!
.
Thank you for trying my tutorial. Leave me a comment or something if anything is unclear. Like I've said, it's my first time. :)
I'm doing this post (and will likely do all tut posts -- or all posts, period, if it turns out nicely) in bold print, because I'm finding that the distraction of the background choice for this blog is just too much. I hope you enjoy the tutorial!
Devilicious
A tutorial by kajira. Written January 9, 2009.
What's needed:
Tube of choice. I'm using a tube from the great artist Jamie Kidd, whose art you can find at CILM.
Scrap Kit: Devilicious, a free to use kit by Kristin at Kristin's Wicked Scrapz.
My Supplies: Mask, from Teresa at Boundless Bliss. Thanks, Teresa!! I am supplying this mask, here.
Filter: Eye Candy 4000 - Fire; Gradient Glow
Okay, let's get started!
Open a 700x700 white canvas. You can resize at the end. I don't know why I work this big, I just do. LOL.
Add a new raster layer.
Select all.
Copy paper 7 and paste into selection.
Select none.
Duplicate this layer.
Copy Frame 3 and paste as your top layer.
Grab your magic wand, click inside your frame and Modify> Expand> 5.
Invert selection.
Back to your top paper layer, delete. Select none.
Go to your bottom paper layer.
Apply your mask, making sure to CHECK the invert transparency box.
Go to your layer palette, and delete mask layer. Answer yes. Merge> Group.
Dropshadow your frame as you choose. FYI. I used 3, 3, 45, 10 and I used the second color down on the color chart from the solid black. It's kind of a dark charcoal.
Duplicate your frame layer twice for a total of three.
Open your filter, Eye Candy 4000, Fire. Use the settings (under the settings heading) "small flame."
The numbers:
146.0
18.00
90.00
10
Draw only outside selection
OK
Go to the next layer of frame and do the same thing, but hit "random seed" on the bottom once or twice until you get the flame you're looking for.
OK
Repeat the flame on your last layer of frame, but hit "random seed" again.
OK
Close off two of the frame layers. I usually leave the bottom one showing, closing off the top two.
Add your tube of choice, and drop shadow of choice.
Add word art of choice from the kit, or think up your own if you like. Position. Drop shadow if you choose.
Add your name. I used A&S Snapper Script. I gave it a gradient glow of 3 in black.
I did this last step to match the word art I'd chosen. It's up to you.
Add doodle, resize 50%, mirror, position under name as you like.
Add your ©, license, water mark, etc.
I cropped mine down to 540x540. You know the size you're more comfortable with, so go ahead and do it now.
If you're saving as a .jpg, Merge> All (flatten) and export to .jpg optimizer, save, and you're done!
Animation
Edit> Copy Merged
Go to Animation Shop, click blank canvas, paste as a new animation.
Back to PSP.
Close off the bottom layer of frame/fire and open the middle layer. Edit> Copy Merged
Go to Animation Shop, Edit> Paste> Paste after current frame.
Back to PSP.
Close off the middle layer of frame/fire and open the top layer. Edit> Copy Merged
Go back to Animation Shop, Edit> Paste> Paste after current frame.
Edit> Select All
Right click the top of your tag > Frame Properties> 25
Run your animation! (View> Animation) If it's good for you, you're done!! Save as .gif and have a ball!
Thank you for trying my tutorial. Leave me a comment or something if anything is unclear. Like I've said, it's my first time. :)
I'm doing this post (and will likely do all tut posts -- or all posts, period, if it turns out nicely) in bold print, because I'm finding that the distraction of the background choice for this blog is just too much. I hope you enjoy the tutorial!
A tutorial by kajira. Written January 9, 2009.
What's needed:
Tube of choice. I'm using a tube from the great artist Jamie Kidd, whose art you can find at CILM.
Scrap Kit: Devilicious, a free to use kit by Kristin at Kristin's Wicked Scrapz.
My Supplies: Mask, from Teresa at Boundless Bliss. Thanks, Teresa!! I am supplying this mask, here.
Filter: Eye Candy 4000 - Fire; Gradient Glow
Okay, let's get started!
Open a 700x700 white canvas. You can resize at the end. I don't know why I work this big, I just do. LOL.
Add a new raster layer.
Select all.
Copy paper 7 and paste into selection.
Select none.
Duplicate this layer.
Copy Frame 3 and paste as your top layer.
Grab your magic wand, click inside your frame and Modify> Expand> 5.
Invert selection.
Back to your top paper layer, delete. Select none.
Go to your bottom paper layer.
Apply your mask, making sure to CHECK the invert transparency box.
Go to your layer palette, and delete mask layer. Answer yes. Merge> Group.
Dropshadow your frame as you choose. FYI. I used 3, 3, 45, 10 and I used the second color down on the color chart from the solid black. It's kind of a dark charcoal.
Duplicate your frame layer twice for a total of three.
Open your filter, Eye Candy 4000, Fire. Use the settings (under the settings heading) "small flame."
The numbers:
146.0
18.00
90.00
10
Draw only outside selection
OK
Go to the next layer of frame and do the same thing, but hit "random seed" on the bottom once or twice until you get the flame you're looking for.
OK
Repeat the flame on your last layer of frame, but hit "random seed" again.
OK
Close off two of the frame layers. I usually leave the bottom one showing, closing off the top two.
Add your tube of choice, and drop shadow of choice.
Add word art of choice from the kit, or think up your own if you like. Position. Drop shadow if you choose.
Add your name. I used A&S Snapper Script. I gave it a gradient glow of 3 in black.
I did this last step to match the word art I'd chosen. It's up to you.
Add doodle, resize 50%, mirror, position under name as you like.
Add your ©, license, water mark, etc.
I cropped mine down to 540x540. You know the size you're more comfortable with, so go ahead and do it now.
If you're saving as a .jpg, Merge> All (flatten) and export to .jpg optimizer, save, and you're done!
Animation
Edit> Copy Merged
Go to Animation Shop, click blank canvas, paste as a new animation.
Back to PSP.
Close off the bottom layer of frame/fire and open the middle layer. Edit> Copy Merged
Go to Animation Shop, Edit> Paste> Paste after current frame.
Back to PSP.
Close off the middle layer of frame/fire and open the top layer. Edit> Copy Merged
Go back to Animation Shop, Edit> Paste> Paste after current frame.
Edit> Select All
Right click the top of your tag > Frame Properties> 25
Run your animation! (View> Animation) If it's good for you, you're done!! Save as .gif and have a ball!
Labels:
Tutorial
Thursday, January 8, 2009
Not So Much Red After All!
.
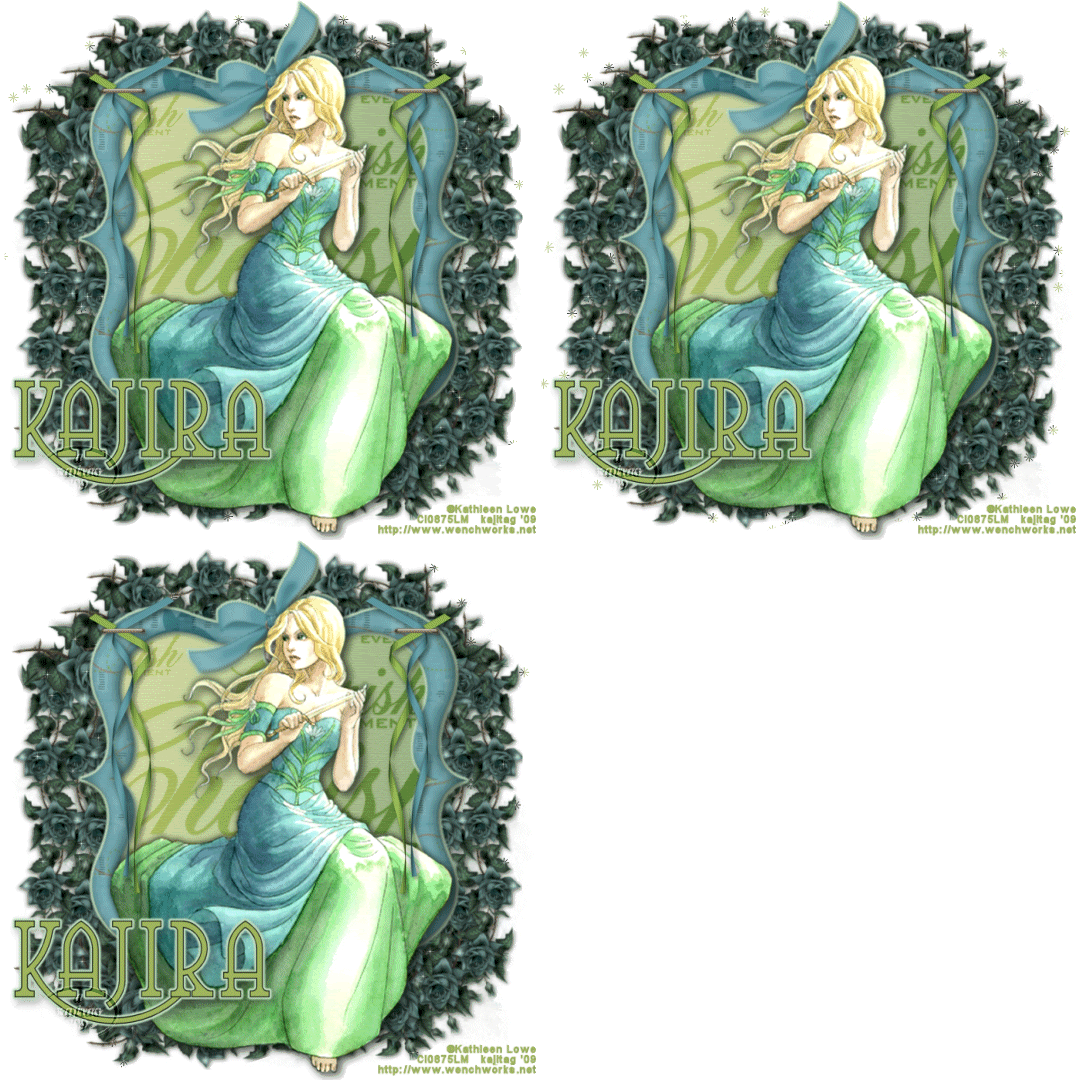
Here's my next creation. I'm not so impressed by this one. I'd give it an "average." I have forever tried to use Xero Sparkles and never have been able to figure it out. I kinda-sorta did this time. I think, however, I should have used VM Natural Sparkles instead.
Anyway, this is from Kitt, of Kittz Kreationz. I used her kit called Cherish. Just in case you'd like to wander on over there and give it a try yourself.
You know what? I just thought of something. DUH! Stay tuned for my next post! Here's the tag:
.
This is most certainly not red, black and white! I happen to LOVE the teal family of colors. I think it's the first time I've used Kathleen Lowe's art. It's available through CILM. I hope you enjoy!
.
Labels:
Art
Here's a New One...
.
.. That I just completed. Thought it turned out pretty well (if I do say so myself), so thought I'd share it. This uses Bluebird's kit entitled Red Hot Romance! I hope you like!!
.
I'll be doing a few more this afternoon, from different scrap kits, but strangely enough I think they're all red and black oriented. Or I may have one different. Oh, I dunno! I just hope you're enjoying (whoever, wherever you are. Is this thing on?).
Labels:
Art
Owie, and Other Things
.
Hola, people! Well, I set another trap last night, but not before the trap got me. I have a big ole something or other on my right thumb. I was sure last night that I was on the road to losing my thumb nail, but this morning it doesn't feel like that anymore. *knock wood* Woke up this morning, looked at the trap, and the cheese is gone, but no mouse. How the MOUSE got that cheese w/o setting off the trap, but I couldn't set it without casuality (sp?), I'll never know. All I now know is that I need to get another piece of cheese on that trap without injuring myself!! Positve thoughts are appreciated. Thank you.
I did a few scrap challenges yesterday, and I'm going to share one with you here. This is my result to a challenge made to use the Sweet Love scrap kit by Maribel. Please note, that the URL says "PTU" but the kit is actually FTU, in case you're inspired to try it.
.
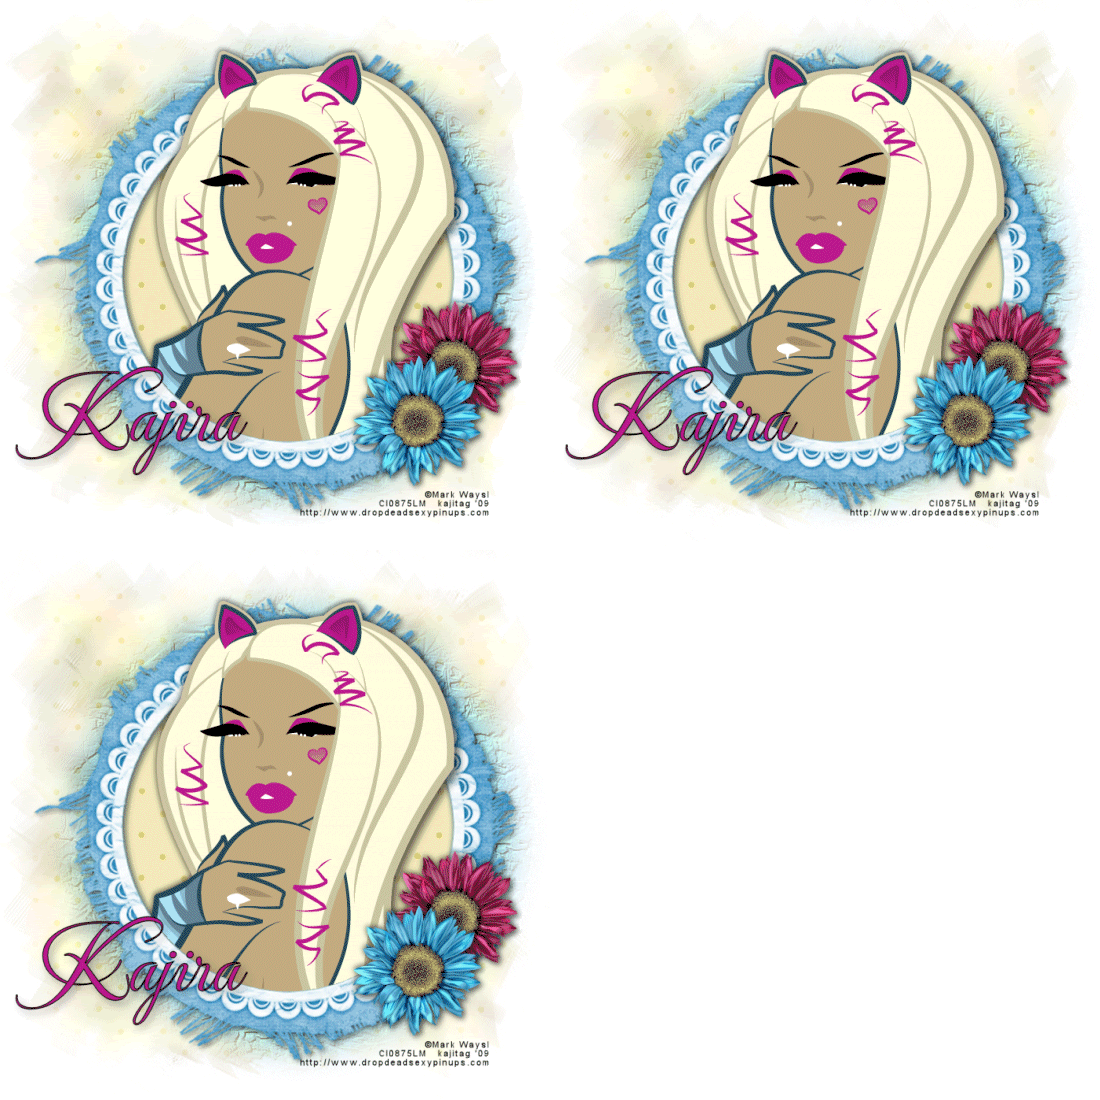
I found the colors challenging until I landed upon Mark Waysl's folder in my tubes. [Note: I'm having problems making this tag show up for some reason, so if it's not there for you to see, know that I'm working on it.]
Argh! It's driving me crazy! I used the EXACT same code as I always have, just changed some of the settings pertaining to size, and it's not working!
Okay, I'll let that go, although I hate failure first thing in the morning.
I have a friend who just had his left leg amputated below the knee. THEN, he sat too close to a heater, and burned his left foot, ergo ending up in a burn center. He's just gotten home, but he has all these appointments he's suppose d to get to, and doesn't know how to navigate with the wheelchair (transportation to and from appts. and home, that is). This has all taken place from Halloween until now. He was in three different places (hospital, rehab, burn center, another rehab). Oh, I guess that's four. He did make it home somewhere in the middle of all that. And now, as I said, he's home again. He's miserable. He's kinda pissed that he is now dependent upon things outside of himself. I try to calm him every night when we visit, but his situation is tentative, at best. He needs to get his foot burn and the "donor site" (from his skin graft) taken care of, then get a prosthesis, then go back to rehand to learn how to navigate with the prosthesis. THEN he gets the *PERMANENT* prosthesis (one which looks like a leg) and works on that. Then I think he's going to do what his job calls "Tele-works", which is just telecommuting, for a while. What a state he's been in. I'm praying his life gets easier for him. He stays in good cheer most of the time, but I don't know how. What makes me angriest is that his out-of-control diabetes got him here, and he still prefers food over losing limbs. I just don't get it. Prayers here, too, please!
And now I'm done begging. And playing with that infernal graphic I'm trying to display. I've had no problems until now with the graphics code. Why now, I can't figure out. I'll come back to it later on.
Great days, everyone! Have them, feel good, keep on,keepin' on!
.


Labels:
Random Personal Stuff; Art
Wednesday, January 7, 2009
Got One!!
.
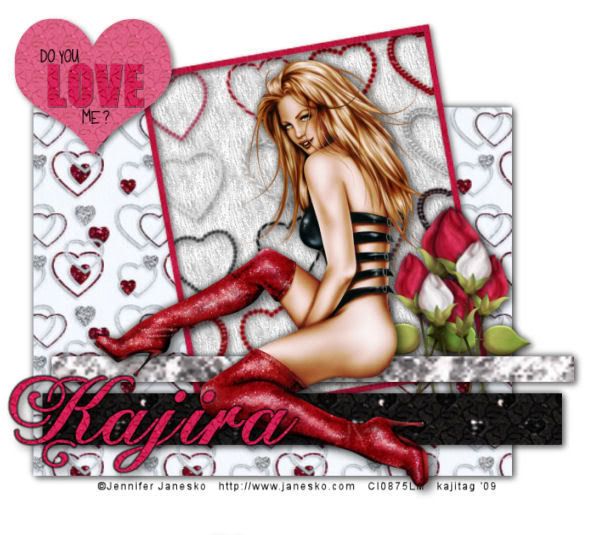
Yep, that mouse trap went off last night about 6-7pm. LOUDLY! I was all, "What the heck was THAT?" Then I realized. I almost went n there immediately, but then realized the poor little thing was in the process of dying. That made me sad. But, I do have to get rid of them! They make me feel creepy, and they leave behind their excrement.
So I got up this morning and used a smaller plastic bag and picked it up (yucky!) and threw it out in the dumpster out back. The second trap I was given yesterday was all bent, due to springing on me when I first tried to set it up. Just got back from the manager's apartment with a new one. I wonder for how long I'll be doing this? It's a sad, gruesome, but necesssary task.
It's downright spring-like outside right now, and it's supposed to get into the 80s before the week is out. Crazy weather. Have the heater out, all the winter clothes, and it's going to be summer in a few days. Or, summer-like, anyway. I enjoy the cold -- especially at night and in the morning, when I'm cozy under my down blanket.
On another note -- you know, that other note that this thing (blog) is supposed to be about? Here's a recently-made tag I did using this tut by Bluey! I hope you like!
.
Have a mouse free day!
.
Labels:
Random Personal Stuff; Art
Tuesday, January 6, 2009
Good Morning....
.
*YAWN* Oh, sorry.
Did you want to know this? I have mice. YIKES! It took me the longest time to figure out what that noise was. I had a treasured cat pass on back in July of 2007. I had just bought her a brand new bag of cat food. When she died, I was devastated. I didn't do much in the way of grieving, however, because that was overtaken by events. So the cat food sat in the small trash thingie I had been keeping it in for the full 14 years I owned her.
The other night, I heard her take a bite of her food. I immediately smiled, then my heart lurched. "That wasn't her. She died. Then what was it?" Heard some more stuff, like something might be rooting around in a carton or bag or something. But that one bite of food defined for me where things were coming from and what they might be. I was thinking rats, because it just seemed whatever it was must be big.
So yesterday I'm sitting here wrestling with the blog, and I suddenly am overtaken by PRIORITIES (finally for a change) and I get up and go take all my Swiffer stuff off the top and then grab the trash bin and start making for the dumpster out back. I held it out in front of me, and walked as fast as I could, holding this container, complete with cat food, out in front of me. Got to the back door of the building and this SMALL, actually cute looking thing came skittering out of the trash bin, onto the porch out back, and under a doorway (one of the building manager's storage places). BOY THEY MOVE FAST!!
So I throw the rest of the bin -- food and all -- into the dumpster. I was thinking "That mouse would have been in its heyday if it'd just stayed in the bin and found itself in the dumpster."
So the day moves on. Suddenly I'm thinking: "Is it *possible* to have just ONE mouse? I don't think so." I mean, there was a little mouse hole, just like in all the Tom & Jerry cartoons. And I think they've been here a while, because way back before Ki even got sick, she'd sit in front of the kitchen sink and look under the door and perk her ears up. She'd sit in there for hours. I knew, just from the situating of things, that she "had something." She could hear them, or at least had seen them. And I don't know how long ago that was!
So now I need mouse traps. *sigh* I mean, I heard those noises last night, and I had taken the food away, so what were they (was it?) aiming for now? My Swiffer pads?? I went in there and kicked the boxes about ten times, and the sound went away. I need mouse traps. And I can't afford them.
Why? BECAUSE I'M PAINT SHOP PRO OBSESSED AND HAVE BOUGHT COPIOUS TUBES IN THE PAST WEEK DUE TO CILM HAVING ITS CRAZY BONUS LOTTO SALE.
*shaking head at myself*
I'm hopeless....
On another note, here's something I've done, just in case you were wondering when you'd see any of this.
.
If you like this tag, and would like to do one like it, it's authored by Cat at Insatiable Dreams. That link will take you directly to that specific tutorial. I hope you like!!!
.
Labels:
Random Personal Stuff; Art
Monday, January 5, 2009
YAY!!
Thank you SO much, Trixy, for helping me get this danged thing looking like I wanted it to look! You're blog-magical!!
So, I've finally decided upon a permanent blog. With the help of Candy Kisses Designz, I may just be writing tuts soon! I haven't heard from her in a while, so I don't know where I stand on that, but she did encourage me and offer to have me use her kits, so.... fingers crossed!!!
As for now, I just wanted to type something. LOL. Hope y'all are having a great day!!
Labels:
Random Personal Stuff
Subscribe to:
Posts (Atom)