
Thank you for trying my tutorial. Leave me a comment or something if anything is unclear. Like I've said, it's my first time. :)
I'm doing this post (and will likely do all tut posts -- or all posts, period, if it turns out nicely) in bold print, because I'm finding that the distraction of the background choice for this blog is just too much. I hope you enjoy the tutorial!
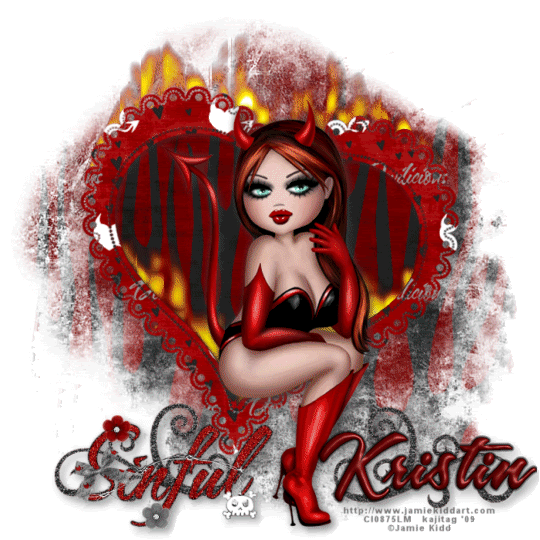
A tutorial by kajira. Written January 9, 2009.
What's needed:
Tube of choice. I'm using a tube from the great artist Jamie Kidd, whose art you can find at CILM.
Scrap Kit: Devilicious, a free to use kit by Kristin at Kristin's Wicked Scrapz.
My Supplies: Mask, from Teresa at Boundless Bliss. Thanks, Teresa!! I am supplying this mask, here.
Filter: Eye Candy 4000 - Fire; Gradient Glow
Okay, let's get started!
Open a 700x700 white canvas. You can resize at the end. I don't know why I work this big, I just do. LOL.
Add a new raster layer.
Select all.
Copy paper 7 and paste into selection.
Select none.
Duplicate this layer.
Copy Frame 3 and paste as your top layer.
Grab your magic wand, click inside your frame and Modify> Expand> 5.
Invert selection.
Back to your top paper layer, delete. Select none.
Go to your bottom paper layer.
Apply your mask, making sure to CHECK the invert transparency box.
Go to your layer palette, and delete mask layer. Answer yes. Merge> Group.
Dropshadow your frame as you choose. FYI. I used 3, 3, 45, 10 and I used the second color down on the color chart from the solid black. It's kind of a dark charcoal.
Duplicate your frame layer twice for a total of three.
Open your filter, Eye Candy 4000, Fire. Use the settings (under the settings heading) "small flame."
The numbers:
146.0
18.00
90.00
10
Draw only outside selection
OK
Go to the next layer of frame and do the same thing, but hit "random seed" on the bottom once or twice until you get the flame you're looking for.
OK
Repeat the flame on your last layer of frame, but hit "random seed" again.
OK
Close off two of the frame layers. I usually leave the bottom one showing, closing off the top two.
Add your tube of choice, and drop shadow of choice.
Add word art of choice from the kit, or think up your own if you like. Position. Drop shadow if you choose.
Add your name. I used A&S Snapper Script. I gave it a gradient glow of 3 in black.
I did this last step to match the word art I'd chosen. It's up to you.
Add doodle, resize 50%, mirror, position under name as you like.
Add your ©, license, water mark, etc.
I cropped mine down to 540x540. You know the size you're more comfortable with, so go ahead and do it now.
If you're saving as a .jpg, Merge> All (flatten) and export to .jpg optimizer, save, and you're done!
Animation
Edit> Copy Merged
Go to Animation Shop, click blank canvas, paste as a new animation.
Back to PSP.
Close off the bottom layer of frame/fire and open the middle layer. Edit> Copy Merged
Go to Animation Shop, Edit> Paste> Paste after current frame.
Back to PSP.
Close off the middle layer of frame/fire and open the top layer. Edit> Copy Merged
Go back to Animation Shop, Edit> Paste> Paste after current frame.
Edit> Select All
Right click the top of your tag > Frame Properties> 25
Run your animation! (View> Animation) If it's good for you, you're done!! Save as .gif and have a ball!


No comments:
Post a Comment